Virtualize REST APIs in API Manager
32 minute read
When you have registered a back-end REST API, you can then virtualize it as a publicly exposed front-end API. The API Catalog stores information about the REST APIs that have been virtualized as front-end APIs. Virtualized REST APIs published in the API Catalog can be made available in API Manager for consumption by API consumers, and for administration by API administrators.
Note
You must first register a back-end REST API before you can virtualize a front-end REST API. For more details, see Register REST APIs in API Manager.Virtualized REST API security
When you virtualize a REST API, you can configure it with security devices, which provide prebuilt authentication and authorization mechanisms for the REST API. The following security devices are supported:
- API Key
- AWS Signing: Authorization Header
- AWS Signing: Query String
- HTTP Basic Authentication
- Invoke Policy (custom authentication)
- OAuth
- OAuth (External)
- Pass Through
- Two-way SSL
This enables you to control the authentication and authorization mechanisms that are supported for the API. For example, an API with higher security requirements can be more restrictive in the authentication mechanism that it supports. You can also configure custom profiles to suit your requirements. You can also configure virtualized REST APIs and API methods with custom policies if required (for example, for request, routing, and response processing).
Virtualize a REST API as a front-end API
When you have first registered a back-end REST API in API Manager, you can then virtualize it as a publicly exposed front-end API. To virtualize a back-end REST API as a front-end API, perform the following steps:
- Click the API Registration > Frontend API view in API Manager.
- Click New API > New API from backend API.
- Select an existing back-end API in the dialog (for example, Petstore), and click Create. This displays the following page:
Note
If the virtualized API is not a Swagger 2.0-compatible REST API, API Manager displays a message that Swagger download will not be available in the API Catalog.Export Swagger 2.0 with multiple traffic ports
When exporting Swagger 2.0 from API Manager Catalog with multiple traffic ports defined, if you try to subsequently reimport the generated document into another API Manager, the back-end URLs (HTTP and HTTPS) are correctly generated, but the port will be incorrect for one of the URLs. This issue is caused by an inherent flaw in Swagger 2.0 as it only permits one host to be specified. At export time, API Manager takes the first SSL-based basePath, if one exists, from the list of available basePaths (host:port) and applies that to the $.host field in the resultant Swagger 2.0 definition.
For example, if an HTTPS traffic port of 8065 and an HTTP traffic port of 8066 are configured, and the host IP address is 127.0.0.1, then the generated Swagger 2.0 definition will look like this:
{
  "swagger" : "2.0",
  "info" : {
    "description" : "",
    "version" : "1.0.3",
    "title" : "Test API"
  },
  "host" : "127.0.0.1:8065",
  "basePath" : "/api",
  "schemes" : [ "https", "http" ],
  "paths" : {...}
}
Note that the $.host field specifies a port of 8065. Importing this definition back into API Manager will result in the following back-end URLs, with the HTTP port being incorrect:
https://127.0.0.1:8065/apihttp://127.0.0.1:8065/api
The recommendation is to use OpenAPI, which has the ability to specify multiple back-end hosts. For more information, see OpenAPI Specification, Server Object.
Import a previously exported API
Alternatively, you can virtualize an existing API by importing a previously exported front-end API (for example, from another API Manager environment). For details on how to export APIs, see Manage the front-end REST API lifecycle.
To import a previously exported API, perform the following steps:
-
Click the API Registration > Frontend API view in API Manager.
-
Click New API > Import API collection.
-
In the Import from dialog, complete the following:
- File: Click to browse to the previously exported API (
.datfile). - Password: Enter the password if required.
- Organization: Select the organization from the list (for example, API Development).
- File: Click to browse to the previously exported API (
-
Click Import.
-
Press F5 to reload the API Manager web console.
Configure inbound request settings
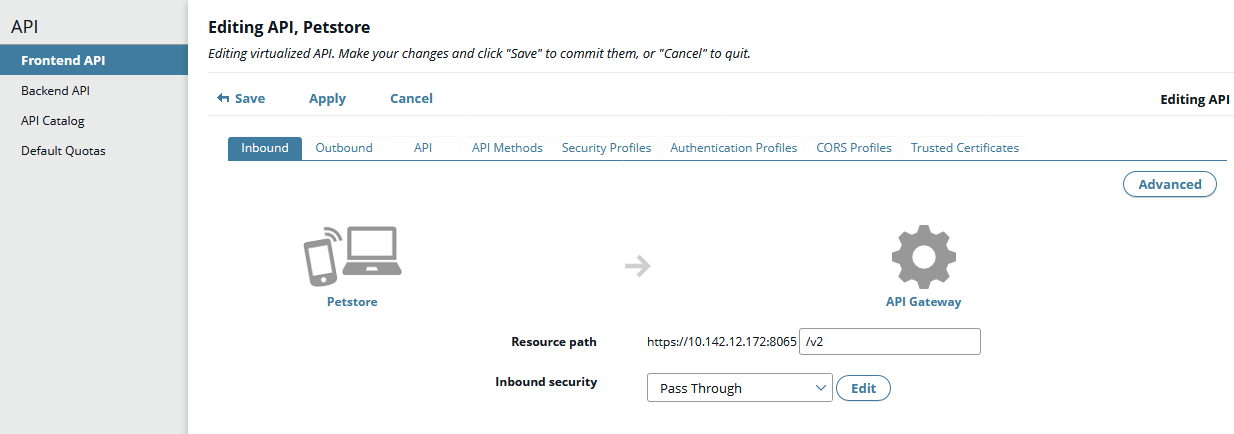
When you have virtualized a REST API to create a front-end API, you can edit and configure the inbound request settings between the client and the API Gateway (for example, for customized authentication, authorization, or monitoring). To configure inbound settings, perform the following steps in API Manager:
- Select the Inbound tab.
- You can edit the Resource path for the API in the text box on the right. Defaults to
/api. - If query string-based version routing has been enabled in Settings > API Manager settings, you can remove the default version from the Resource path and enter an API version in the Query string version routing field instead (for example,
v1). For details on how to enable query string version routing, see Configure API routing based on version query string. - Select a required security device from the Inbound Security list. This enables you to configure prebuilt inbound authentication and authorization mechanisms for the virtualized API. The most commonly used devices are API Key and Pass Through. The available options are detailed below.
- Click the Advanced button on the right to configure settings such as monitoring, sharing resources across domains, and per-API method overrides.
The following shows an example:
Inbound security settings
API Key
Configure the following to enable API key authentication:
API key field name: Enter a required name used to store the API key field in the inbound request. Defaults to KeyId.
API key location: Select the required location of the API key in the inbound request (Request Headers or Query string/form body). Defaults to Request Headers.
Scopes must match: Select whether the scopes configured in the next setting must match Any or All of the scopes registered for client applications.
Scopes: Enter the scopes configured for this API, which are used for client application authorization. These scopes define a set of authorizations (for example, all read methods) that can be assigned to specific client applications. You can enter a single scope (for example, app.all, app.read, or app.write) or a comma-separated list of scopes.
Remove credentials on success: Select whether to remove the user credentials from the message after successful authentication. This is selected by default. If you disable this option, an inbound request authorization header is forwarded to the back-end. To use another authentication and authorization mechanism to secure the connection to the back-end, you must remove the inbound authorization header using a custom routing policy.
AWS Signing (Authorization Header)
Configure the following to enable access to the API using an Amazon Web Services authorization header:
Name: Enter a required name for the device. Defaults to AWS Signing Device (Authorization Header).
Remove credentials on success: Select whether to remove the user credentials from the message after successful authentication. This is selected by default. If you disable this option, an inbound request authorization header is forwarded to the back-end. To use another authentication and authorization mechanism to secure the connection to the back-end, you must remove the inbound authorization header using a custom routing policy.
The signing algorithm used by this device as part of the verification step is Amazon S3 version 2. The expected format of the Authorization header is as follows:
"Authorization: AWS " + AWSAccessKeyId + ":" Signature
where Signature is calculated as:
base64(hmac-sha1(VERB + "\n" + CONTENT-MD5 + "\n" + CONTENT-TYPE + "\n" + DATE + "\n" + CanonicalizedAmzHeaders + "\n" + CanonicalizedResource))
AWS Signing (Query String)
Configure the following to enable access to the API using an Amazon Web Services query string:
Name: Enter a required name for the device. Defaults to AWS Signing Device (Query String).
API key field name: Enter a required name of the query-string parameter used to store the API key field in the inbound request. Defaults to AWSAccessKeyId.
The signing algorithm used by this device as part of the verification step is Amazon S3 version 2. The expected format of the request is as follows:
VERB /path?Signature=<generated-signature>&Expires=<seconds-since-epoch>&AWSAccessKeyId=<aws-id>
where Signature is calculated as:
urlencode(base64(hmac-sha1(VERB + "\n" + CONTENT-MD5 + "\n" + CONTENT-TYPE + "\n" + Expires + "\n" + CanonicalizedAmzHeaders + "\n" + CanonicalizedResource)))
HTTP Basic
Configure the following to enable HTTP Basic authentication:
Name: Enter a required name for the device. Defaults to HTTP Basic Device.
Realm: Enter the realm required for HTTP basic authentication purposes (for example, Flickr). This enables clients to identify the zone that they are accessing. For example, the browser can then cache user credentials on a per-realm basis. The realm is required for all authentication schemes that issue an authentication challenge.
Remove credentials on success: Select whether to remove the user credentials from the message after successful authentication. This is selected by default. If you disable this option, an inbound request authorization header is forwarded to the back-end. To use another authentication and authorization mechanism to secure the connection to the back-end, you must remove the inbound authorization header using a custom routing policy.
Note
When using HTTP basic authentication, the client application invoking the API must use the API key as username and the API secret as password, formatted asBase64Encode("APIKey:APISecret").
Invoke Policy
Configure the following to use a custom authentication policy:
Name: Enter the name of the custom security device. Defaults to Invoke Policy.
Policy to invoke: Select the authentication policy that this security device invokes. This lists policies already configured in Policy Studio in Environment Configuration > Server Settings > API Manager > Inbound Security Policies.
Use client registry: Select whether the authentication.subject.id identifier must match one of the application’s external credentials in the Client Registry in API Manager. This setting is selected by default, and is required for API Manager to check if the organization has access to the API. If you do not select this setting, API Manager will not check the organization access.
Traffic Monitor subject: If Use client registry is not selected, the API has no client information, and API Manager does not check organization access to the API. In this case, you can enter the subject name to display in the Traffic tab in API Gateway Manager. Defaults to ${authentication.subject.id}.
Description: Select where the Markdown description for this security device is located. Select one of the following:
- Use original policy description: Use the policy description specified when creating the policy in Policy Studio.
- Use manual description: Get the description from the contents of a field. Enter the description in the Manual Description field.
- Use markdown file location: Get the description from a file located on the server. Enter the path to this file in the Markdown file location field. For security reasons, this file must start with an environmentalized variable and cannot attempt directory traversal. For example, the following path is valid:
${env.DOCUMENTS}/markdown/api.md. The following paths are invalid:/opt/documents/api.md,${env.DOCUMENTS}/../markdown/api.md. - Use external URL: Get the description from an external URL. Enter the URL in the External URL location field.
Note
Invoke Policy security devices generate an Authentication section in the API Catalog that displays the description entered when creating the security device.OAuth
Configure the following to enable OAuth authorization for access tokens issued by API Manager.
Note
Configuring the grant types in API Manager does not affect the runtime aspect of the OAuth flow. If you wish to modify the grant types supported at runtime for the OAuth flow, you must do it at the OAuth authorization server. The purpose of grant types in API Manager is to advertise this information to clients of the API so that they can successfully retrieve an access token. The token can then be supplied for verification by the security device when invoking an API.General OAuth settings
Access token store: Select a required OAuth access token store from the list. For details on how to add OAuth access token stores to this list, see Configure API Manager settings in Policy Studio.
Scopes must match: Select whether the OAuth scopes match Any or All of the OAuth scopes configured in the next field. OAuth scopes are used to control how access tokens are accepted.
Scopes: Enter a comma-separated list of scopes used to manage how access tokens are accepted. In addition, these tokens are used as default scopes for applications that use this API and do not send the scope parameter in the access token request. You can also configure additional default scopes for an application if enabled in Settings > API Manager Settings > General settings > Enable application scopes. For details, see API Manager settings. Defaults to resource.WRITE, resource.READ.
Remove credentials on success: Select whether to remove the user credentials from the message after successful authentication. This is selected by default. If you disable this option, an inbound request authorization header is forwarded to the back-end. To use another authentication and authorization mechanism to secure the connection to the back-end, you must remove the inbound authorization header using a custom routing policy.
OAuth authorization settings
Access token location: Select the required location of the OAuth access token in the inbound request (Request Header or Query string/form body). Defaults to Request Header.
Authorization header prefix: Select the header prefix used to authorize the request (Bearer or OAuth). Defaults to Bearer.
Grant type - Implicit
Publish to API Catalog: The implicit grant is a simplified authorization code flow optimized for clients implemented in a browser using a scripting language, such as JavaScript. Select whether to advertise this grant type in the API Catalog. It is the role of the OAuth authorization server to support it. Disabling excludes this grant type from the API Catalog.
Login endpoint URL: Enter the authorization endpoint where resource owners can interact with the OAuth service to authorize access for the client application. This is the URL where client applications will redirect end users. Defaults to http://localhost:8089/api/oauth/authorize.
Login token name: Enter the response parameter name that will contain the access token. Defaults to access_token.
Grant type - Authorization code
Publish to API Catalog: The authorization code is obtained by using an authorization server as an intermediary between the client and resource owner. Select whether to advertise this grant type in the API Catalog. It is the role of the OAuth authorization server to support it. Disabling excludes this grant type from the API Catalog.
Request endpoint URL: Enter the authorization endpoint where resource owners can interact with the OAuth service to authorize access for client application. This is the URL where client application will redirect end users. Defaults to http://localhost:8089/api/oauth/authorize.
Request client ID name: Enter the name of the request parameter that will contain the client application ID. Defaults to client_id.
Request client secret name: Enter the name of the request parameter that will contain the client application secret. Defaults to client_secret.
Token URL: Enter the token endpoint URL where the client application will exchange an authorization code for an access token. Defaults to http://localhost:8089/api/oauth/token.
Token name: Enter the request parameter name that will contain the access code. Defaults to access_token.
Grant type - Client credentials
Publish to API Catalog: The client credentials grant is a simplified authorization code flow optimized for clients that have arranged resource sharing from another server using a client ID and a client secret. Select whether to advertise this grant type in the API Catalog. It is the role of the OAuth authorization server to support it. Disabling excludes this grant type from the API Catalog.
Token URL: Enter the token endpoint URL where the client application will exchange credentials for an access token. Defaults to http://localhost:8089/api/oauth/token.
Token name: Enter the request parameter name that will contain the access code. Defaults to access_token.
OAuth (External)
Configure the following to enable OAuth authorization for access tokens issued by an external token provider.
General OAuth (external) settings
Token information policy: Select a required OAuth token information policy from the list. This is a custom policy used to obtain and extract token information from the external OAuth provider. For details on how to add OAuth token information policies to the list, see Configure API Manager settings in Policy Studio.
Scopes must match: Select whether the OAuth scopes match Any or All of the OAuth scopes configured in the next field. OAuth scopes are used to control how access tokens are accepted.
Scopes: Enter a comma-separated list of OAuth scopes used to manage how access tokens are accepted. Defaults to resource.WRITE, resource.READ.
Remove credentials on success: Select whether to remove the user credentials from the message after successful authentication. This is selected by default. If you disable this option, an inbound request authorization header is forwarded to the back-end. To use another authentication and authorization mechanism to secure the connection to the back-end, you must remove the inbound authorization header using a custom routing policy.
Use client registry: Select this option so that API Manager can use the external provided client ID (with either configured API keys, OAuth credentials, or external credentials) to identify the configured client application in API Manager client registry, which allows it to apply quotas and assign a subject identifier for traffic monitoring. If this is not selected, the API effectively is pass-through and the client registry does not apply API access or enforce quotas. This is not selected by default because external OAuth providers typically use their own client registries.
Traffic monitor subject: Enter the identifier name used for clients from the external OAuth provider, which is displayed on the Traffic tab in the API Gateway Manager console. This value can be a selector. Defaults to ${oauth.token.client_id}.
Extract token attributes: Click the add button to specify OAuth token attributes to be extracted from the configured Token information policy and copied to the message whiteboard. For example, these can then be passed to request, response, or routing policies downstream. Specifying attributes ensures their values are retained on the whiteboard after invoking the policy. By default, the following attributes are extracted:
oauth.token.client_idoauth.token.scopesoauth.token.valid
For authorization, grant type implicit, grant type authorization code, and grant type client credentials settings, see the OAuth security device settings.
For a complete example, see Configure OAuth (External) security for a front-end API.
Pass Through
Configure the following to enable pass-through authentication where the API Gateway passes the user credentials through to an authenticating server:
Name: Enter a required name for the device. Defaults to Pass Through Device.
Subject ID: Enter a required authentication subject ID. Defaults to Pass Through. This will be displayed in the Traffic view in the API Gateway Manager when the API is invoked using this device.
Note
When you enable pass-through authentication, there is no client application context so application quotas cannot be enforced.Two-way SSL
To enable two-way (mutual) SSL authentication, the client must supply a certificate signed by the server CA.
Before you can configure an API to use two-way SSL you must first configure the API Manager traffic port (default 8065) to accept and trust client certificates issued by the server CA. API Manager ignores client certificates by default, but when you configure API Manager to accept them, clients have the option during the SSL handshake to send their client certificate, which is then used by API Manager to validate access.
For details on how to configure mutual authentication and accepting client certificates, see Mutual Authentication settings.
Note
You must not require client certificates, as this would mean that all clients for all APIs must provide a client certificate. Clients who do not provide a client certificate are rejected during the SSL handshake and are unable to access your APIs.By default, the provided client certificate must contain a Subject Common Name (CN) containing the API key generated by API Manager, or a configured external credential for a registered application. The CN value is evaluated at runtime using a selector (for example, ${certificate.subject.CN}), and used to look up the Client Registry to retrieve the application.
Configure the following settings:
Name: Enter a required name for the device. Defaults to Two-way SSL Device.
API key field: Enter the name of the selector used to look up the KPS to retrieve and validate the API key and application details. Defaults to ${certificate.subject.CN}.
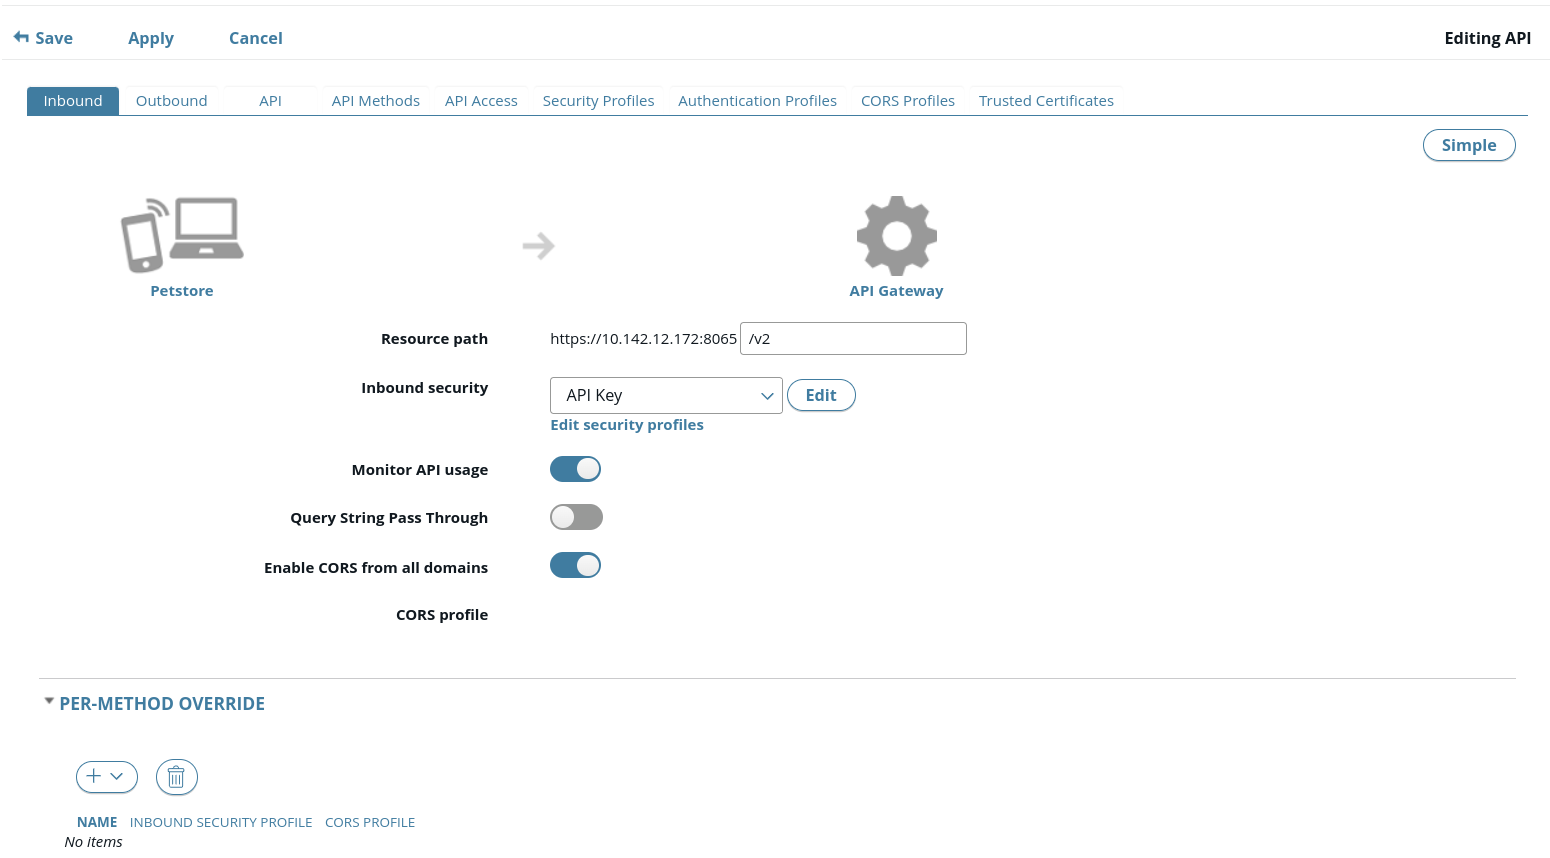
Advanced inbound settings
Monitor API usage: Select whether to enable monitoring metrics for the REST API in the Monitoring > API Usage view.
Query String Pass Through: Select whether to enable this setting for the REST API. When enabled, query parameters are sent unmodified to the back-end service. This is a per API implementation of the global system property api.manager.querystring.passthrough.
Enable CORS from all domains: Select whether to enable Cross Origin Resource Sharing (CORS) from all domains. When enabled, this means that requests to this API are allowed from all domains (which corresponds to a CORS setting of *). To add more advanced CORS configuration (for example, allowed or exposed headers), disable this setting, and add a specific CORS profile for this API. For more details, see Configure CORS profiles.
PER-METHOD OVERRIDE: You can click to override the REST API level settings for specified REST API methods. Click the add button, select an API method from the list, and override the following settings as required:
- INBOUND SECURITY PROFILE: Select a preconfigured security profile for the API method. For more details, see Configure security profiles.
- CORS PROFILE: Select a preconfigured CORS profile for the API method.
Configure outbound request settings
When you have virtualized a back-end REST API to create a front-end API, you can edit and configure the outbound request settings between the API Gateway and the back-end API. For example, this enables you to customize authentication, and request or response processing. The following page shows configuring an API key authentication profile:
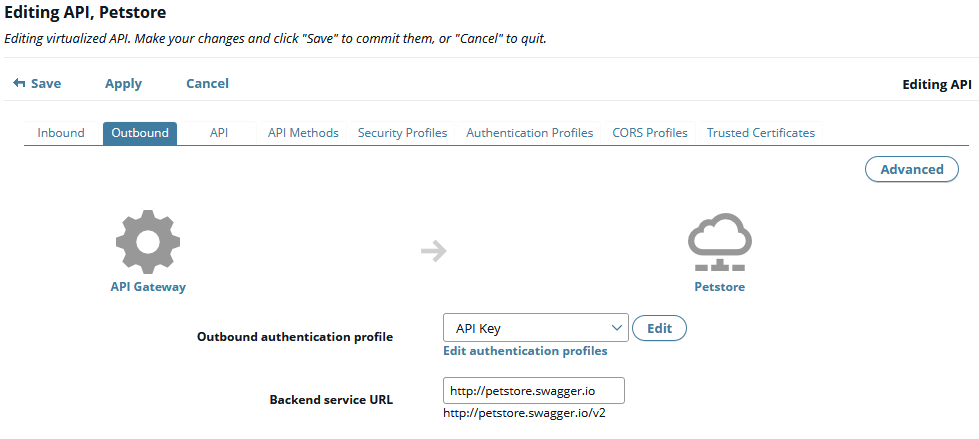
To configure outbound settings, perform the following steps in API Manager:
- Select the Outbound tab.
- Select an optional profile from the Outbound authentication profile list. This enables you to configure a pre-built authentication mechanism for outbound communication between the API Gateway and the virtualized API.
- Click the Advanced button on the right to configure settings such as request or response processing, routing, and per-API method overrides. The following shows an example:
Outbound authentication settings
No authentication
No authentication is performed between the API Gateway and the back-end API.
HTTP Basic authentication
Configure the following to enable HTTP Basic authentication:
Name: Enter a required name for the profile. Defaults to HTTP Basic.
Username: Enter the required username (API key) used to access the API.
Password: Enter the optional password (API secret) used to access the API.
HTTP Digest authentication
Configure the following to enable HTTP Digest authentication:
Name: Enter a required name for the profile. Defaults to HTTP Digest.
Username: Enter the required username (API key) used to access the API.
Password: Enter the optional password (API secret) used to access the API.
OAuth authentication
Configure the following to enable OAuth authentication:
Provider Profile: Select the OAuth service provider profile from the list.
Token Key (Owner ID): Enter the message attribute to be used as the key to look up the token. The token key must be set to the authentication value you require for the OAuth token. Defaults to ${authentication.subject.id}.
API Key authentication
Configure the following to enable API key authentication:
Name: Enter a required name for the profile. Defaults to API key.
API key field name: Enter a required name used to store the API key field in the outbound request (for example, KeyId).
API key: Enter the API key required to access the API (for example, AIzaSyB6CzrBlkzuzDKJw0QaZhW9WwBV5IxXMS7).
Pass credentials as HTTP: Select the required location of the API key in the outbound request (Header, Query string, or Form).
SSL authentication
To enable SSL authentication, the API Gateway must supply a certificate signed by certificate authority used by the API. You can configure the following settings:
Name: Enter a required name for the profile. Defaults to SSL.
PFX/P12 Source: Select whether to specify the certificate using a .pfx or .p12 file, or using a URL.
PFX/P12 File or PFX/P12 URL: Browse to the PFX/P12 file, or enter the PFX/P12 URL.
PFX/P12 Password: Enter the password for the certificate.
Trust all certificates in chain: Select whether to trust all the CA certificates in the certificate chain. If this is not selected, only the top-level CA is trusted. This setting is selected by default.
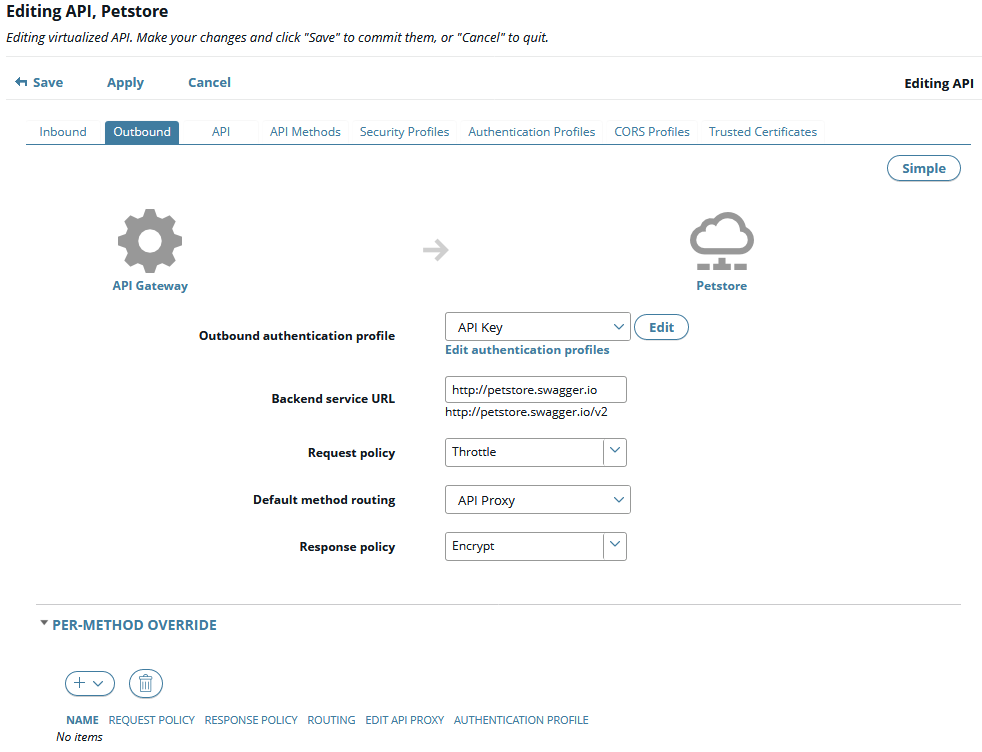
Advanced outbound settings
Global request policy
If a global policy has been configured, this field displays the read-only global request policy applied to all front-end API invocations (for example, a mandatory security, compliance, or governance policy). The global request policy is executed after inbound authentication, but before any configured request, routing, or response policies. No global policies are configured by default.
Request policy
Select an optional request processing policy for the API. For example, you could use this pre-configured policy to check the request message for additional authentication, authorization, or validation. No request policies are configured by default.
Default method routing
Select an optional routing policy for virtualized API method calls. For example, you could use this pre-configured policy to route to a backend JMS service. API method calls are routed to the API proxy in API Manager by default.
Response policy
Select an optional response processing policy for the API. For example, you could use this pre-configured policy to validate or transform outbound response messages. No response policies are configured by default.
Global response policy
If a global policy has been configured, this field displays the read-only global response policy applied to all front-end API invocations (for example, a mandatory security, compliance, or governance policy). The global response policy is executed last after any configured response policy. No global policies are configured by default.
Fault handler policy
If fault handler policies have been enabled and configured, you can select a fault handler policy for the API. The selected fault handler is executed when an error or exception occurs during the API Manager runtime API invocation. This setting defaults to the API Manager Default Fault Handler policy.
PER-METHOD OVERRIDE
You can click to override the REST API level settings for specified REST API methods. Click the add button, select an API method from the list, and override the following settings as required:
REQUEST POLICY: Select an optional request processing policy for the API method.
RESPONSE POLICY: Select an optional response processing policy for the API method.
ROUTING: Select an optional routing policy for the API method.
FAULT HANDLER POLICY: If fault handler policies have been enabled and configured, select an optional fault handler policy for the API method.
EDIT API PROXY: Click Edit to add parameters to the API method. To add parameters, click the add button, and configure the following settings:
- OUTBOUND PARAMETER: Enter the parameter name (for example,
customer_name). - PARAMETER TYPE: Enter the parameter type (for example,
query,path,form, orheader). - DATA TYPE: Enter the parameter name (for example,
string,int, and so on). - REQUIRED: Select whether the parameter is required.
- OUTBOUND VALUE: Enter the parameter value (for example,
john doeor${params.path.id}). - EXCLUDE: Select whether to exclude the parameter.
- DEFAULT MAPPING: Select whether the parameter is mapped by default.
AUTHENTICATION PROFILE: Select an optional authentication profile for the API method.
Configure API information
The API tab enables you to view and edit the API information to be displayed in the API Catalog. For example, this includes general settings such as the API name, version, graphic, documentation, and tags.
Configure general API information
You can configure the following settings in the GENERAL section:
- Image: Click the Add Image box, and browse to the location of the graphic file for your API.
- API Name: Enter a value to edit your API name.
- API Version: Enter a value to edit your API version.
Other details such as the API state, owner, date are read-only.
Configure API documentation
You can configure the following in DOCUMENTATION > Description:
- Use original description: Uses the description specified when the back-end API was registered.
- Use manual description: Click the Edit tab, and enter a description.
- Use markdown file location: Enter the location in Markdown file location (for example,
${environment.VINSTDIR}/../markdown/API/API.md). - Use external URL: Enter the location in External URL location (for example,
https://api.any.org/doc#myapi).
The description is using the Markdown syntax.
Configure API tags
The TAGS section enables you to add tags to categorize and help find your API in the API Catalog. Click the add button, and enter a tag name (for example, Department) and values (for example, Engineering,Testing). You can add multiple tags for your API. You can enter multiple tag values in a comma-separated list without any spaces between each value.
Configure API method information
You can use the Method tab to configure the API method information to be displayed in the API Catalog. For example, this includes testing the method, configuring its documentation, and adding tags. For example, click Try method to invoke the method for test purposes. Authentication credentials are automatically formatted and passed in the test request. Other settings such as method parameters and content types are displayed as read-only.
You can configure API method documentation and tags in the same way that you configure API documentation and tags.
Configure security profiles
You can use the Security Profiles tab to create custom security profiles with multiple security devices, which can then be applied as per-method override in the Inbound settings for the front-end API.
To create a security profile, perform the following steps:
- Click the add button on the left.
- In GENERAL, enter a Name for the security profile.
- In DEVICES, click the add button, select a security device from the list, and configure its settings. For details on configuring each security device type, see Inbound security settings.
- Repeat to add multiple security devices if required.
- You can click Up or Down to change the order in which security devices are invoked, or Edit to change any settings as required.
Note
Multiple security devices are combined using anOR logic. This means that if authentication to the first security device fails, authentication to the second security device is attempted, and so on.
For an end-to-end example of using security profiles, see Configure API method-level authorization for client applications.
Configure authentication profiles
You can use the Authentication Profiles tab to create custom authentication profiles, which can then be applied to the front-end API in the Outbound settings.
To create an authentication profile, click the add button on the left, select an authentication profile from the list, and configure its settings. For details on configuring each authentication profile type, see Outbound authentication settings.
Configure CORS profiles
You can use the CORS Profiles tab to create profiles for Cross Origin Resource Sharing, which can then be applied to the front-end API in the Inbound settings. To create an authentication profile, click the add button on the left, and configure the following settings:
-
GENERAL: Enter a descriptive Name for the profile.
-
ORIGINS: Click the add button, and enter the list of domains allowed to access this API (for example,
http://test.mydomain.org, or a wild-carded value such ashttp://*.mydomain.org). Defaults to*to allow all domains. -
ALLOWED HEADERS: Click the add button, and enter the list of HTTP headers that can be used when invoking this API. This list of headers is defined by the value of the
Access-Control-Request-HeadersCORS header. -
EXPOSED HEADERS: Click the add button, and enter the list of HTTP headers to be exposed to the client in response to an invocation of this API.
This does not include simple headers such as
Cache-Control,Content-Language,Content-Type,Expires,Last-Modified, andPragma. -
CREDENTIALS SUPPORT: Select whether the API advertises that it supports user credentials. When selected, the
Access-Control-Allow-CredentialsCORS header is sent in the response, with a value oftrue. This setting is not selected by default. -
PREFLIGHT RESULT CACHE: Enter how long the results of a CORS preflight
OPTIONSrequest can be stored in the client preflight result cache. When configured, theAccess-Control-Max-AgeCORS header is sent in the response.
For more details on using CORS, see the API Gateway Policy Developer Guide. This provides more background information and explains how to configure CORS for specific HTTP services and relative paths in Policy Studio. For example, this may be useful when using a third-party load balancer, and you need to configure a CORS profile for the default API Portal HTTP service in Policy Studio.
Configure trusted certificates
You can use the Trusted Certificates tab to add X.509 certificates, which can be used for the Outbound and Inbound SSL settings. To add a new certificate, perform the following steps:
-
Click the add button on the left, and configure the following:
- Source: Select the source of the certificate (X.509 Certificate file or URL).
- File or URL: Browse to the certificate source file (PKCS12, PEM, DER file), and enter a password if required. Alternatively, enter the URL for the certificate.
- Use for outbound: Select whether is certificate is used for outbound security between the API Gateway and the back-end API. This is selected by default.
- Use for inbound: Select whether is certificate is used for inbound security between the client and the API Gateway. This is not selected by default.
-
If you selected a URL certificate source, enter your User name and Password if required.
-
Click Import.
Manage front-end REST API lifecycle
When you have registered the back-end REST API, you can select it in the list of registered APIs, click Manage selected, and chose one of the following options:
-
Delete: Deletes the selected REST API(s) from the API Registration > Frontend API view. You can delete APIs registered as back-end REST APIs in the Backend API view.
-
Publish: Publishes the selected REST API to be consumed by API consumers. You can edit the API Name, and enter an optional Virtual host name. When published, the API can be assigned to any organization or application. The API is locked, and no further edits are allowed.
-
Unpublish: Unpublishes the selected REST API. When unpublished, the API is only available to the API administrator and to API owners in their organization, and not to other organizations. The API can be edited, published, or deleted.
-
Deprecate: Select whether to Retire API at specific date, and enter a Retirement date. When selected, the published API is displayed with a date when it will be retired (unpublished) from the API Catalog, and is no longer available to client applications. When deprecated, the API is still published and clients can continue to discover and use the API. Only a published API can be deprecated and unpublished.
-
Undeprecate: Undeprecates the selected deprecated REST API.
-
Upgrade access to newer API: Upgrades all organizations and applications that had access to the original API to a more recent version of the API (if one exists). You can also deprecate and retire the original API as options.
-
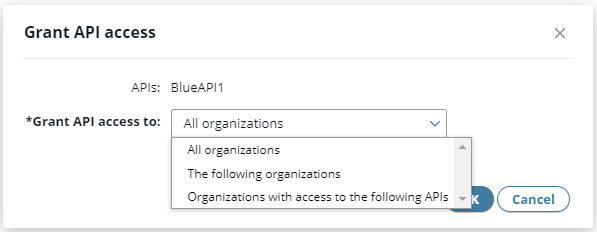
Grant Access: Grants organizations access to the selected APIs. You can select whether to Grant API access to all organizations, specific organizations, or organizations with access to specific APIs. For more information see Manage API access.
-
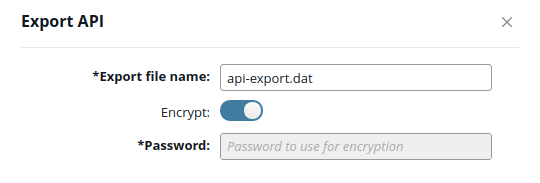
Export API collection: Exports a copy of the selected front-end REST APIs to your chosen directory. The APIs are exported in JSON format in a
.datfile, which combines the front-end API, back-end API, security profiles, and so on. You must specify the following in the dialog:- Export file name: Specify a file name to export (defaults to
api-export.dat) - Password: Add a mandatory password for encryption
You can then import this file into API Manager as required (for example, when promoting between environments). See Import a previously exported API and Promote managed APIs between environments.
- Export file name: Specify a file name to export (defaults to
Encryption of exported API collections
In earlier API Manager versions, you could export API collections as a plain text file. Now, by default, to export API collections as plain text you must supply a password so that the generated file is encrypted.
If you wish to generate a plain text export file, the administrator must add the following lines towards the start of the INSTALL_DIR/apigateway/webapps/apiportal/vordel/apiportal/app/app.config file, for example, before the nodemanager setting:
/* Flag to determine if API collections can be exported as clear text:
 - Set to false if API export as clear text is not allowed (exported file is always encrypted)
 - Set to true if API export as clear text is allowed (you can choose to encrypt the file or not)*/

allowAPIExportAsClearText: true,
If you change this setting, you must clear your browser cache so that the old setting is removed.
When allowAPIExportAsClearText is set to true, the Export API dialog also includes an Encrypt option, which enables you to select whether to encrypt the export file using the specified password. For example:
Perform zero downtime updates to an API
Sometimes it is necessary to make non-breaking changes to an API. For example, when the front-end API remains unchanged but the back-end API must be updated, or when the front-end API has additional methods or parameters that are backwards compatible. In this case, you must perform a zero downtime update.
Consider the following example with only the v1.0.0 of an API published in API Manager:

To upgrade the access to a newer version of the API (v1.1.0) to all organizations and applications that had access to the old version, as well as to deprecate or retire the old API, perform a zero downtime update as follows:
-
Add the new API v1.1.0 to API Manager and publish it.

-
Select the old v1.0.0 API, click Manage selected, and choose Upgrade access to newer API, which brings you to the following screen:

After this is done and the old API is unpublished, the new API will be invoked and traffic will flow through the new API.
Manage API access
You can grant or revoke access to your APIs, as well as you can view a list of the organizations and applications that have access to your APIs. The scope of access is as follows:
-
API Administrator (API Admin):
- Grant access to any API belonging to any organization.
- Dependency view for all published APIs from all organizations.
- Revoke access to any API belonging to any organization.
-
Organization Administrator (Org Admin):
- Grant access to APIs that belong to an organization within the scope of the Org Admin.
- Dependency view to APIs that belong to an organization within the scope of the Org Admin.
- Revoke access to APIs that belong to an organization within the scope of the Org Admin.
Grant access to an API
Both API Admins and Org Admins can grant API access to organizations. After access has been granted to an API, it can then be used in any application within the organization, but the Org Admin still needs access to all the organizations and proxies to be able to manage the API. For more information on how to enable API management access to Org Admins, see Organization administrator.
To grant access to an API, perform the following steps:
- Click Frontend API view in API Manager, then select one or more APIs from the list.
- Click the Manage selected drop-down list, then choose Grant access.
- Choose an option in the Grant API access dialog dialog box, then click OK.
List resources with access to the API
To view the list of organizations and applications, which can access an API, perform the following steps:
-
Click Frontend API view in API Manager, then select an API from the list.
-
In the details of the API, click the API Access tab. A table containing two tabs, Organizations and Applications, is shown.
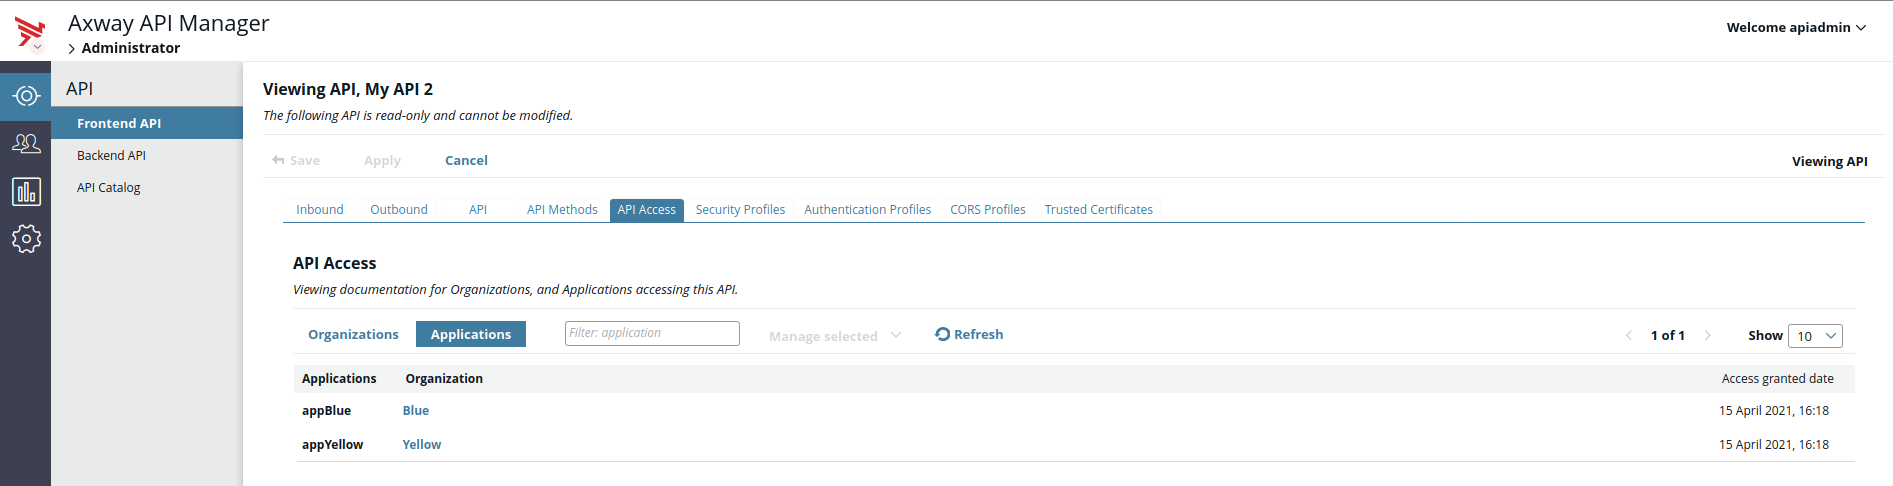
You can view the usage of published front-end APIs that have been granted access to external organizations and their applications, as well as the access granted date.
Revoke access to an API
You can revoke an API access from applications and organizations. When you revoke access at the organizational level, this automatically also remove the access from all applications belonging to that organization, which were using the API.
Note that you cannot revoke access to the original organization that API belongs to, no self-revoke access is allowed.
To revoke access to organizations or applications, perform the following steps:
-
Click Frontend API view in API Manager and select an API from the list.
-
In the details of the API, click the API Access tab.
-
From the Organizations tab, select the organizations you wish to revoke access from. The Manage selected drop-down list is enabled.
-
Click the Manage selected drop-down list, and select Revoke access.
-
Click Revoke in the Revoke API Access dialog box to confirm the operation.
The organization is removed form the list.