Attribute filters
18 minute read
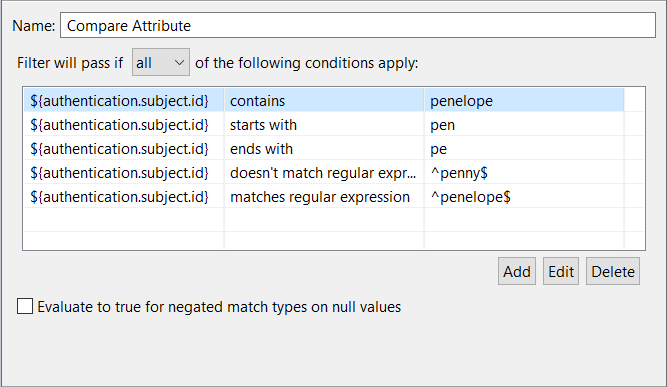
Compare attribute filter
The Compare Attribute filter enables you to compare the value of a specified message attribute on the API Gateway white board with the values specified in the filter. For example, the following filter only passes if the ${authentication.subject.id} message attribute has a value of penelope:
Configure the following fields:
Name: Enter an appropriate name for this filter to display in a policy.
Filter will pass if: Select all or one of the specified conditions to apply. Defaults to all. Click the Add button at the bottom right to specify a rule condition. In the Attribute filter rule dialog, perform the following steps:
-
Enter a message attribute selector in the Value from text box on the left (for example,
${http.request.verb}or${my.customer.attribute}). -
Select one of the following rule conditions from the list:
containsdoesn't containdoesn't match regular expressionends withisis notmatches regular expressionstarts with
-
Enter a value to compare with in the text box on the right (for example,
POST). Alternatively, you can enter a selector that is expanded at runtime (for example,${http.request.uri}). -
Click OK.
Evaluate to true: When checked, the negated rule conditions (doesn't contain, doesn't match regular expression and is not) evaluate to true if either the message attribute selector resolves to null or the value to compare resolves to null for selector values. Negated rule conditions evaluate to false by default.
Finally, to edit or delete an existing rule condition, select it in the table and click the appropriate button.
Extract REST request attributes filter
This filter extracts the values of query string parameters and HTTP headers from a REST request and stores them in separate message attributes. The request can be an HTTP GET or HTTP POST request.
HTTP GET requests
The following example shows an incoming HTTP GET request with query string and HTTP headers:
GET /services?name=Niall&location=Dublin&location=Pembroke%20St HTTP/1.1
Host:mail.google.com
User-Agent:Mozilla/5.0 (Windows; U; Windows NT 6.1; en-GB; rv:1.9.2.15) Gecko/20110303 Firefox/3.6.15
Accept:text/html,application/xhtml+xml,application/xml;q=0.9,*/*;q=0.8
Accept-Language:en-gb,en;q=0.5
Accept-Encoding:gzip,deflate
Accept-Charset:ISO-8859-1,utf-8;q=0.7,*;q=0.7
Using this example, when Request Querystring is selected, the Extract REST Request Attributes filter generates the following attributes:
http.header.Host = mail.google.com
http.header.User-Agent = Mozilla/5.0 (Windows; U; Windows NT 6.1; en-GB; rv:1.9.2.15) Gecko/20110303 Firefox/3.6.15
http.header.Accept = text/html,application/xhtml+xml,application/xml;q=0.9,*/*;q=0.8
http.header.Accept-Language = en-gb,en;q=0.5
http.header.Accept-Encoding = gzip,deflate
http.header.Accept-Charset = ISO-8859-1,utf-8;q=0.7,*;q=0.7
params.query.name = Niall
params.query.location.1 = Dublin
params.query.location.2 = Pembroke St
This filter extracts all parameters from an incoming REST request, and stores them in separate message attributes so that they can be validated easily.
Note
For multi-valued query string parameters, each value is given an incremental index. For example, the multi-valuedlocation
parameter results in the creation of the params.query.location.1
and params.query.location.2
message attributes.
HTTP POST requests
When you POST a form to the API Gateway, the parameters are placed in the message body, and not in the query string. However, the Extract REST Request Attributes filter treats posted parameters the same as normal query parameters, and also adds them to the params.query message attribute in a similar way to the HTTP GET request. For example, an HTTP POST message body contains the following:
grant_type=password&username=johndoe&password=A3ddj3w
This means that the ${params.query.grant_type} message attribute selector contains a value of password.
Note
REST APIs created in Policy Studio use a different naming scheme forx-www-form-urlencoded parameters. Body parameters go into message attributes named params.form.parameter_name instead of being merged into params.query.parameter_name.
Configure extract REST request attributes
Configure the following fields on the Extract REST Request Attributes window:
Name: Enter an appropriate name for this filter to display in a policy.
Request Querystring: Select whether to extract the values of query string parameters from an HTTP POST or GET request. These are simple name-value pairs (for example, Name=Joe Bloggs). This setting is selected by default.
HTTP Headers: Select whether to extract the HTTP header values from an HTTP POST or GET request (selected by default).
Decode Extracted Attributes: Select whether to decode URI paths that have been percent-encoded (for example, using %2F for /). This setting enables compatibility with previous API Gateway versions, which decoded URI paths, and is not selected by default. For example, this means that URI path components such as the following stay in a raw state:
/s8koID4%2FAd6AqgADSghC%2Bg%3D%3D/book%20repo/first%20book.pdf
This results in:
path[0] = ""
path[1] = "s8koID4%2FAd6AqgADSghC%2Bg%3D%3D"
path[2] = "book%20repo"
path[3] = "first%20book.pdf"
When this setting is selected, the URI path is decoded. This results in:
path[0] = ""
path[1] = "s8koID4%/Ad6AqgADSghC+g=="
path[2] = "book repo"
path[3] = "first book.pdf"
Note
For APIs virtualized in API Manager, any parameters not declared in the API method will be consumed and will not get passed to any API Gateway policies that are invoked. For more information, see Create REST API methods.Extract WSS header filter
The Extract WSS Header filter extracts a WS-Security Header block from a message. The extracted security header is stored in the authentication.ws.wsblockinfo message attribute.
To process this security header later in the policy, you can specify this message attribute in the configuration window for the specific processing filter. For example, to sign the security header, you can specify the authentication.ws.wsblockinfo message attribute in the What to Sign section of the XML Signature Generation filter. Open the Message Attribute tab on the What to Sign window, and specify this attribute to sign the security header.
Timestamp validity
The Extract WSS Header filter implicitly checks the wsu:Timestamp in the WSS Header block, if present. It checks the Expires and Created time to determine whether the current time is between the following values:
[Created time - drift time], [Expires time + drift time]
The drift time is taken from the value set in Environment Configuration > Server Settings > General > Token drift time (secs), which defaults to 300 seconds. This filter fails if the extracted WSS header block contains an invalid timestamp.
Configure extract WSS header
Configure the following fields on the Extract WSS Header filter configuration window:
Name: Enter an intuitive name for this filter to display in a policy (for example, ExtractCurrent Actor WSS Header).
Actor or Role: Specify the name of the SOAP Actor or Role of the WS-Security header that you want to extract. Remember, the WS-Security header is stored in the authentication.ws.wsblockinfo message attribute.
Remove enclosing WS-Security element: This option removes the enclosing wsse:Security element from the message.
Extract WSS timestamp filter
You can use the Extract WSS Timestamp filter to extract a WSS header timestamp from a message. The timestamp is stored in a specified message attribute so that it can be processed later in a policy. This filter requires the WSS header block to have been extracted previously.
Typically, the Validate Timestamp filter is used to retrieve the timestamp from the specified message attribute and validate it. The Validate Timestamp filter is available from the Content Filtering filter category.
Configure the following fields on the Extract WSS Timestamp filter configuration window:
Name: Enter an appropriate name for this filter to display in a policy.
Message Attribute to Contain the Timestamp: When API Gateway extracts the WSS header timestamp from the message at runtime, it stores the timestamp in the specified message attribute. To validate the timestamp later in the policy, you must specify this message attribute in the configuration window for the Validate Timestamp filter.
Extract WSS UsernameToken filter
You can use the Extract WSS Username Token filter to extract a WS-Security UsernameToken from a message if it exists. The extracted UsernameToken token is stored in the wss.usernameToken message attribute.
To process the UsernameToken later in the policy, you can specify this message attribute in the configuration window for the processing filter. For example, to sign the UsernameToken, you can simply specify the wss.usernameToken message attribute in the What to Sign section of the XML Signature Generation filter. Open the Message Attribute tab on the What to Sign window, and specify this attribute to sign the user name token.
Configure the following field on the Extract WSS Username Token filter configuration window:
Name: Enter an appropriate name for the filter. Remember that the WS-Security UsernameToken is stored in the wss.usernameToken message attribute.
Get cookie filter
A HTTP cookie is data sent by a server in an HTTP response to a client. The client can then return an updated cookie value in subsequent requests to the server. For example, this enables the server to store user preferences, manage sessions, track browsing habits, and so on.
The Get Cookie filter is used to read the Cookie and Set-Cookie HTTP headers. The Cookie header is used when a client sends a cookie to a server. The Set-Cookie header is used when the server instructs the client to store a cookie.
For more details, see Create cookie.
Configure get cookie
Configure the following fields on the Get Cookie filter configuration window:
Filter Name: Enter an appropriate name for this filter to display in a policy.
Cookie Name: Enter a regular expression that matches the name of the cookie. This value can use wildcards. Defaults to the.* wildcard.
Remove all Cookie Headers from Message after retrieval: When this setting is selected, all Cookie and Set-Cookie headers are removed from the message after retrieving the target cookie. This setting is not selected by default.
Message attributes
When a cookie is retrieved, it is stored in the appropriate API Gateway message attribute. The following message attributes are used to store cookies:
| Cookie Header Type | Message Attribute Name |
|---|---|
Cookie |
cookie.cookie_name.value (for example, cookie.mytest.value) |
Set-Cookie |
cookie.cookie_name.cookie_attribute_name (for example, cookie.mytest.header) |
Set-Cookie attribute list
The Set-Cookie HTTP header includes the following cookie attributes (reflected in the Set-Cookie message attribute name):
| Cookie Attribute Name | Description |
|---|---|
header |
The HTTP header name. |
value |
The value of the cookie. |
domain |
The domain name for this cookie. |
path |
The path on the server to which the browser returns this cookie. |
maxage |
The maximum age of the cookie in days, hours, minutes, and seconds. |
secure |
Whether sending this cookie is restricted to a secure protocol. This setting is not selected by default, which means that it can be sent using any protocol. |
HTTPOnly |
Whether the browser should use cookies over HTTP only. This setting is not selected by default. |
Insert SAML attribute assertion filter
A Security Assertion Markup Language (SAML) attribute assertion contains information about a user in the form of a series of attributes. Having collated a certain amount of information about a user, the API Gateway can generate a SAML attribute assertion, and insert it into the downstream message. A SAML Attribute is generated for each entry in the attribute.lookup.list attribute.
You can also use other filters from the Attributes filter group to insert user attributes into the attribute.lookup.list, or you can use the Javascript filter to dynamically create the attribute.lookup.list using custom attributes. For more information, see Create SAML assertion using the API Gateway.
You can refer to the following example of a SAML attribute assertion when configuring this filter:
<?xml version="1.0" encoding="utf-8"?>
<soap:Envelope xmlns:soap="http://schemas.xmlsoap.org/soap/envelope/"
  xmlns:xsi="http://www.w3.org/2000/10/XMLSchema-instance">
    <soap:Header>
      <wsse:Security>
        <saml:Assertion xmlns:saml="urn:oasis:names:tc:SAML:2.0:assertion"
          ID="Id-0000010a3c4ff12c-0000000000000002"
          IssueInstant="2006-03-27T15:26:12Z" Version="2.0">
        <saml:Issuer Format="urn:oasis ... WindowsDomainQualifiedName">
          TestCA
        </saml:Issuer>
        <saml:Subject>
          <saml:NameIdentifier Format="urn:oasis ... WindowsDomainQualifiedName">
            TestUser
          </saml:NameIdentifier>
        </saml:Subject>
        <saml:Conditions NotBefore="2005-03-27T15:20:40Z"
          NotOnOrAfter="2028-03-27T17:20:40Z"/>
        <saml:AttributeStatement>
          <saml:Attribute Name="role" NameFormat="http://www.axway.com">
            <saml:AttributeValue>admin</saml:AttributeValue>
          </saml:Attribute>
          <saml:Attribute Name="email" NameFormat="http://www.axway.com">
            <saml:AttributeValue>joe@axway.com</saml:AttributeValue>
          </saml:Attribute>
          <saml:Attribute Name="dept" NameFormat="">
            <saml:AttributeValue>engineering</saml:AttributeValue>
          </saml:Attribute>
        </saml:AttributeStatement>
        </saml:Assertion>
      </wsse:Security>
    </soap:Header>
    <soap:Body>
      <product>
        <name>API Gateway</name>
        <company>Axway</company>
        <description>Web Services Security</description>
      </product>
    </soap:Body>
</soap:Envelope>
Configure assertion details
Configure the following fields on the Assertion Details tab:
Issuer Name: Select the certificate containing the Distinguished Name (DName) to be used as the Issuer of the SAML assertion. This DName is included in the SAML assertion as the value of the Issuer attribute of the <saml:Assertion> element. For an example, see the sample SAML assertion above.
Expire In: Specify the lifetime of the assertion in this field. The lifetime of the assertion lasts from the time of insertion until the specified amount of time has elapsed.
Drift Time: The drift time is used to account for differences in the clock times of the machine hosting API Gateway (that generate the assertion) and the machines that consume the assertion. The specified time is subtracted from the time at which API Gateway generates the assertion.
SAML Version: You can create SAML 1.0, 1.1, and 2.0 attribute assertions. Select the appropriate version from the list.
Note
SAML 1.0 recommends the use of the http://www.w3.org/TR/2001/REC-xml-c14n-20010315 XML Signature Canonicalization algorithm. When inserting signed SAML 1.0 assertions into XML documents, it is quite likely that subsequent signature verification of these assertions might fail. This is due to the side effect of the algorithm including inherited namespaces into canonical XML calculations of the inserted SAML assertion that were not present when the assertion was generated.
For this reason, Axway recommend that SAML 1.1 or 2.0 is used when signing assertions as they both uses the exclusive canonical algorithm http://www.w3.org/2001/10/xml-exc-c14n#, which safeguards inserted assertions from such changes of context in the XML document. See section 5.4.2 of the oasis-sstc-saml-core-1.0.pdf and section 5.4.2 of sstc-saml-core-1.1.pdf documents, both of which are available from OASIS Open Standards.
Configure assertion location
The options on the Assertion Location tab specify where the SAML assertion is inserted in the message. By default, the SAML assertion is added to the WS-Security block with the current SOAP actor/role. The following options are available:
Append to Root or SOAP Header: Appends the SAML assertion to the message root for a non-SOAP XML message, or to the SOAP Header for a SOAP message. For example, this option is suitable for cases where this filter might process SOAP XML messages or non-SOAP XML messages.
Add to WS-Security Block with SOAP Actor/Role: Adds the SAML assertion to the WS-Security block with the specified SOAP actor (SOAP 1.0) or role (SOAP 1.1). By default, the assertion is added with the current SOAP actor/role only, which means the WS-Security block with no actor. You can select a specific SOAP actor/role when available from the list.
XPath Location: To insert the SAML assertion at an arbitrary location in the message, you can use an XPath expression to specify the exact location in the message. You can select XPath expressions from the list. The default is the First WSSE Security Element, which has an XPath expression of //wsse:Security. You can add, edit, or remove expressions by clicking the relevant button.
You can specify exactly how the SAML assertion is inserted using the following options:
- Append to node returned by XPath expression (the default)
- Insert before node returned by XPath expression
- Replace node returned by XPath expression
Insert into Message Attribute: Specify a message attribute to store the SAML assertion from the drop-down list (for example, saml.assertion). Alternatively, you can also enter a custom message attribute in this field (for example, my.test.assertion). The SAML assertion can then be accessed downstream in the policy.
Configure subject confirmation method
The settings on the Subject Confirmation Method tab determine how the <SubjectConfirmation> block of the SAML assertion is generated. When the assertion is consumed by a downstream web service, the information contained in the <SubjectConfirmation> block can be used to authenticate either the end user that authenticated to the API Gateway, or the issuer of the assertion, depending on what is configured.
The following is a typical <SubjectConfirmation> block:
<saml:SubjectConfirmation>
  <saml:ConfirmationMethod>
    urn:oasis:names:tc:SAML:1.0:cm:holder-of-key
  </saml:ConfirmationMethod>
  <dsig:KeyInfo xmlns:dsig="http://www.w3.org/2000/09/xmldsig#">
    <dsig:X509Data>
      <dsig:X509SubjectName>CN=axway</dsig:X509SubjectName>
      <dsig:X509Certificate>
        MIICmzCCAY ...... mB9CJEw4Q=
      </dsig:X509Certificate>
    </dsig:X509Data>
  </dsig:KeyInfo>
</saml:SubjectConfirmation>
The following configuration fields are available on the Subject Confirmation Method tab:
Method: The value selected here determines the value of the <ConfirmationMethod> element. The following table shows the available methods, their meanings, and their respective values in the <ConfirmationMethod> element:
- Holder Of Key: The API Gateway includes the key used to prove that the API Gateway is the holder of the key, or includes a reference to the key. Value:
urn:oasis:names:tc:SAML:1.0:cm:holder-of-key - Bearer: The subject of the assertion is the bearer of the assertion. Value:
urn:oasis:names:tc:SAML:1.0:cm:bearer - SAML Artifact: The subject of the assertion is the user that presented a SAML Artifact to the API Gateway. Value:
urn:oasis:names:tc:SAML:1.0:cm:artifact - Sender Vouches: Use this confirmation method to assert that the API Gateway is acting on behalf of the authenticated end user. No other information relating to the context of the assertion is sent. It is recommended that both the assertion and the SOAP Body must be signed if this option is selected. These message parts can be signed by using the XML Signature Generation filter. Value:
urn:oasis:names:tc:SAML:1.0:cm:bearer
You can also leave the Method field blank, in which case no <ConfirmationMethod> block is inserted into the assertion.
When you select Holder of Key as the SAML subject confirmation in the Method field, you must configure how information about the key is to be included in the message. There are a number of configuration options available depending on whether the key is a symmetric or asymmetric key.
Asymmetric Key: To use an asymmetric key as proof that the API Gateway is the holder-of-key entity, you must select the Asymmetric Key radio button, and then configure the following fields on the Asymmetric tab:
- Certificate from Store: To select a key that is stored in the Certificate Store, select this option and click the Signing Key button. On the Select Certificate screen, select the box next to the certificate that is associated with the key to use.
- Certificate from Selector Expression: Alternatively, the key may have already been used by a previous filter in the policy (for example, to sign a part of the message). In this case, the key can be retrieved using the selector expression entered in this field.
Symmetric Key: To use a symmetric key as proof that the API Gateway is the holder of key, select the Symmetric Key radio button, and configure the fields on the Symmetric tab:
-
Generate Symmetric Key, and Save in Message Attribute: If you select this option, the API Gateway generates a symmetric key, which is included in the message before it is sent to the client. By default, the key is saved in the
symmetric.keymessage attribute. -
Symmetric Key Selector Expression: If a previous filter (for example, an XML Signature Generation filter) has already used a symmetric key, you can reuse this key as proof that the API Gateway is the holder-of-key entity. Enter the name of the selector expression (for example, message attribute) in the field provided, which defaults to
${symmetric.key}. -
Encrypt using Certificate from Certificate Store: When a symmetric key is used, you must assume that the recipient has no prior knowledge of this key. It must, therefore, be included in the message so that the recipient can validate the key. To avoid meet-in-the-middle style attacks, where a hacker could eavesdrop on the communication channel between the API Gateway and the recipient and gain access to the symmetric key, the key must be encrypted so that only the recipient can decrypt the key.
One way of doing this is to select the recipient’s certificate from the Certificate Store. By encrypting the symmetric key with the public in the recipient’s certificate, the key can only be decrypted by the recipient’s private key, to which only the recipient has access. Select the Signing Key button and then select the recipient’s certificate on the Select Certificate dialog.
-
Encrypt using Certificate from Selector Expression: Alternatively, if the recipient’s certificate has already been used (perhaps to encrypt part of the message), the certificate can be retrieved using the selector expression entered in this field.
-
Symmetric Key Length: Enter the length (in bits) of the symmetric key to use.
-
Key Wrap Algorithm: Select the algorithm to use to encrypt (wrap) the symmetric key.
The Key Info tab must be configured regardless of whether you have elected to use symmetric or asymmetric keys. It determines how the key is included in the message. The following options are available:
-
Do Not Include Key Info: Select this option if you do not wish to include a
<KeyInfo>section in the SAML assertion. -
Embed Public Key Information: If this option is selected, details about the key are included in a
<KeyInfo>block in the message. You can include the full certificate, expand the public key, include the distinguished name, and include a key name in the<KeyInfo>block by selecting the appropriate boxes. When selecting the Include Key Name field, you must enter a name in the Value field, and select the Text Value or Distinguished Name Attribute radio button, depending on the source of the key name. -
Put Certificate in Attachment: Select this option to add the certificate as an attachment to the message. The certificate is then referenced from the
<KeyInfo>block. -
Security Token Reference: The Security Token Reference (STR) provides a way to refer to a key contained in a SOAP message from another part of the message. It is often used in cases where different security blocks in a message use the same key material, and it is considered an overhead to include the key more than once in the message.\
When this option is selected, a
<wsse:SecurityTokenReference>element is inserted into the<KeyInfo>block. It references the key material using aURIto point to the key material and aValueTypeattribute to indicate the type of reference used. For example, if the STR refers to an encrypted key, you should selectEncryptedKeyfrom the list, whereas if it refers to aBinarySecurityToken, selectX509v3from the list. Other options are available to enable more specific security requirements.
Configure advanced settings
The settings on the Advanced tab include the following fields.
Select Required Layout Type: WS-Policy and SOAP Message Security define a set of rules that determine the layout of security elements that appear in the WS-Security header in a SOAP message. The SAML assertion is inserted into the WS-Security header according to the layout option selected here. The available options correspond to the WS-Policy Layout assertions ofStrict, Lax, LaxTimestampFirst, and LaxTimestampLast.
Indent: Select this method to ensure that the generated signature is properly indented.
Security Token Reference: The generated SAML attribute assertion can be encapsulated in a <SecurityTokenReference> block. The following example demonstrates this:
<soap:Header>
  <wsse:Security
     xmlns:wsse="http://schemas.xmlsoap.org/ws/2002/12/secext"
     soap:actor="axway">
    <wsse:SecurityTokenReference>
      <wsse:Embedded>
        <saml:Assertion xmlns:saml="urn:oasis:names:tc:SAML:2.0:assertion"
           ID="Id-0000010a3c4ff12c-0000000000000002"
           IssueInstant="2006-03-27T15:26:12Z" Version="2.0">
          <saml:Issuer Format="urn:oasis ... WindowsDomainQualifiedName">
            TestCA
          </saml:Issuer>
          <saml:Subject>
            <saml:NameID Format="urn:oasis ... WindowsDomainQualifiedName">
              TestUser
            </saml:NameID>
          </saml:Subject>
          <saml:Conditions NotBefore="2005-03-27T15:20:40Z"
            NotOnOrAfter="2028-03-27T17:20:40Z"/>
          <saml:AttributeStatement>
            <saml:Attribute Name="role" NameFormat="http://www.example.com">
              <saml:AttributeValue>admin</saml:AttributeValue>
            </saml:Attribute>
            <saml:Attribute Name="email" NameFormat="http://www.example.com">
              <saml:AttributeValue>joe@example.com</saml:AttributeValue>
            </saml:Attribute>
            <saml:Attribute Name="attrib1" NameFormat="">
              <saml:AttributeValue xsi:nil="true"/>
              <saml:AttributeValue>value1</saml:AttributeValue>
            </saml:Attribute>
          </saml:AttributeStatement>
        </saml:Assertion>
      </wsse:Embedded>
    </wsse:SecurityTokenReference>
  </wsse:Security>
</soap:Header>
To add the SAML assertion to a <SecurityTokenReference> block like in this example, select the Embed SAML assertion within Security Token Reference option. Otherwise, select No Security Token Reference.