Additional routing filters
20 minute read
HTTP redirect filter
You can use the HTTP Redirect filter to enable API Gateway to send an HTTP redirect message. For example, you can send an HTTP redirect to force a client to enter user credentials on an HTML login page if no HTTP cookie already exists. Alternatively, you can send an HTTP redirect if a web page has moved to a new URL address.
Configure a HTTP redirect
Complete the following settings:
Name: Enter a descriptive name for this filter to display in a policy.
HTTP response code status: Enter the HTTP response code status to use in the HTTP redirect message. Defaults to 301, which means that the requested resource has been assigned a new permanent URI, and any future references to this resource should use the returned redirect URL.
Redirect URL: Enter the URL address to which the message is redirected.
Content-Type: Enter the Content-Type of the HTTP redirect message (for example, text/xml).
Message Body: Enter the message body text to send in the HTTP redirect message.
HTTP status filter
This filter sets the HTTP status code on response messages. This enables you to ensure that a more meaningful response is sent to the client in the case of an error occurring in a configured policy.
For example, if a Relative Path filter fails, it might be useful to return a 503 Service Unavailable response. Similarly, if a user does not present identity credentials when attempting to access a protected resource, you can configure API Gateway to return a 401 Unauthorized response to the client.
HTTP status codes are returned in the status-line of an HTTP response. The following are some typical examples:
HTTP/1.1 200 OK
HTTP/1.1 400 Bad Request
HTTP/1.1 500 Internal Server Error
Configure a HTTP status
Name: Enter an appropriate name for this filter to display in a policy.
HTTP response code status: Enter the status code returned to the client. For a complete list of status codes, see the HTTP specification.
File upload filter
You can use the File Upload filter to upload processed messages as files to a file transfer server. This enables you to upload the contents of the content.body message attribute as a file. The File Upload filter supports the following protocols:
- FTP: File Transfer Protocol
- FTPS: FTP over Secure Sockets Layer (SSL)
- SFTP: Secure Shell (SSH) File Transfer Protocol
Configuring a File Upload filter can be useful when integrating with Business-to-Business (B2B) partner destinations or with legacy systems. For example, instead of making drastic changes to either system, API Gateway can make files available for upload to the other system. The added benefit is that the files are exposed to the full complement of API Gateway message processing filters. This ensures that only properly validated files are uploaded to the target system.
The File Upload filter is available from the Routing category of filters in Policy Studio. This topic describes how to configure the fields on the File Upload filter dialog.
Configure a file upload
Configure the following general settings:
Name: Enter a descriptive name for this filter to display in a policy.
Host: Enter the name of the host machine on which the file transfer server is running.
Port: Enter the port number to connect to the file transfer server. Defaults to 21.
Username: Enter the user name to connect to the file transfer server.
Password: Specify the password for this user.
Configure the following fields in the File details section:
Filename: The message body (in the content.body message attribute) is stored using this file name on the destination file transfer server. The default value of ${id}.out enables you to use the unique identifier associated with each message processed by API Gateway. When this value is specified, messages are stored in individual files on the file transfer server according to their unique message identifier.
Directory: Specify the directory where the file is stored on the destination file transfer server.
Use temporary file name during upload: This option specifies whether to use a temporary file name of ${id}.part when the file is uploading to the file transfer server. When the file has uploaded, it then uses the file name specified in this filter (for example, the default ${id}.out file name). This prevents an incomplete file from being uploaded. This option is selected by default.
Note
You must deselect this option if the file transfer server is API Gateway. For example, this option applies when the API Gateway uploads to a file transfer server, and then another server (possibly API Gateway) polls the file transfer server for new files to process. The poller server is configured to consume*.xml
files and ignores the temporary file. When the upload is complete, the file is renamed and the poller sees the new file to process.
Configure upload connection
The fields configured in the Connection Type section determine the type of file transfer connection. Select the FTP connection type from the following options:
- FTP - File Transfer Protocol
- FTPS - FTP over SSL
- SFTP - SSH File Transfer Protocol
The following general settings apply to FTP and FTPS connections:
Passive transfer mode: Select this option to prevent problems caused by opening outgoing ports in the firewall relative to the file transfer server (for example, when using active FTP connections). This is selected by default.
Note
To use passive transfer mode, you must perform the steps described in Configure passive transfer mode.File Type: Select ASCII mode for sending text-based data, or Binary mode for sending binary data over the file transfer connection. Defaults to ASCII mode.
The following security settings apply to FTPS connections only:
SSL Protocol: Enter the SSL protocol used (for example, SSL or TLS). Defaults to SSL.
Implicit: When this option is selected, security is automatically enabled as soon as the File Upload client makes a connection to the remote file transfer service. No clear text is passed between the client and server at any time. In this case, a specific port is used for secure connections (990). This option is not selected by default.
Explicit: When this option is selected, the remote file transfer service must explicitly request security from the File Upload client, and negotiate the required security. If the file transfer service does not request security, the client can allow the file transfer service to continue insecure or refuse or limit the connection. This option is selected by default.
Trusted Certificates: To connect to a remote file server over SSL, you must trust that server’s SSL certificate. When you have imported this certificate into the Certificate Store, you can select it on the Trusted Certificates tab.
Client Certificates: If the remote file server requires the File Upload client to present an SSL certificate to it during the SSL handshake for mutual authentication, you must select this certificate from the list on the Client Certificates tab. This certificate must have a private key associated with it that is also stored in the Certificate Store.
The following security settings apply to SFTP connections only:
Present following key for authentication: Click the button on the right, and select a previously configured key to be used for authentication from the tree. To add a key, right-click the Key Pairs node, and select Add. Alternatively, you can import key pairs under the Environment Configuration > Certificates and Keys node in the Policy Studio tree.
SFTP server must present key with the following fingerprint: Enter the fingerprint of the public key that the SFTP server must present, for example, SHA-256 hash algorithm and Zs5O+Y+gyl7pmq0hC68nz3M1ehZOTTn5Vyl3WbWERzE fingerprint value.
File download filter
You can use the File download filter to download files from a file transfer server and store their contents in the content.body message attribute. The File download filter supports the following protocols:
- FTP: File Transfer Protocol
- FTPS: FTP over Secure Sockets Layer (SSL)
- SFTP: Secure Shell (SSH) File Transfer Protocol
Configuring a File download filter can be useful when integrating with Business-to-Business (B2B) partner destinations or with legacy systems. For example, instead of making drastic changes to either system, API Gateway can download files from the other system. The added benefit is that the files are exposed to the full compliment of API Gateway message processing filters. This ensures that only properly validated files are downloaded from the target system. The File download filter is available from the Routing category of filters in Policy Studio.
Configure a file download
Configure the following general settings:
Name: Enter a descriptive name for this filter to display in a policy.
Host: Enter the name of the host machine on which the file transfer server is running.
Port: Enter the port number to connect to the file transfer server. Defaults to 21.
Username: Enter the user name to connect to the file transfer server.
Password: Specify the password for this user.
Configure the following fields in the File details section:
Filename: Specifies the file name to download from the file transfer server. The default value is filename.xml. You can enter a different file name or use a message attribute selector, which is expanded at runtime (for example, ${authentication.subject.id}).
When downloading a file from the file transfer server, API Gateway uses a temporary file name of filename.part. When the file has been downloaded, it then uses the file name specified in this filter (for example, the default filename.xml). This prevents an incomplete file from being downloaded.
Directory: Specify the directory where the file is stored.
Configure file download connection
The fields configured in the Connection Type section determine the type of file transfer connection. Select the FTP connection type from the following options:
- FTP - File Transfer Protocol
- FTPS - FTP over SSL
- SFTP - SSH File Transfer Protocol
The following general settings apply to FTP and FTPS connections:
Passive transfer mode: Select this option to prevent problems caused by opening outgoing ports in the firewall relative to the file transfer server (for example, when using active FTP connections). This is selected by default.
Note
To use passive transfer mode, you must perform the steps described in Configure passive transfer mode.File Type: Select ASCII mode for sending text-based data, or Binary mode for sending binary data over the file transfer connection. Defaults to ASCII mode.
The following security settings apply to FTPS connections only:
SSL Protocol: Enter the SSL protocol used (for example, SSL or TLS). Defaults to SSL.
Implicit: When this option is selected, security is automatically enabled as soon as the File Download client makes a connection to the remote file transfer service. No clear text is passed between the client and server at any time. In this case, a specific port is used for secure connections (990). This option is not selected by default.
Explicit: When this option is selected, the remote file transfer service must explicitly request security from the File Download client, and negotiate the required security. If the file transfer service does not request security, the client can allow the file transfer service to continue insecure or refuse or limit the connection. This option is selected by default.
Trusted Certificates: To connect to a remote file server over SSL, you must trust that server’s SSL certificate. When you have imported this certificate into the Certificate Store, you can select it on the Trusted Certificates tab.
Client Certificates: If the remote file server requires the File Download client to present an SSL certificate to it during the SSL handshake for mutual authentication, you must select this certificate from the list on the Client Certificates tab. This certificate must have a private key associated with it that is also stored in the Certificate Store.
The following security settings apply to SFTP connections only:
Present following key for authentication: Click the button on the right, and select a previously configured key to be used for authentication from the tree. To add a key, right-click the Key Pairs node, and select Add. Alternatively, you can import key pairs under the Environment Configuration > Certificates and Keys node in the Policy Studio tree.
SFTP server must present key with the following fingerprint: Enter the fingerprint of the public key that the SFTP server must present (for example, SHA-256 hash algorithm and Zs5O+Y+gyl7pmq0hC68nz3M1ehZOTTn5Vyl3WbWERzE fingerprint value).
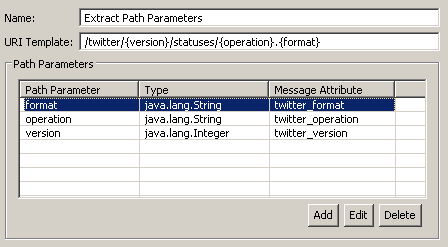
Extract path parameters filter
The Extract Path Parameters filter enables API Gateway to parse the contents of a specified HTTP path into message attributes. This means that you can define HTTP path parameters, and then extract their values at runtime using selectors. For example, this is useful when passing in parameters to REST-based requests.
Configure extract path parameters
Complete the following settings:
Name: Enter a descriptive name for this filter to display in a policy.
URI Template: Enter the URI template for the path to be parametrized. This is a formatted Jersey @Path annotation string, which enables you to parametrize the path specified in the incoming http.request.path message attribute. The following is an example URI template entry:
/twitter/{version}/statuses/{operation}.{format}
Path Parameters: The Path Parameters table enables you to map the path parameters specified in the URI Template to user-defined message attributes. These attributes can then be used by other filters downstream in the policy. Click Add to configure a path parameter, and specify the following in the dialog:
- Path Parameter:
- Enter the name of the path parameter (for example,
version). - Type:
- Enter the type of the path parameter (for example,
java.lang.String). - Message Attribute:
- Enter the name of the message attribute that stores the parameter value (for example,
twitter_version).
The following figure shows the example path parameters:
Required input and generated output
The incoming http.request.path message attribute is required as input to this filter.
This filter generates the message attributes for the parameters that you specify in the Path Parameters table. For example, in the previous figure, the following attributes are generated:
twitter_formattwitter_operationtwitter_version
Possible outcomes
The possible outcomes of this filter are as follows:
Trueif the specified URI Template is successfully parsed.Falseif an error occurs during URI Template parsing.CircuitAbortExceptionif an exception occurs during URI Template parsing.
SMTP filter
You can use the SMTP filter to relay messages to an email recipient using a configured SMTP server.
Complete the following general settings:
Name: Specify a descriptive name for this filter to display in a policy.
SMTP Server Settings: Click the browse button and select a preconfigured SMTP server in the tree.
Configure message settings
Complete the following fields in the Message settings section:
To: Enter the email address of the recipients of the messages. You can enter multiple addresses by separating each one using a semicolon. For example:
joe.soap@example.com;joe.bloggs@example.com;john.doe@example.com
From: Enter the email address of the senders of the messages. You can enter multiple addresses by separating each one using a semicolon.
Subject: Enter some text as the subject of the email messages.
Send content in body: Select this option to send the message content in the body of the message. This is selected by default.
Send content as attachment: Select this option to send the message content as an attachment.
Send content in body and as attachment: Select this option to send the message content in the body of the message and as an attachment.
Attachment name: If you selected Send content as attachment or Send content in body and as attachment, enter a name for the attachment in this field. The default is ${id}.bin.
Insert WS-Addressing filter
The WS-Addressing specification defines a transport-independent standard for including addressing information in SOAP messages. API Gateway can generate WS-Addressing information based on a configured endpoint in a policy, and then insert this information into SOAP messages.
Configure WS-Addressing information to insert
Complete the following fields to configure API Gateway to insert WS-Addressing information into the SOAP message header.
Name: Enter an appropriate name for the filter to display in a policy.
To: The message is delivered to the specified destination.
From: Informs the destination server where the message originated from.
Reply To: Indicates to the destination server where it should send response messages to.
Fault To: Indicates to the destination server where it should send fault messages to.
MessageID: A unique identifier to distinguish this message from others at the destination server. It also provides a mechanism for correlating a specific request with its corresponding response message.
Action: The specified action indicates what action the destination server should take on the message. Typically, the value of the WS-Addressing Action element corresponds to the SOAPAction on the request message. For this reason, this field defaults to the soap.request.action message attribute.
Relates To: If responses are to be received asynchronously, the specified value provides a method to associate an incoming reply to its corresponding request.
Namespace: The WS-Addressing namespace to use in the WS-Addressing block.
Read WS-Addressing filter
The WS-Addressing specification defines a transport-independent standard for including addressing information in SOAP messages. API Gateway can read WS-Addressing information contained in a SOAP message and subsequently use this information to route the message to its intended destination.
Configure WS-Addressing information to read
Complete the following fields to configure API Gateway to read WS-Addressing information contained in a SOAP message.
Name: Enter an appropriate name for the filter to display in a policy.
Address location: Specify the name of the element in the WS-Addressing block that contains the address of the destination server to which the API Gateway routes the message.
By default, XPath expressions are available to extract the destination server from the From, To, ReplyTo, and FaultTo elements. Click the Add button to add a new XPath expression to extract the address from a different location.
Remove enclosing WS-Addressing element: If this option is selected, the WS-Addressing element returned by the XPath expression configured above is removed from the SOAP header when it has been consumed.
Save to file filter
The Save to File filter enables you to write the current message contents to a file. For example, you can save the message contents to a file in a directory where it can be accessed by an external application. This can be used to quarantine messages to the file system for offline examination.
This filter can also be useful when integrating legacy systems. Instead of making drastic changes to the legacy system by adding an HTTP engine, API Gateway can save the message contents to the file system, and route them on over HTTP to another back-end system.
To configure the Save to File filter, specify the following fields:
Name: Name of the filter to be displayed in a policy.
File name: Enter the name of the file that the content is saved to. You can specify this using a selector, which is expanded to the specified value at runtime. Defaults to ${id}.out.
Directory: Enter the directory that the file is saved to. You can specify this using a selector, which is expanded to the specified value at runtime. Defaults to ${environment.VINSTDIR}/message-archive, where VINSTDIR is the location of a running API Gateway instance.
Maximum number of files in directory: Enter the maximum number of files that can be saved in the directory. Defaults to 500. When this limit is reached, the oldest file is removed.
Maximum file size: Enter the maximum file size in MB. Defaults to 1000.
Include HTTP Headers: Select whether to include HTTP headers in the file. HTTP headers are not included by default.
Include Request Line: Select whether to include the request line in the file. This is not included by default.
TIBCO Rendezvous filter
TIBCO Rendezvous is a low latency messaging product for real-time high throughput data distribution applications. It facilitates the exchange of data between applications over the network. A TIBCO Rendezvous daemon runs on each participating node on the network. All data sent to and read by each application passes through the daemon. API Gateway uses the TIBCO Rendezvous API to communicate with a TIBCO Rendezvous daemon running locally (by default) to send messages to other TIBCO Rendezvous programs.
You can configure the TIBCO Rendezvous filter to route messages (using a TIBCO Rendezvous daemon) to other TIBCO Rendezvous programs. This filter is found in the Routing category of filters.
Configure routing to TIBCO Rendezvous
Configure the following fields to route messages to other TIBCO Rendezvous programs:
Name: Enter an appropriate name for this filter.
TIBCO Rendezvous Daemon to Use: Click the button on the right, and select a previously configured TIBCO Rendezvous Daemon from the tree. API Gateway sends messages to the specified TIBCO Rendezvous Subject on this daemon. To add a TIBCO Rendezvous Daemon, right-click the TIBCO Rendezvous Daemons tree node, and select Add a TIBCO Rendezvous Daemon.
Rendezvous Subject: The message is sent with the subject entered here meaning that all other TIBCO daemons on the network that have subscribed to this subject name will receive the message. The subject name comprises a series of elements, including wild cards (for example, *), separated by dot characters, for example:
news.sport.soccernews.sport.*FINANCE.ACCOUNT.SALES
For more information on the subject name syntax, see the TIBCO Rendezvous documentation.
Add fields
Click the Add button to add details about a particular field to add to the message. On the Message Field Definition dialog, complete the following fields:
Field Name: Enter the name of the field to send in the message.
Type: Select the data type of the value specified in either of the following fields:
Set value to the following constant value: You can explicitly set this value by entering it here.
Set value to the object found in the following attribute: To dynamically populate the field value using the contents of a message attribute, select the attribute from the list. At runtime, the contents of the message attribute are placed into the message that is sent to TIBCO Rendezvous.
Wait for response packets filter
API Gateway can capture both incoming and outgoing packets when it is listening passively (not opening any ports) on the network interface. For example, a web service is deployed in a web server that listens on port 80. API Gateway can be installed on the same machine as the web server. It is configured not to open any ports and to use a packet sniffer to capture all packets destined for TCP port 80.
For details on how to configure a packet sniffer, see Packet sniffers.
Response packet sniffing
When packets arrive on the network interface that are destined for this port, they are assembled by the packet sniffer into HTTP messages and passed into the configured policy. Typically, this policy logs the message to an audit trail, and so usually consists of just a Log Message Payload filter.
To also log response messages passively, as is typically required for a complete audit trail, you can use the Wait for response packets filter to correlate response packets with their corresponding requests. The Wait for response packets filter assembles the response messages into HTTP messages and can then log them again using the Log Message Payload filter. The following policy logs both request and response messages captured transparently by the packet sniffer:
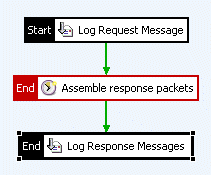
You can see from the policy that the first logging filter logs the request message. By this stage, the packet sniffer has assembled the request packets into a complete HTTP request, and this is what is passed to the Log Request Message filter. The Assemble response packets filter is a Wait for response packets filter that assembles response packets into complete HTTP response messages and passes them to the Log Response Messages filter, which logs the complete response message.
Call internal service filter
The Call internal service filter is a special filter that passes messages to an internal servlet application or static content provider that has been deployed at the API Gateway. The appropriate application is selected based on the relative path on which the request message is received.
This filter is used by Management Services that are configured to listen on the Management Interface on port 8090. For more information on how the Call internal service filter is used by these services, see Management services.
Configure call internal service
You can configure the following fields on the filter window:
Name: Enter an appropriate name for this filter to display in a policy.
Additional HTTP Headers to Send to Internal Service: Click the Add button to configure additional HTTP headers to send to the internal application. Specify the following fields on the HTTP Header dialog:
- HTTP Header Name: Enter the name of the HTTP header to add to the message
- HTTP Header Value: Enter the value of the new HTTP header. You can also enter selectors to represent message attributes. At runtime, API Gateway expands these selectors to the current value of the corresponding message attribute. For example, the
${id}selector is replaced by the value of the current message ID