Configure policies from WSDL files
23 minute read
When you import a WSDL file describing a web service into the web service repository, API Gateway exposes a virtualized version of the web service. This virtualized service is exposed on a host and port of the machine running API Gateway. In this way, a client can retrieve the WSDL for the virtualized web service from API Gateway without knowing its real location.
When you import a WSDL file, Policy Studio automatically generates policies that can be used to talk to the back-end web service. For example, a Service Handler is created to resolve and validate requests to the web service and responses from the web service. The service handler is automatically configured based on the operation definitions in the WSDL.
A WSDL file can include WS-Policy assertions that define the security policies or security requirements that a client must adhere to in order to communicate with the corresponding service. For example, a web service might require the client to sign sensitive parts of the message and include a WS-Security UsernameToken to authenticate to the web service.
If the imported WSDL file contains WS-Policy assertions, API Gateway is responsible for making sure the requests it sends to the web service adhere to the security constraints specified in the policy. In this case API Gateway is considered as the initiator of the web service.
During the WSDL import process, you can select which operations to expose to clients and what path to expose the service on, and you can also specify the WS-Policy assertions that API Gateway enforces on the messages it receives from clients. In this case, API Gateway is considered to be the recipient to a consumer (that is, client) of the virtualized web service.
You can use the Import WSDL wizard to configure API Gateway as a web service initiator, as a recipient to a consumer of the virtualized web service, or both. The steps involved in the wizard, and the configuration windows displayed, differ according to whether WS-Policy assertions are being enforced between API Gateway and the web service (initiator case) or between a client and API Gateway (recipient case).
The Import WSDL wizard enables you to configure complex policies to secure and virtualize web services with only a few clicks and minimal intervention.
API Gateway as the web service initiator
The following figure demonstrates the case where API Gateway is the initiator of the web service:
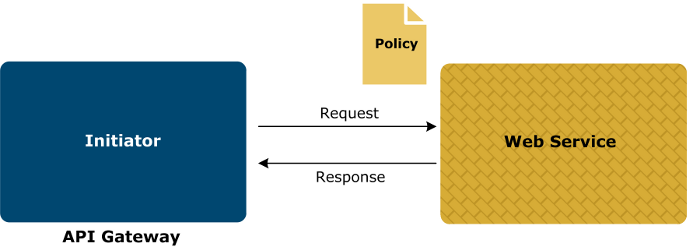
When the imported WSDL describing the web service includes WS-Policy assertions, API Gateway is responsible for making sure that the requests it sends to the web service adhere to the security constraints specified in the policy.
Policy Studio automatically generates the policies required to talk to the web service, and to enforce the security requirements specified by the policy assertions in the WSDL. These policies contain filters, most of which are configured automatically. However, a small number of filters require you to manually configure specific fields. For example, when signing or encrypting a message, you must specify the signing or encrypting key.
API Gateway as the web service recipient
The following figure demonstrates the case where API Gateway is the recipient of the web service:
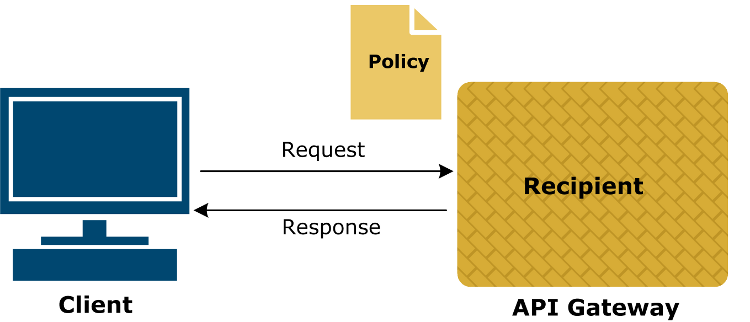
When importing the WSDL, the Import WSDL wizard enables you to select the web service operations to expose to the client, set the path on which to expose the service, and optionally to specify the security policies that API Gateway enforces on the messages it receives from the client.
Policy Studio automatically generates the policies that API Gateway uses to talk to the client, and to enforce the security requirements you specified during WSDL import. These policies contain filters, most of which are configured automatically. However, a small number of filters require you to manually configure specific fields. For example, when configuring the duration of a WS-Security timestamp, you might need to specify a longer or shorter duration.
Import WSDL summary
The steps involved in the Import WSDL wizard are summarized as follows:
- Load the WSDL from a file, URL, or UDDI.
- Retrieve and validate the WSDL.
- Select the operations to expose.
- Configure the WS-Policy settings. If the imported WSDL file includes WS-Policy settings, policies are generated to secure the connection between API Gateway and the web service. You can also secure the virtualized service by configuring WS-Policy settings between the client and API Gateway at this step.
- Select the path to expose the services on.
- If you selected to secure the virtualized service using WS-Policy settings, configure the policies that API Gateway needs to enforce for messages it receives. You can select gateway and message level policies at this step.
- Configure the recipient security settings. At this step you can manually configure the policies that have been automatically generated by Policy Studio to enforce the WS-Policy settings between the client and API Gateway.
- Configure initiator security settings. At this step you can manually configure the policies that have been automatically generated by Policy Studio to enforce the WS-Policy settings between API Gateway and the back-end web service.
- Review the summary information for the virtualized service. At this step you can also override the default validation and routing policies with custom policies, and decide whether or not to publish the WSDL to clients.
Import a WSDL file
To import a WSDL file into the web service repository, complete the following steps:
-
In the Policy Studio tree view, expand the APIs > Web Service Repository node.
-
Right-click the Web Services node, and select Register Web Service to launch the Import WSDL wizard.
-
In the Load WSDL window, select the WSDL location from one of the following options:
- WSDL File: Click the Browse button to select a WSDL file from the file system.
- WSDL URL: Enter a URL where the WSDL can be loaded from. This option supports HTTP basic authentication. Under Authentication select the Use HTTP Basic option and enter a user name and password.
- WSDL from UDDI: Click the Browse UDDI button to select a WSDL file from a Universal Description, Discovery, and Integration (UDDI) registry.
-
Click Next.
-
In the Retrieve and Validate window, enter a user name and a comment for this version of the WSDL. Click Next to continue.
Note
If the WSDL fails validation, an error is displayed. For details, see XML schema and WSDL document validation and XML schema and WSDL document limitations -
In the WSDL Operations window, select the operations to be exposed on the virtualized service and click Next. Alternatively, click Select All or Select None to select all or none of the operations defined in the WSDL file.
-
On the WS-Policy Options window, select Secure this virtualized service with a WS-Policy to use a WS-Policy to secure the virtualized service. If you select this option, the Secure Virtual Service dialog is displayed at a later step, which enables you to configure WS-Policy settings between the client and API Gateway and generate policies that API Gateway uses to enforce for messages it receives from clients.
-
On the WS-Policy Options window, select Use the WS-Policy in the WSDL to connect securely to the back-end Web Service to generate policies to secure the connection between API Gateway and the web service, based on the WS-Policy settings included in the WSDL file. This is enabled (and selected by default) only if the imported WSDL file includes WS-Policy information. Click Next to continue.
-
On the Expose Services window, select or enter a unique relative path on which to expose the virtualized service (for example,
Default Services). If the WSDL file contains multiple services, you must select a relative path for each service before continuing. Select a service from the Select a service field, and then select or enter a unique relative path to expose that service on. Repeat for each service. -
Click Finish. The configuration is prepared based on your selections and one or more of the following windows are then displayed:
- Secure Virtual Service: If you selected to secure the virtualized service with a WS-Policy, this window is displayed. For more information, see Configure a security policy.
- Configure Recipient Security Settings: This window is displayed if you selected to secure the virtualized service with a recipient WS-Policy. For more information, see Configure recipient security settings.
- Configure Initiator Security Settings: This window is displayed if selected to use the WS-Policy in the WSDL to secure messages sent from API Gateway (as initiator) to the web service. For more information, see Configure initiator security settings.
-
After you have completed configuring the security settings, the Summary window is displayed. This window summarizes the details for the imported WSDL file. It includes the location of the WSDL file, and a tab for each web service virtualized by API Gateway. Each tab includes the following:
- The name of the virtualized service.
- The path that the WSDL for the virtualized service is exposed on.
- Validation: API Gateway uses the WSDL to validate incoming messages by default. Alternatively, you can select the check box and click the browse button to use a dedicated validation policy for all messages sent to the web service. For example, this enables you to delegate to a custom validation policy used by multiple web services.
- Routing: API Gateway routes to the displayed URL by default. Alternatively, you can select the check box and click the browse button to use a dedicated routing policy to send all messages on to the web service. For example, this enables you to delegate to a custom routing policy used by multiple web services.
- WSDL Access Options: Select the Allow the Gateway to publish WSDL to clients option to make the WSDL for this web service available to clients. This option is selected by default. The published WSDL represents a virtualized view of the web service. Clients can retrieve the WSDL from API Gateway, generate SOAP requests, and send them to API Gateway, which routes them on to the web service. For more details, see *Publish the WSDL.
These options enable you to configure the underlying auto-generated Service Handler without having to navigate to it in the Policies tree. Review the information on each tab and click OK to close the wizard.
Note
If a web service is defined using multiple WSDLs, an error of “Cannot find the declaration of element” might occur during the schema validation of a SOAP message. The error is shown because of a duplication of the WSDLs types schematargetNamespace. To avoid this failure, change the types schema targetNamespace to be unique across the WSDLs.
Configure a security policy
The Secure Virtual Service dialog enables you to specify the policy that API Gateway enforces on the messages that it receives from the client. To specify a policy, perform the following steps:
- Select a policy from the Gateway Policy field. A description for the currently selected policy is displayed in the dialog. For details on all the available policies, see *WS-Policy reference.
- Select a message-level request policy from the Request Policy field. The available policies are as follows:
- Encrypt SOAP Body
- Sign SOAP Body
- Sign and Encrypt SOAP Body
- Select a message-level response policy from the Response Policy field. The available policies are the same as for Request Policy.
- Click OK.
Configure recipient security settings
If API Gateway is configured as a recipient for the client, the Configure Recipient Security Settings window is displayed. This window enables you to configure the filters used to implement the rules required by the WS-Policy settings you selected in the Secure Virtual Service window. The exact sequence of filters differs depending on the policies that you selected.
For example, if a policy with a SAML token is selected, the Validate SAML Authentication Assertion filter is displayed, whereas if a WS-Policy requiring a WS-Security UsernameToken is selected, the Validate WS-Security Username Token filter is displayed. The effort required to configure these filters is minimal because most of the fields are populated automatically from the WS-Policy assertions. For example, the layout, signing, encryption, and key wrapping algorithms, key referencing method, user name digest, and clear password are all automatically populated from the WS-Policy assertions. This means that you only need to configure a small number of settings, such as the signing key, encryption certificate, and timestamp validity period.
Configure initiator security settings
If API Gateway is configured as an initiator of the web service, the Configure Initiator Security Settings window is displayed. This window enables you to configure the filters used to implement the rules required by the WS-Policy settings specified in the imported WSDL file. The exact sequence of filters differs depending on the WS-Policy assertions contained in the WSDL.
For example, if an sp:SamlToken assertion is specified, the wizard contains a window for the Insert SAML Authentication Assertion filter. The effort required to configure these filters is minimal because most of the fields are populated automatically from the WS-Policy assertions in the WSDL.
In the case of the Sign Message filter, the decision to use asymmetric or symmetric signatures is based on whether the policy uses an asymmetric or symmetric binding. The layout rules are determined by the sp:Layout
assertion. The digest method, signature method, and key wrap algorithm (for symmetric signatures) are all populated automatically based on the contents of the sp:AlgorithmSuite assertion. The KeyInfo section of the XML Signature can be taken from various properties set in the WSDL. The parts of the message to be signed can be inferred from assertions such as sp:SignedParts, sp:SignedElements, and SignedSupportingTokens.
The same is true for the XML Encryption Settings filter where the encryption algorithms and key types can all be taken from the assertions in the WSDL. The ConfirmationMethod for SAML assertions can be inferred from the context of the SamlToken assertion. For example, an sp:SamlToken that appears as a child of the sp:SignedSupportingTokens
assertion uses a sender-vouches confirmation method, whereas if it appears as a child of an sp:EndorsingSupportingTokens assertion, the holder-of-key confirmation method can be assumed.
Configure recipient policy filters
The following sections describe the filters that can be created when API Gateway is configured as a recipient. You can configure these filters in the Configure Recipient Security Settings window. For simplicity, only filters that require manual input are shown, and only the fields that might require manual input are detailed in the tables.
Insert Timestamp
- Expires In
- You can specify a more appropriate lifetime for the assertion (instead of the default one hour) by configuring the various time period fields.
Signed Parts Outbound
- Signing Key
- If the policy uses an asymmetric binding, on the Asymmetric tab, click the Signing Key button, and select a key from the certificate store to sign the message parts with. Alternatively, if the policy specifies a symmetric binding, on the Symmetric tab, click the Signing Key button, and select a key to wrap the symmetric signing key with.
Find Recipient Certificate for Encryption
- Certificate Store
- Click the Select button to choose the recipient’s certificate from the certificate store. The public key contained in this certificate is used to encrypt the message parts so that only the recipient is able to decrypt them using the corresponding private key.
Validate SAML Authentication Assertion
- Drift Time
- You can specify a drift time value to allow for a time differential between the clock on the machine hosting API Gateway and the machine hosting the web service.
- Trusted Issuers
- On the Trusted Issuers tab, click Add to specify the Distinguished Name of a SAML authority whose certificate has been added to the certificate store, and click OK. Repeat this step to add more SAML authorities to the list of trusted issuers.
Configure SSL Certificate
- X.509 Certificate
- On the Network tab, click the X.509 Certificate button to create or import an SSL certificate.
- SSL Server Name Identifier (SNI)
- On the Network tab, click the Add button to configure a server name in the SSL Server Name Identifier (SNI) dialog. You can specify the server name in the Client requests server name field. Click the Server assumes identity button to import a certificate authority certificate into the certificate store.
- Mutual Authentication
- On the Mutual Authentication tab, select root certificate authorities trusted for mutual authentication.
Insert MTOM Content
- XPath Location
- When the
wsoma:OptimizedMimeSerializationWS-MTOM Policy assertion is specified in a recipient policy, you must configure an Insert MTOM Content filter. Configure an XPath expression that points to the base64-encoded element content to insert and create an MTOM type attachment for.
Configure initiator policy filters
The following sections describe the filters that can be created when API Gateway is configured as an initiator. You can configure these filters in the Configure Initiator Security Settings window. For simplicity, only filters that require manual input are shown, and only the fields that might require manual input are detailed in the tables.
Insert WS-Security Timestamp
- Expires In
- You can specify a more appropriate lifetime for the assertion (instead of the default one hour) by configuring the various time period fields.
Sign Message
- Signing Key
- If the policy uses an asymmetric binding, on the Asymmetric tab, click the Signing Key button, and select a key from the certificate store to sign the message parts with. Alternatively, if the policy specifies a symmetric binding, on the Symmetric tab, click the Signing Key button, and select a key to wrap the symmetric signing key with.
Insert WS-Security Username
- Username
- Enter the user name inserted into the WS-Security
UsernameTokenblock. By default, the name of the authenticated user is used, which is stored in theauthentication.subject.idmessage attribute. However, you can enter any value in this field. - Password
- If the policy requires a password, the password for the user entered above must be specified here. You can use the default authenticated user password by selecting the
authentication.subject.passwordmessage attribute. Alternatively, you can enter any suitable password. The decision to use a Clear or Digest password is taken from the corresponding policy assertions.
Insert SAML Authentication Assertion
- Expire In
- Specify a suitable lifetime for the SAML assertion by configuring the various time period fields.
- Drift Time
- You can specify a drift time value to allow for a time differential between the clock on the machine hosting API Gateway and the machine hosting the web service.
- Issuer Name
- Select the alias of the certificate from the certificate store to use to identify the issuer of the assertion. The alias name is used as the value of the
Issuerattribute of thesaml:Assertionelement. - Holder of Key: Signing Key
- In cases where the
sp:SamlTokenappears as a child ofEndorsingSupportingTokensor anInitiatorToken, theholder-of-keySAML confirmation method is inferred. In this case, if an asymmetric binding is used, on the Asymmetric tab, specify a key from the certificate store by clicking the Signing Key button. Alternatively, if a symmetric binding is used in the policy, on the Symmetric tab, specify a key to use to encrypt the symmetric key with by clicking the Signing Key button.
Find Recipient Certificate for Encryption filter
- Certificate Store
- Select this option, and click the Select button to choose the recipient’s certificate from the certificate store. The public key contained in this certificate is used to encrypt the message parts so that only the recipient is able to decrypt them using the corresponding private key.
Connect to URL
- Trusted Certificates
- To connect to an external web service over SSL, you need to trust that web service’s SSL certificate. You can do this on the Trusted Certificates tab of the Connect to URL filter. Assuming you have already imported this certificate into the trusted certificate store, simply select it from the list.
- Client SSL Authentication
- If the web service requires the client to present an SSL certificate to it during the SSL handshake, you must select that certificate from the list on the Client SSL Authentication tab.
Note
This certificate must have a private key associated with it that is also stored in the certificate store.Extract MTOM Content
- XPath Location
- When the
wsoma:OptimizedMimeSerializationWS-MTOM Policy assertion is specified in an initiator policy, you must configure an Extract MTOM Content filter. Configure an XPath expression that points to the base64-encoded element content to extract and create an MTOM type attachment for.
Edit the recipient or initiator WS-Policy
To edit a previously configured WS-Policy (for example, to change the signing key in the auto-generated policy), right-click the web service in the Policy Studio tree, and select WS-Policy > Edit Recipient WS-Policy or WS-Policy > Edit Initiator WS-Policy. You can also add or remove a recipient WS-Policy after import by selecting the WS-Policy > Add Recipient WS-Policy or WS-Policy > Remove Recipient WS-Policy options. These options are described as follows:
- Edit Recipient WS-Policy
- If you configured a recipient WS-Policy during WSDL import (using the Secure Virtual Service window), you can edit its filters using this option. If you did not configure a recipient WS-Policy during WSDL import, this option is disabled.
- Add Recipient WS-Policy
- If you did not configure a recipient WS-Policy during WSDL import (using the Secure Virtual Service window), this option enables you to add a recipient WS-Policy after import. The Secure Virtual Service window is displayed when you select this option followed by the Configure Recipient Security Settings window. This enables you to select and configure a WS-Policy to enforce between the client and API Gateway.
- Remove Recipient WS-Policy
- If you configured a recipient WS-Policy during WSDL import (using the Secure Virtual Service window), you can remove it using this option. If you did not configure a recipient WS-Policy during WSDL import, this option is disabled.
- Edit Initiator WS-Policy
- If the imported WSDL file included WS-Policy assertions, you can edit the filters used to implement the WS-Policy assertions in the WSDL using this option. However, if there was no WS-Policy in the imported WSDL file, you cannot use this option. You cannot add an initiator WS-Policy after WSDL import because that would break the contract between API Gateway and the back-end web service. If the contract for the web service changes (for example, a WS-Policy is applied to it at the back-end), you can reimport the WSDL.
Configure a recipient WCF WS-Policy
API Gateway provides four WS-Policies that are identical to those exposed by WCF (Windows Communication Foundation) web services. When one of these policies is exposed by a virtual service in API Gateway, the svcutil .NET web services utility can consume the WS-Policy and auto-generate clients that communicate securely with API Gateway.
The security settings for a WCF web service are configured in its web.config file, in which the security
element determines the WS-Policy applied to the service. For example, the following extract from a WCF web service web.config file shows the configuration:
<customBinding>
    <binding name="MyCustomBinding">
    <textMessageEncoding messageVersion="Soap11" />
    <security defaultAlgorithmSuite="Basic256" allowSerializedSigningTokenOnReply="true"
        authenticationMode="MutualCertificate" requireDerivedKeys="false" includeTimestamp="true"
        messageProtectionOrder="SignBeforeEncrypt" messageSecurityVersion="WSSecurity10..."
        requireSecurityContextCancellation="false">
    </security>
    </binding>
</customBinding>
In this example, the authenticationMode for a customBinding is set to MutualCertificate, which means that messages sent to and from the web service must be signed and encrypted with mutual certificates. The following example shows an example of the WCF wsHttpBinding configuration, which is less verbose:
<wsHttpBinding>
    <binding name="MyWsHttpBinding">
    <security mode="Message">
        <message clientCredentialType="Certificate" />
    </security>
    </binding>
</wsHttpBinding>
The following table shows how the WCF WS-policies provided with API Gateway correspond to a particular configuration of the security element in the WCF web service web.config file. As shown in the preceding examples, the configuration settings are slightly different, depending on the WCF binding (customBinding or wsHttpBinding). The following table shows the available settings:
| WS-Policy Name | WCF Binding | Authentication Mode | Security Mode | Client Credential Type |
|---|---|---|---|---|
| WCF MutualCertificate Service | customBinding |
MutualCertificate |
— | — |
| WCF UsernameForCertificate Service | customBinding |
UserNameForCertificate |
— | — |
| WCF UsernameOverTransport Service | customBinding |
UsernameForTransport |
— | — |
| WCF BrokeredX509Authentication Service | wsHttpBinding |
— | Message |
Certificate |
Note
If you intend to consume the WS-Policy exposed by API Gateway with a WCF client, you should use one of the WCF WS-Policies. All of these policies can be consumed seamlessly by the WCFsvcutil
utility to auto-generate secure clients. While the other WS-Policies exposed by API Gateway can be consumed by svcutil, you need to make additional configuration changes to the auto-generated WCF client to communicate securely with API Gateway. For more details on making any necessary configuration changes, see your WCF documentation.
Remove security tokens
When you import a WSDL file containing a WS-Policy into the web service repository, the Remove All Security Tokens filter is enabled in the Service Handler for the imported web service. To view the configured policy, double-click the Service Handler, and select the Message Interception Points > 2. User-defined Request Hooks tab.
The Remove All Security Tokens policy ensures that the following security contexts are kept separate:
- Recipient security context: This is between the client and API Gateway, and is determined by the WS-Policy selected in the Secure Virtual Service window.
- Initiator security context: This is between API Gateway and the back-end web service, and is determined by the WS-Policy contained in the imported WSDL file for the back-end web service.
The Remove All Security Tokens policy prevents tokens from one context passing over into the other context, which could breach the security contract governing that context. This ensures that each security context receives a clean SOAP message, on which it can then act to enforce the security requirements of the relevant WS-Policy. The following diagram shows both security contexts and the Remove All Security Tokens policy:

Recipient-side WS-Policy only
In this case, a recipient WS-Policy is configured in the Secure Virtual Service window to protect a virtual service exposed by API Gateway. The recipient WS-Policy defines the security contract between the client and API Gateway. Any security tokens sent by the client are intended for consumption by API Gateway. They are not intended for the back-end web service.
For example, the web service might not understand SAML, WS-Security, XML Signature, and so on, which might result in a serialization error if these tokens are propagated to it. In addition, it would add unnecessary overhead to the message to propagate security tokens to it. On the response side, the response that API Gateway returns to the client must adhere to the selected recipient WS-Policy. For example, if the web service has returned a SAML token (out of scope of any WS-Policy requirements), this must not be returned to the client because it would breach the recipient WS-Policy.
Initiator-side WS-Policy only
In this case, the WS-Policy is contained in the imported WSDL file. The WS-Policy defines the security contract between API Gateway and the back-end web service defined in the WSDL. On the request side, any security tokens sent by the client to API Gateway, which are out of scope of the initiator WS-Policy between API Gateway and web service, are removed before API Gateway starts enforcing the initiator WS-Policy on the request, and before it sends the request to the web service.
For example, if the client sends a wsu:Timestamp in the request message and the initiator policy stipulates that a wsu:Timestamp must be sent by API Gateway to the web service, two timestamps could be sent in the request, which is invalid. This means that the timestamp and any other security tokens sent by the client to API Gateway, which might contradict the rules in the initiator contract (between API Gateway and the web service) must be stripped out before API Gateway starts adding security tokens to the message. This ensures that the message adheres to the initiator WS-Policy.
Similarly, any security tokens returned by the web service are only present because the web service complies with the contract between the web service and API Gateway. Therefore, any tokens returned by the web service are only intended for use by API Gateway. They are not intended for consumption by the client. In other words, the security context is only between API Gateway and the web service. If the web service returns a UsernameToken, it is consumed by API Gateway.
If a token must be returned to the client, this is a user-enforced rule, which is out of scope of the WS-Policy configuration in the WSDL. If necessary, you can override the default behavior by removing the Remove All Security Tokens filter from the Service Handler to allow the UsernameToken to be propagated to the client.
Initiator-side and Recipient-side WS-Policy
This occurs when you import a WSDL file that includes a WS-Policy (initiator case), and you also select a WS-Policy in the Secure Virtual Service window (recipient case). This scenario includes both the recipient security context between the client and API Gateway, and the initiator security context between API Gateway and the web service.
It is vital that these security contexts are kept separate because if tokens from one context pass over into the other context, it is highly likely that the security contract for that context will be breached. For example, if the recipient contract between the client and API Gateway requires a UsernameToken, but the initiator contract between API Gateway and the web service requires a SAML token, the UsernameToken must not pass over into the initiator context and be sent to the web service.