Integrate with Oracle Access Manager 11gR2
12 minute read
When integrating with OAM:
- API Gateway is configured to authenticate a client against OAM using a user name and password.
- Upon successful authentication, API Gateway authorizes the user against OAM.
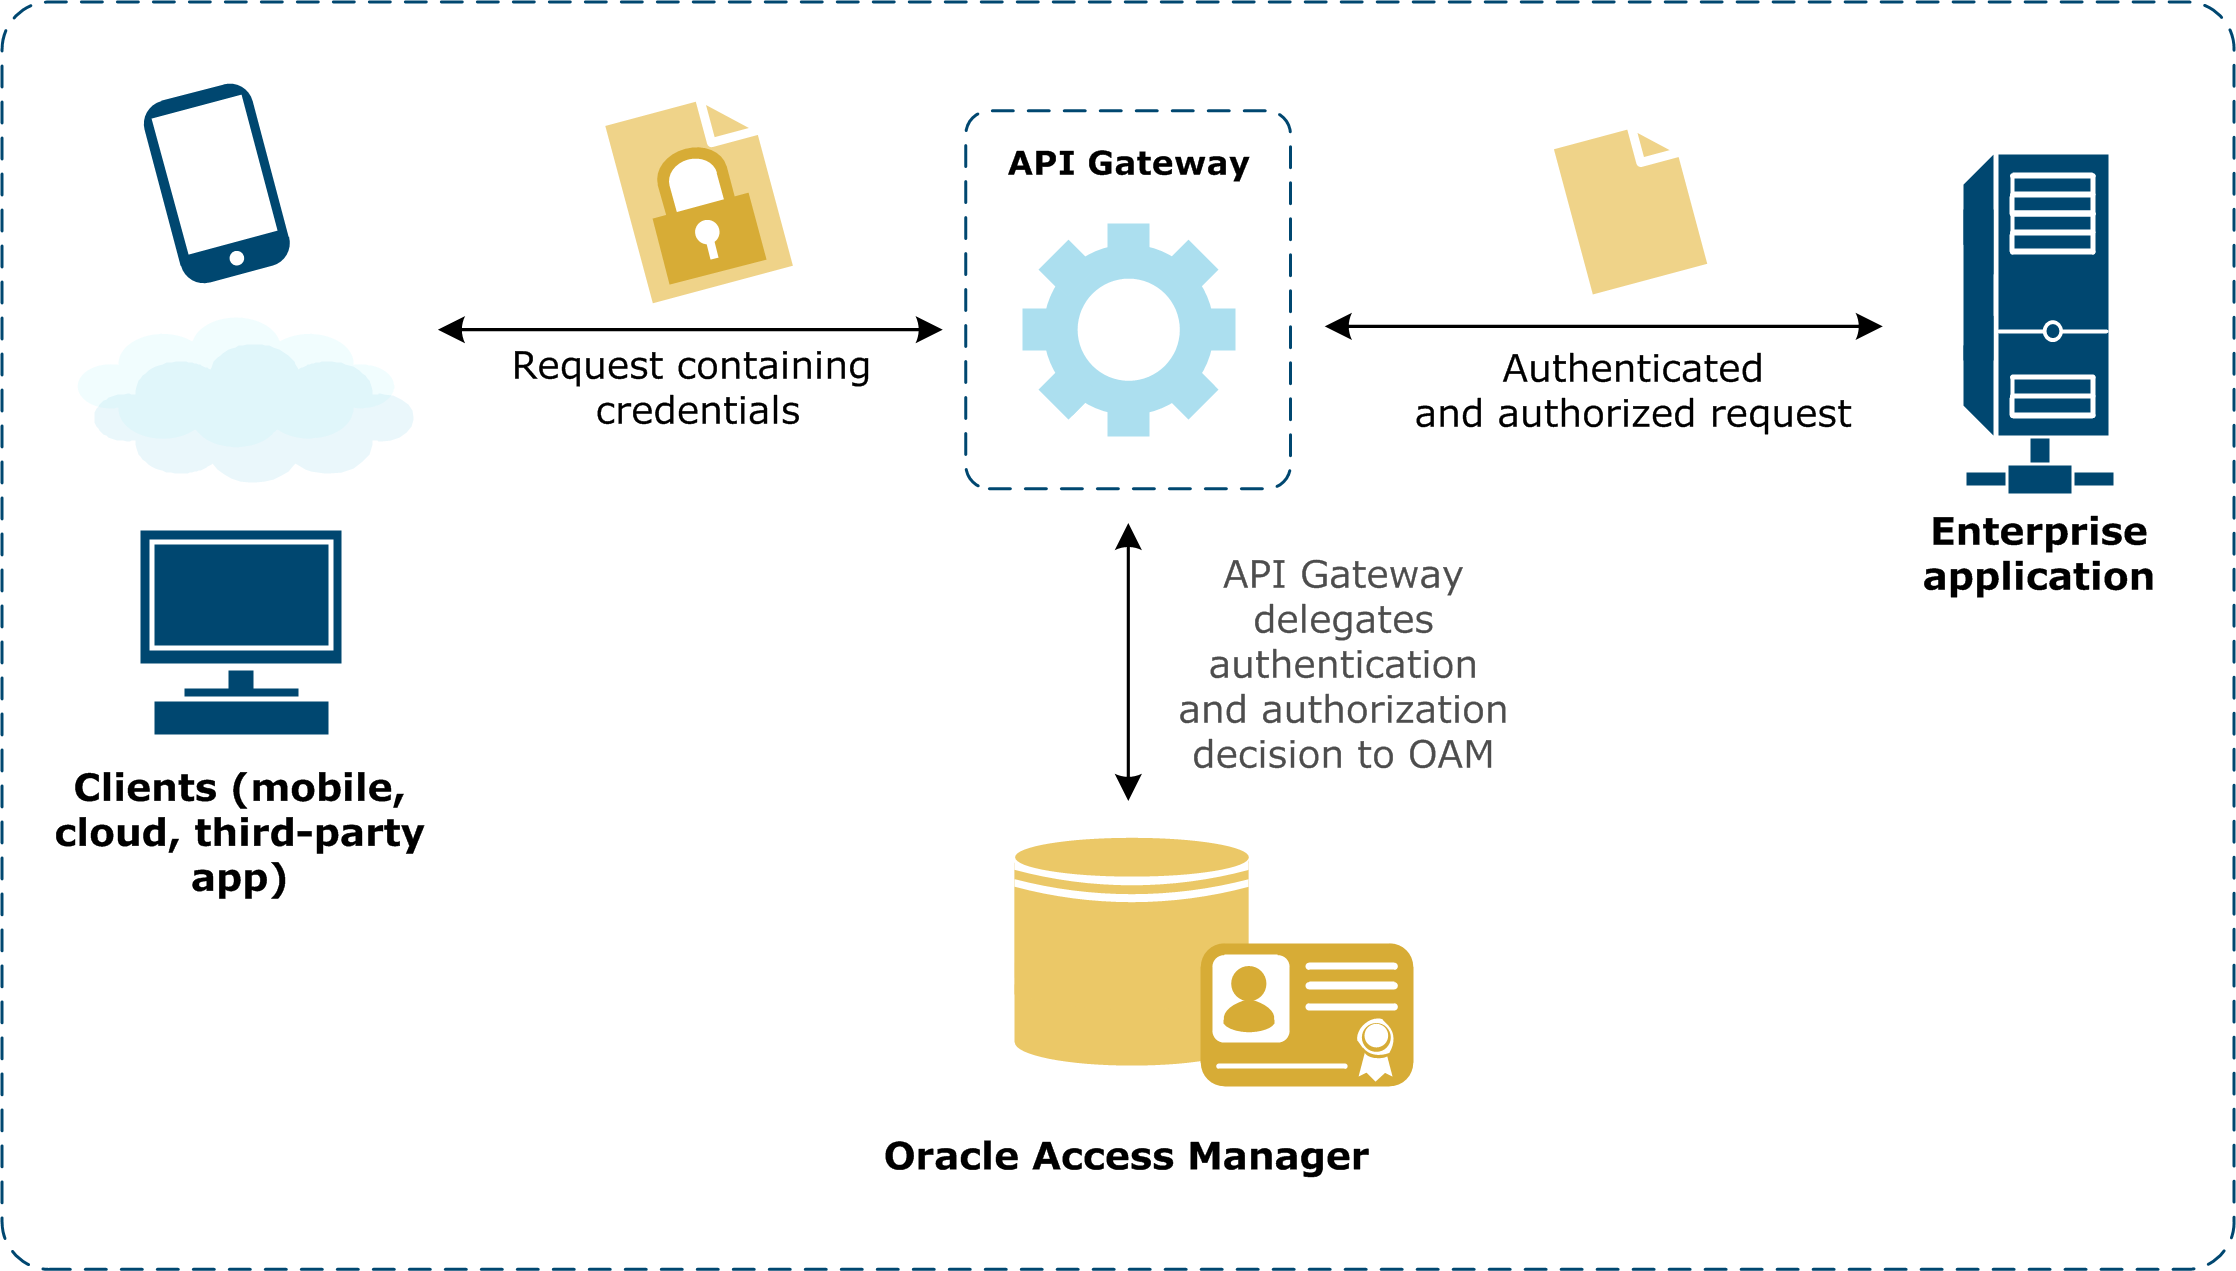
The following overview diagram shows the message flow through API Gateway, which authenticates and authorizes a user for a particular resource against OAM before routing the message on to the web service.
Prerequisites
API Gateway
You must have installed API Gateway and have received a valid license from Axway.
Access Server SDK
The Access Server SDK (ASDK) must be installed on the machine running API Gateway.
Oracle Access Manager
OAM 11gR2 must be installed and configured on the machine running API Gateway.
You should start it by using the following commands on UNIX-based systems (assuming a WebLogic domain of idm_domain, a server name of oam_server1, and a host name of oam_host).
Start WebLogic using the following command:
cd ~/middleware/user_projects/domains/idm_domain/bin
./startWebLogic.sh
You can then start managed WebLogic using the following:
cd ~/middleware/user_projects/domains/idm_domain/bin
./startManagedWebLogic.sh oam_server1 t3://oam_host:7001
Enter the user name of your administrator user when prompted:
Please enter your username :weblogic
Please enter your password :
OAM user
Create an OAM user called weblogic with the password weblogic in OAM to test the procedure. Refer to the OAM documentation for instructions on how to add a user.
cURL testing utility
To test the integration steps, the cURL testing utility is used to POST requests to API Gateway. This utility is available from cURL Downloads.
Alternatively, you can use any client capable of sending HTTP POST requests with HTTP basic authentication.
Configure Oracle Access Manager
This section describes how to create a 11g WebGate and configure an authentication policy for it using the OAM Administration Console. For more detailed instructions on OAM configuration, refer to the OAM documentation for your OAM version.
Configure an 11g WebGate with OAM 11gR2
Use the web-based OAM Administration Console to create the new WebGate. The web interface is available at the following URL, where OAM_HOST refers to the IP or host name of the machine on which OAM is running:
http://OAM_HOST:7001/oamconsole
Log in using your WebLogic credentials and complete the following steps:
Create the 11g WebGate
-
On the Welcome page, click the New OAM 11g Webgate link.
-
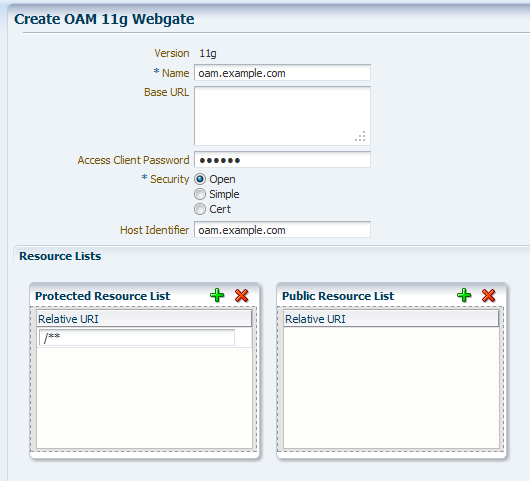
Complete the following fields on the Create OAM 11g Webgate page:
- Name: Enter a unique name for this OAM 11g WebGate, for example,
oam.example.com. - Access Client Password: Enter a suitable password for this WebGate.
- Host Identifier: Enter the host name of the machine on which your API Gateway and ASDK have been installed.
In the following screenshot, the host name (that is to say Host Identifier) is used as the Name of the new WebGate.
- Name: Enter a unique name for this OAM 11g WebGate, for example,
-
Click Apply when you have completed the configuration.
-
Write down the location of the generated artifacts given in the confirmation message:

-
The complete configuration for the new WebGate is now displayed. You must enter a non-null value in the Logout Target URL field, for example,
end_url. -
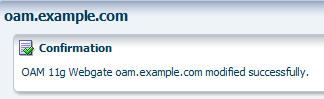
Click Apply one more time to save the new Logout Target URL. You should see another confirmation message acknowledging the modification:
Configure the authentication policy
Update the authentication policy for the new WebGate:
- Double-click the Application Domains node in the tree view under the Policy Configuration tab.
- Click Search in the Search area. You do not need to enter anything in the Search field.
- You will be able to see your newly created 11g WebGate in the list of application domains.
- Click the newly created
oam.example.comWebGate link in the table. - Open the Authentication Policies tab to display the list of policies.
- Click the
Protected Resource Policylink in the table. - Change the Authentication Scheme field from
LDAPSchemetoBasicScheme. - Click Apply.
You will see a confirmation message indicating that the update was successful.
Copy the WebGate artifacts to the API Gateway machine
Copy the auto-generated WebGate artifacts generated in Create the 11g WebGate1.
As notified in the confirmation message, the artifacts were generated in the following location after creating the 11g WebGate:
/app/u01/middleware/user_projects/domains/idm_domain/output/oam.example.com
A directory listing on this location shows that two files were generated when the 11g WebGate was created: the ObAccessClient.xml and cwallet.sso files.
[oracle@oam oam.example.com]$ ls
cwallet.sso  ObAccessClient.xml
Both files must be copied from the OAM machine to the machine on which you have installed the 11g ASDK and are running API Gateway. They must be copied to the ASDK_HOME/config directory together with the jps-config.xml file.
 ls -l /opt/oracle/AccessServerSDK11/config/
-rw-r--r--. 1 axway axway 3141 Feb 12 08:35 cwallet.sso
-rw-r--r--. 1 axway axway 1358 Feb 12 08:35 jps-config.xml
-rw-r--r--. 1 axway axway 3033 Feb 12 08:35 ObAccessClient.xml
Modify the API Gateway classpath
The API Gateway’s classpath must be extended to include the ASDK 11 jars.
-
To achieve this, create a
jvm.xmlfile at the following location:INSTALL_DIR/apigateway/conf/jvm.xml -
Edit this
jvm.xmlfile so that its contents are as follows. Make sure to set the value of theASDK_HOMEenvironment variable to the location where you installed ASDK 11.<ConfigurationFragment> <!-- OAM ASDK Settings --> <Environment name="ASDK_HOME" value="/opt/oracle/AccessServerSDK11" /> <ClassDir name="$ASDK_HOME" /> <VMArg name="-Doracle.security.jps.config=$ASDK_HOME/config/jps-config.xml"/> </ConfigurationFragment>
Configure API Gateway
This section describes how to configure API Gateway to work with Oracle Access Manager.
Start API Gateway
Refer to Install API Gateway guide for instructions on how to start API Gateway.
Example:
startinstance -n "APIGateway1" -g "Group1"
Configure API Gateway to authenticate and authorize against OAM
This section explains how to configure API Gateway to delegate authentication and authorization decisions to Oracle Access Manager.
The resulting policy created will appear as follows:
Configure the OAM authentication repository
To configure the OAM authentication repository, perform the following steps:
- In Policy Studio, expand the Environment Configuration > External Connections node in the tree.
- Expand the Authentication Repositories node and click Oracle Access Manager Repositories.
- Click the Add a New Repository link in the main window.
- Configure the following fields in the Authentication Repository window.
- Name: Name of the authentication repository. For example:
OAM 11g R2 Repo. - Resource Type:
http - Resource Name: Enter the resource and host name. For example,
//oam.example.com${http.request.uri}. Enter the exact same host name as you did for the Host Identifier field when creating the OAM 11g WebGate. The value is case-sensitive. - Operation:
${http.request.verb} - Client Location:
${http.request.clientaddr.getAddress().getHostAddress()} - Create SSO Token: Select the check box.
- Store SSO token in attribute named:
oracle.sso.token - Add SSO Token to user attributes: This option is checked by default in order to store the OAM token for consumption by downstream OAM filters, for example, the OAM Authorization filter.
- OAM ASDK Directory: Enter:
C:\Oracle\AccessServerSDK11\config - OAM ASDK Compatibility Mode: Select OAM 11g.
- Name: Name of the authentication repository. For example:
- Click OK to complete the configuration.
Create a new policy
Create a new policy in Policy Studio called, for example, OAM 11gR2 Authentication and Authorization. The OAM authentication and authorization filters will be added here.
Add the HTTP Basic Authentication filter
Create an HTTP Basic Authentication filter and configure it to authenticate users against the OAM authentication repository created in Configure the OAM authentication repository.
- Open the newly created
OAM 11gR2 Authentication and Authorizationpolicy. - Drag an HTTP Basic filter from the Authentication category in the palette and drop it onto the canvas and configure it as follows.
- Name: Name of the filter. For example:
HTTP Basic via OAM 11g R2 Repository. - Credential Format: Select User Name.
- Allow Client Challenge: Select the Allow client challenge check box.
- Repository Name: Select OAM 11gR2 Repo.
- Name: Name of the filter. For example:
- Click OK.
- Right-click the filter and select the Set as Start menu option.
Add the OAM Authorization filter
The next step is to add the OAM Authorization filter, which will authorize authenticated users against OAM. Complete the following steps to configure the OAM Authorization filter:
- From the Oracle Access Manager category in the palette of Policy Studio, drag the Authorization filter and drop it onto the HTTP Basic Authentication filter created in Add the HTTP Basic Authentication filter. By dropping a filter directly on to another filter, the new filter will be automatically connected to the first filter with a
successpath. - Configure the fields on the filter as follows.
- Name: Enter a suitable name, such as
Authorization via OAM 11gR2. - Attribute Containing SSO Token: Enter the name of the message attribute configured in the authentication repository earlier where the SSO token is stored, that is to say
oracle.sso.token. - Resource Type:
http - Resource Name: Enter the resource and host name. For example,
//oam.example.com${http.request.uri}. Enter the exact same host name as you did for the Host Identifier field when creating the OAM 11g WebGate. The value is case-sensitive. - Operation:
${http.request.verb} - OAM ASDK Directory: Enter:
C:\Oracle\AccessServerSDK11\config - OAM ASDK Compatibility Mode: Select OAM 11g.
- Name: Enter a suitable name, such as
- Click OK.
Add the Success Message filter
To display a success message to the user after successfully authorizing the user you can add a Set Message filter as follows.
- Drag a Set Message filter from the Conversion category in the palette and drop it onto the OAM Authorization filter created in Add the OAM Authorization filter.
- Configure the following fields on this filter:
- Name: Enter
Set Success Message. - Content-type:
text/plain - Message Body:
User '${authentication.subject.id}' was authenticated and authorized successfully!
- Name: Enter
- Click OK.
Add the Failure Message filter
If OAM fails to authenticate or authorize the user, an appropriate error message must be returned to the client. To display a failure message to the client after an unsuccessful authentication/authorization event you can add another Set Message filter as follows:
- Drag a Set Message filter from the Conversion category in the palette and drop it onto the OAM Authorization filter. Because this filter already has the “Set Success Message” filter connected on its success path, the new Set Message filter will be automatically added on its failure path.
- Configure the following fields on this filter.
- Name: Enter
Set Blocked Message. - Content-type:
text/plain - Message Body:
Access Denied!
- Name: Enter
- Click OK.
For completion, it would be useful to connect the Set Blocked Message filter to the HTTP Basic via OAM 11g R2 Repository filter along its failure path to get an appropriate failure message when authentication and authorization fail.
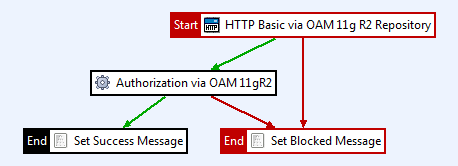
Click the Failure Path item at the top of the palette to select it. Then simply click the HTTP Basic via OAM 11g R2 Repository filter and then click the Set Blocked Message filter to connect the failure path. The final policy is now displayed as follows:
Add a relative path for the OAM authentication and authorization policy
In order for API Gateway to invoke the new policy for certain requests you must create a Relative Path and map it to the policy. All requests received on this path will be automatically forwarded to the policy for processing.
To add a Relative Path for this policy click Add Relative Path in the toolbar beneath the canvas.
Enter the path on which API Gateway will receive requests for this policy in the field provided in the Resolve Path to Policies dialog box:
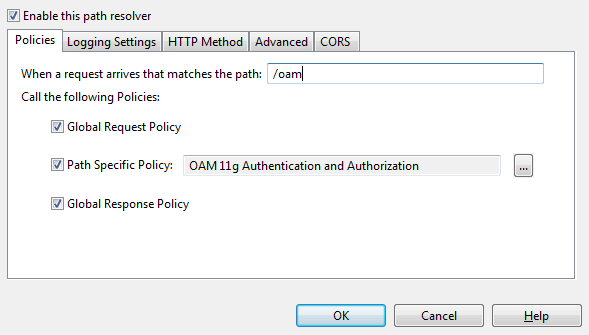
Enter a relative path of /oam in the field provided. You can see that this path is automatically mapped to the OAM 11g Authentication and Authorization policy created earlier in this section.
Deploy the policy
To push the configuration changes to the live API Gateway instance you must deploy the new policy. You can do this by pressing the F6 button.
Test the integration
Having completed the integration steps, you can now test the setup using the cURL testing utility. Assuming you are running API Gateway on a machine called apigateway on the default port of 8080, you can send a POST request to the newly created policy on API Gateway using HTTP basic authentication with the following command:
curl --user weblogic:weblogic --data "test=data" http://apiserver:8080/oam
User 'weblogic' was authenticated and authorized successfully!
You can see that the success message has been returned by API Gateway meaning that the weblogic user has been successfully authenticated and authorized by OAM to access the resource. A quick look at the API Gateway’s trace output shows that the weblogic user has been authenticated and authorized to access the //oam.example.com/oam resource.
DEBUG 11/Dec/2012:13:07:44.090 [0794] run circuit "OAM 11g Authentication and Authorization"...
DEBUG 11/Dec/2012:13:07:44.094 [0794] run filter [HTTP Basic via OAM 11g R2 Repository] {
DEBUG 11/Dec/2012:13:07:44.094 [0794]   Check user name via Oracle Access Manager
DEBUG 11/Dec/2012:13:07:44.338 [0794]   Creating ResourceRequest with resType: 'http', resName: '//oam.example.com/oam, operation: 'POST'.
DEBUG 11/Dec/2012:13:07:44.339 [0794]   Successfully created ResourceRequest
DEBUG 11/Dec/2012:13:07:44.543 [0794]   Login succeeded to OAM for user weblogic
DEBUG 11/Dec/2012:13:07:44.544 [0794] } = 1, filter [HTTP Basic via OAM 11g R2 Repository]
DEBUG 11/Dec/2012:13:07:44.544 [0794] Filter [HTTP Basic via OAM 11g R2 Repository] completes in 450 milliseconds.
DEBUG 11/Dec/2012:13:07:44.545 [0794] run filter [Authorization via OAM 11gR2] {
DEBUG 11/Dec/2012:13:07:44.545 [0794]   Creating ResourceRequest with resType: 'http', resName: '//oam.example.com/oam, operation: 'POST'.
DEBUG 11/Dec/2012:13:07:44.545 [0794]   Successfully created ResourceRequest
DEBUG 11/Dec/2012:13:07:44.545 [0794]   Authz for resource: oracle.security.am.asdk.ResourceRequest@33aa7b
DEBUG 11/Dec/2012:13:07:44.638 [0794]   User 'uid=weblogic,ou=people,ou=myrealm,dc=idm_domain' is authorized for resource: //oam.example.com/oam
DEBUG 11/Dec/2012:13:07:44.638 [0794] } = 1, filter [Authorization via OAM 11g R2]
DEBUG 11/Dec/2012:13:07:44.639 [0794] Filter [Authorization via OAM 11gR2] completes in 94 milliseconds.
DEBUG 11/Dec/2012:13:07:44.639 [0794] run filter [Set Success Message] {
DEBUG 11/Dec/2012:13:07:44.639 [0794]   The content type of the converted message is text/plain
DEBUG 11/Dec/2012:13:07:44.640 [0794]   handle type text/plain with factory class com.vordel.mime.Body$1
DEBUG 11/Dec/2012:13:07:44.640 [0794]   Added converted message is added to the whiteboard
DEBUG 11/Dec/2012:13:07:44.640 [0794] } = 1, filter [Set Success Message]
DEBUG 11/Dec/2012:13:07:44.640 [0794] Filter [Set Success Message] completes in 1 milliseconds.
DEBUG 11/Dec/2012:13:07:44.641 [0794] ..."OAM 11g Authentication and Authorization" complete.
Now, check what happens when authenticating with a user that has not been configured in OAM:
curl --user admin:changeme --data "test=data" http://apiserver:8080/oam
Access Denied!
If you look at the API Gateway’s trace output again, you can see that the filter has blocked the authorization request:
DEBUG   11/Dec/2012:14:35:42.331 [0ad4] run circuit "OAM 11g Authentication and Authorization"...
DEBUG   11/Dec/2012:14:35:42.331 [0ad4] run filter [HTTP Basic via OAM 11g R2 Repository] {
DEBUG   11/Dec/2012:14:35:42.331 [0ad4] Check user name via Oracle Access Manager
DEBUG   11/Dec/2012:14:35:42.335 [0ad4] Creating ResourceRequest with resType: 'http',
resName: '//Tyson3-pc.vordel.com/oam, operation: 'POST'.
DEBUG   11/Dec/2012:14:35:42.336 [0ad4] Successfully created ResourceRequest
ERROR   11/Dec/2012:14:35:42.486 [0ad4] Login failed to Oracle Access Manager for user admin
ERROR   11/Dec/2012:14:35:42.487 [0ad4] java exception:
com.vordel.circuit.authn.VordelAuthNException: Login failed
...

DEBUG   11/Dec/2012:14:35:42.533 [0ad4] } = 0, filter [HTTP Basic via OAM 11g R2 Repository]
DEBUG   11/Dec/2012:14:35:42.534 [0ad4] Filter [HTTP Basic via OAM 11g R2 Repository] completes in 203 milliseconds.
ERROR   11/Dec/2012:14:35:42.534 [0ad4] The message [Id-71222fbb50c744be03d40000] logged Failure
at 12.11.2012 14:35:42,534 with log description: HTTP basic authentication failed
DEBUG   11/Dec/2012:14:35:42.535 [0ad4] run filter [Set Blocked Message] {
DEBUG   11/Dec/2012:14:35:42.535 [0ad4] The content type of the converted message is text/plain
DEBUG   11/Dec/2012:14:35:42.535 [0ad4] handle type text/plain with factoryclass com.vordel.mime.Body$1
DEBUG   11/Dec/2012:14:35:42.536 [0ad4] Added converted message is added to the whiteboard
DEBUG   11/Dec/2012:14:35:42.536 [0ad4] } = 1, filter [Set Blocked Message]
DEBUG   11/Dec/2012:14:35:42.536 [0ad4] Filter [Set Blocked Message] completes in 1 milliseconds.
DEBUG   11/Dec/2012:14:35:42.536 [0ad4] ..."OAM 11g Authentication and Authorization" complete.