Content filtering filters
41 minute read
Query string validation filter
The API Gateway can check the request query string
to ensure that only properly configured name and value pairs appear. Regular expressions
are used to test the attribute values. This enables you to make decisions on what to do with the message (for example, if the query sting value is X, route to service X).
You can configure the following sections on the Validate Query String window:
- Enter Regular Expression:
Query string values can be checked using regular expressions. You can select regular expressions from the global library (White list) or enter them manually. For example, if you know that a query string must have a value of
ABCD, a regular expression of^ABCD$is an exact match test. - Enter Threatening Content Regular Expression: You can select threatening content regular expressions from the global library (Black list) or to run against all query string names and values. These regular expressions identify common attack signatures (for example, SQL injection attacks).
You can configure the global White list and Black list libraries of regular expressions under the Environment Configuration > Libraries node in the Policy Studio tree.
This filter uses the regular expression syntax specified by java.util.regex.Pattern. For more details, see Class Pattern.
The request query string is the portion of the URL that comes after the ?
character, and contains the request parameters. It is typically used for HTTP GET
requests in which form data is submitted as name-value pairs on the URL. This contrasts with the HTTP POST
method where the data is submitted in the body of the request. The following example shows a request URL that contains a query string:
http://hostname.com/services/getEmployee?first=john&last=smith
In this example, the query string is first=john&last=smith. Query strings consist of attribute name-value pairs, and each name-value pair is separated by the &
character.
The Query String Validation
filter can also operate on the form parameters submitted in an HTTP Form POST. Instead of encoding the request parameters in the query string, the client uses the application/x-www-form-urlencoded
content-type, and submits the parameters in the HTTP POST
body, for example:
POST /services/getEmployee HTTP/1.1
Host: localhost:8095
Content-Length: 21
SOAPAction: HelloService
Content-Type: application/x-www-form-urlencoded
first=john&last=smith
If the API Gateway receives an HTTP request body such as this, the Query String Validation filter can validate the form parameters.
Configure query string regular expressions
The Enter Regular Expression table displays the list of configured query string names together with the white list of regular expressions that restrict their values. For this filter to run successfully, all required attributes must be present in the request, and all must have the correct value.
The Name column shows the name of the query string attribute. The Regular Expression column shows the name of the regular expression that the API Gateway uses to restrict the value of the named query string attribute. A number of common regular expressions are available from the global White list library.
If the Allow unspecified names check box is selected, additional unnamed query string attributes are not filtered by the API Gateway. For example, this is useful if you are interested in filtering the content of only a small number of query string attributes but the request may contain many attributes. In such cases, you only need to filter those few attributes, and by selecting this check box, the API Gateway ignores all other query string attributes.
You can configure regular expressions by selecting the Add, Edit, and Delete buttons. The Configure Regular Expression dialog enables you to add or edit regular expressions to restrict the values request query string attributes. To configure a regular expression, perform the following steps:
-
Enter the name of the query string attribute in the Name field.
-
Select whether this request parameter is Optional or Required using the appropriate radio button. If it is Required, the parameter name must be present in the request. If the parameter is not present, the filter fails. If it is Optional, the attribute does not need to be present for the filter to pass.
-
You can enter the regular expression to restrict the value of the query string attribute manually or select it from the global White list library of regular expressions in the Expression Name drop-down list. A number of common regular expressions are provided (for example, alphanumeric values, dates, and email addresses).
You can use selectors representing the values of message attributes to compare the value of the query string attribute with the value contained in a message attribute. Enter the
$character in the Regular Expression field to view a list of available attributes. At runtime, the selector is expanded to the corresponding attribute value, and compared to the query string attribute value that you want to check. -
You can add a regular expression to the library by selecting the Add/Edit button. Enter a Name for the expression followed by the Regular Expression.
The Advanced
section enables you to extract a portion of the query string attribute value that is run against the regular expression. The extracted substring can also be Base64 decoded if necessary. The following is an example of a URL containing a query string. The value of the password
attribute is Base64 encoded, and must be extracted from the query string and decoded before it is run against the regular expression.
http://axway.com/services?username=user&password=dXNlcg0K&dept=eng
You can extract the encoded value of the password=
attribute value by specifying the string that occurs directly before the substring you want to extract, together with the string that occurs directly after the substring. Enter password=
in the Start substring
field, and &
in the End substring
field.
You must select the start and end substrings to ensure that the exact substring is extracted. For example, in this example, password=
(including the equals sign) should be entered in the Start substring
field, and not password
(without the equals sign).
By specifying the correct substrings, you are left with the Base64-encoded attribute value (dXNlcg0K). However, you still need to Base64 decode it before you can run a regular expression on it. Make sure to select the Base64 decode
check box. The Base64-decoded password value is user. This is the value that you need to run the regular expression against.
If both Start substring and End substring fields are blank, the regular expression is run against the entire attribute value. Furthermore, if both fields are blank and the Base64 decode check box is selected, the entire attribute value is Base64 encoded before the regular expression is run against it.
Configure query string threatening content regular expressions
The regular expressions entered in this section guard against the possibility of a query string attribute containing malicious content. The Enter Threatening Content Regular Expression table lists the Black list of regular expressions to run to ensure that the header values do not contain threatening content.
For example, to guard against an SQL DELETE
attack, you can write a regular expression to identify SQL syntax and add it to this list. The Threatening Content Regular Expressions
are listed in a table. All
of these expressions are run against all
attribute values in the query string. If the expression matches any
of the values, the filter fails.
If any regular expressions are configured in Configure query string regular expressions, these expressions are run before the threatening content regular expressions. For example, if you have already configured a regular expression to extract the Base64-decoded attribute value, the threatening content regular expression is run against this value instead of the attribute value stored in the message.
You can add threatening content regular expressions using the Add button. You can edit or remove existing expressions by selecting them in the drop-down list and clicking the Edit or Delete button.
You can enter the regular expressions manually or select them from the global Black list
library of threatening content regular expressions. This library is prepopulated with regular expressions that guard against common attack signatures. These include a expressions to guard against common SQL injection style attacks (for example, SQL INSERT, SQL DELETE, and so on), buffer overflow attacks (content longer than 1024 characters), and the presence of control characters in attribute values (ASCII control character).
Enter or select an appropriate regular expression to restrict the value of the specified query string. You can add a regular expression to the library by selecting the Add/Edit button. Enter a Name for the expression followed by the Regular Expression.
REST request validation filter
The Validate REST Request filter enables you to validate the following aspects of a REST request:
- The HTTP method used in the request
- Each of the path parameters against a set of restrictive conditions called a request parameter restriction
- Each of the query string parameters against a request parameter restriction
For example, a request parameter restriction enables you to specify the expected data type of a named parameter, a regular expression for the parameter value, the minimum and maximum length of a string parameter, the minimum and maximum value of a numeric parameter, and so on.
This filter is found in the Content Filtering category in Policy Studio.
Configure REST request general settings
Complete the following general settings:
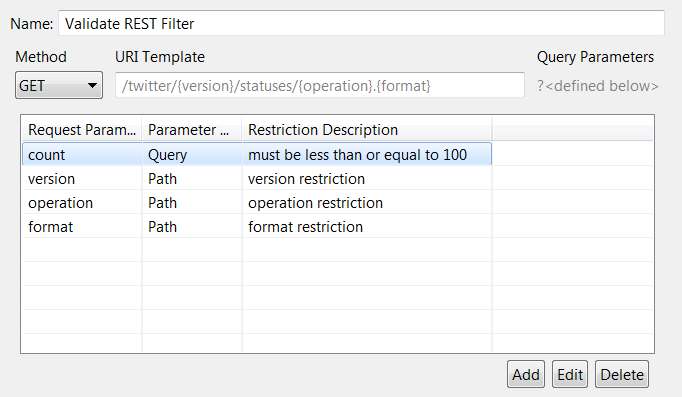
Name: Enter an appropriate name for the filter to display in a policy.
Method:
Enter or select the HTTP method of the incoming message (for example, POST, GET, DELETE, and so on). The HTTP method of the incoming request must match the method specified here.
URI Template:
Enter the URI template of the inbound path. You can include parameters in the path (for example, /twitter/{version}/statuses/{operation}.{format}). For more information, see URI path templates. Any path parameters are automatically added to the table of parameter restrictions below. The path of the incoming request must match the path specified here, and the path parameters must meet the restrictions defined in the parameter restrictions table.
Query Parameters: You can define query string parameters and restrictions in the parameter restrictions table below. The query string parameters must meet the restrictions defined in the parameter restrictions table. For more information, see Add REST request parameter restrictions.
The following figure shows the parameter restrictions table for the path /twitter/{version}/statuses/{operation}.{format}
and the query string parameter count:
Fail if unspecified query string parameters found:
Select this option to have this filter fail if a request parameter is found on the incoming query string that has not been specified in the parameter restrictions table. This option is selected by default. You can use this option to guard against processing a query string containing a potentially malicious request parameter (for example, /uri?number=2&badParam=System.exit(1);).
Extract valid parameters into individual message attributes: Select this option to store valid parameters in message attributes. This option is not selected by default.
On failure save invalid parameter name as a message attribute: Select this option to save the invalid parameter name as a message attribute if the filter fails. This option is not selected by default.
Apply path matching against decoded url:
If this option is selected, API Gateway decodes a URL in the REST request and matches the decoded URL against a path parameter using the message attribute http.request.path. This is the default behavior.
If the path parameter contains URL encoded characters, the decoded URL that API Gateway uses (for example, http://localhost:8080/myapi/myoperation/first/test) does not match the path parameter with URL encoding (http://localhost:8080/myapi/myoperation/first%2Ftest). To achieve the match, deselect this option. Instead of using the decoded URL, API Gateway then uses the message attribute http.request.rawURI.path to match the encoded URL against the path parameter.
Add REST request parameter restrictions
Click the Add button to configure restrictions on the values of query string parameters. Click the Edit button to configure restrictions on the values of path parameters that have been automatically added to the table. You can configure the following settings in the REST Request Parameter Restriction dialog:
Request Parameter Name:
Enter the name of the parameter to validate (for example, customer_name). This field is prefilled for path parameters. This is displayed in the table of parameter restrictions.
Description:
Enter a description of the restriction (for example, Name parameter must be a string no longer than 10 characters).This field is prefilled for path parameters. This is displayed in the table of parameter restrictions.
Data Type:
Enter or select the data type of the parameter (for example, string or integer). The default type is string.
Fail if request parameter not found: Select this option if the specified request parameter must be present in the request. The filter fails if the parameter is not found. This option is not selected by default for query string parameters, but is selected by default for path parameters.
Complete the following fields on the Request Parameter Restrictions tab:
-
Min Length: Specifies the minimum number of characters or list items allowed (for example,
0). The default value of-1means that this restriction is ignored. -
Max Length: Specifies the exact number of characters or list items allowed (for example,
10). The default value of-1means that this restriction is ignored. -
Regular Expression: Specifies the exact sequence of characters that are permitted using a regular expression (for example,
[a-zA-Z\s]*).Do not enter the
^character at the beginning of the expression and the$character at the end of the expression. This filter uses the XML Schema Pattern Facet regular expression language, which implicitly anchors all regular expressions at the head and tail. -
Enumeration of Allowed Values: Specifies a list of permitted values. Click Add to enter an item in the list, and Click OK. Repeat as necessary to add multiple values.
Complete the following fields on the Advanced Restrictions tab:
- Greater than: Specifies that the value entered in the Minimum Value field represents an exclusive lower bound (the value must be greater than this).
- Greater than or Equal to: Specifies that the value entered in the Minimum Value field represents an inclusive lower bound (the value must be greater than or equal to this).
- Minimum Value: Specifies the lower bounds for numeric values (for example, the value must be greater than 20).
- Less than: Specifies that the value entered in the Maximum Value field represents an exclusive lower bound (the value must be less than this).
- Less than or Equal to: Specifies that the value entered in the Maximum Value field represents an inclusive lower bound (the value must be less than or equal to this).
- Maximum Value: Specifies the upper bounds for numeric values (for example, the value must be less than or equal to 30).
- Max Total Digits for Number: Specifies the maximum number of digits allowed for a numeric data type. The default value of
-1means that this restriction is ignored. - Max Digits in Fraction Part of Number: Specifies the exact number of digits allowed in the fraction part of a numeric type. For example, the number 1.23 has two fraction digits (two numbers after the decimal point). The default value of
-1means that this restriction is ignored. - Whitespace: Specifies how white space is handled (for example, line feeds, tabs, spaces, and carriage returns). You can select one of the following values:
Preservemeans the XML processor preserves (does not remove) any white space characters.Replacemeans the XML processor replaces any white space characters (line feeds, tabs, and carriage returns) with spaces.Removemeans the XML processor removes any white space characters (line feeds, tabs, spaces, carriage returns are replaced with spaces, leading and trailing spaces are removed, and multiple spaces are reduced to a single space).
URI path templates
Paths are specified using a formatted Jersey @Path annotation string. The @Path annotation’s value is a relative URI path (for example, /twitter). The Jersey @Path annotation enables you to parametrize the path specified in the incoming request, by embedding variables in the URIs.
URI path templates are URIs with variables embedded within the URI syntax. These variables are substituted at runtime in order for a resource to respond to a request based on the substituted URI. Variables are denoted by curly braces (for example, /twitter/{version}).
The following is an example URI template:
/twitter/{version}/statuses/{operation}.{format}
It contains the variables version, operation, and format. At runtime, this URI template might resolve to:
/twitter/1.1/statuses/retweets_of_me.json
For more information on Jersey @Path annotations, go to https://jersey.java.net/.
HTTP header validation filter
The API Gateway can check HTTP header values for threatening content. This ensures that only properly configured name-value pairs appear in the HTTP request headers. Regular expressions
are used to test HTTP header values. This enables you to make decisions on what to do with the message (for example, if the HTTP header value is X, route to service X).
You can configure the following sections on the Validate HTTP Headers window:
- Enter Regular Expression:
HTTP header values can be checked using regular expressions. You can select regular expressions from the global library (White list) or enter them manually. For example, if you know that an HTTP header must have a value of
ABCD, a regular expression of^ABCD$is an exact match test. - Enter Threatening Content Regular Expression: You can select threatening content regular expressions from the global library (Black list) to run against all HTTP headers in the message. These regular expressions identify common attack signatures (for example, SQL injection attacks).
You can configure the global White list and Black list libraries of regular expressions under the Environment Configuration > Libraries node in the Policy Studio tree.
This filter uses the regular expression syntax specified by java.util.regex.Pattern. For more details, go to http://docs.oracle.com/javase/7/docs/api/java/util/regex/Pattern.html.
Configure HTTP header regular expressions
The Enter Regular Expression table displays the list of configured HTTP header names together with the White list of regular expressions that restrict their values. For this filter to run successfully, all required headers must be present in the request, and all must have values matching the configured regular expressions.
The Name column shows the name of the HTTP header. The Regular Expression column shows the name of the regular expression that the API Gateway uses to restrict the value of the named HTTP header. A number of common regular expressions are available from the global White list library.
You can configure regular expressions by selecting the Add, Edit, and Delete buttons. The Configure Regular Expression dialog enables you to add or edit regular expressions to restrict the values of HTTP headers. To configure a regular expression, perform the following steps:
-
Enter the name of the HTTP header in the Name field.
-
Select whether this header is Optional or Required using the appropriate radio button. If it is Required , the header must be present in the request. If the header is not present, the filter fails. If it is Optional, the header does not need to be present for the filter to pass.
-
You can enter the regular expression to restrict the value of the HTTP header manually or select it from the global White list library of regular expressions in the Expression Name drop-down list. A number of common regular expressions are provided (for example, alphanumeric values, dates, and email addresses).
You can use selectors representing the values of message attributes to compare the value of an HTTP header with the value contained in a message attribute. Enter the
$character in the Regular Expression field to view a list of available attributes. At runtime, the selector is expanded to the corresponding attribute value, and compared to the HTTP header value that you want to check. -
You can add a regular expression to the library by selecting the Add/Edit button. Enter a Name for the expression followed by the Regular Expression.
The Advanced
section enables you to extract a portion of the header value which is run against the regular expression. The extracted substring can be Base64 decoded if necessary. This section is specifically aimed towards HTTP Basic authentication headers, which consist of the Basic prefix (with a trailing space), followed by the Base64-encoded user name and password. The following is an example of the HTTP Basic authentication header:
Authorization:Basic dXNlcjp1c2Vy
The Base64-encoded portion of the header value is what you are interested in running the regular expression against. You can extract this by specifying the string that occurs directly before the substring you want to extract, together with the string that occurs directly after the substring.
To extract the Base64-encoded section of the Authorization
header above, enter Basic (with a trailing space) in the Start substring
field, and leave the End substring
field blank to extract the entire remainder of the header value.
You must select the start and end substrings to ensure that the exact substring is extracted. For example, in the HTTP Basic example above, you should enter Basic (with a trailing space) in the Start substring
field, and not Basic (with no trailing space).
By specifying the correct substrings, you are left with the Base64-encoded header value (dXNlcjp1c2Vy). However, you still need to Base64 decode it before you can run a regular expression on it. Make sure to select the Base64 decode
check box. The Base64-decoded header value is user:user, which conforms to the standard format of the Authorization
HTTP header. This is the value that you need to run the regular expression against.
The following example shows an example of an HTTP Digest authentication header:
Authorization: Digest username="user", realm="axway.com", qop="auth",
algorithm="MD5", uri="/editor", nonce="Id-00000109924ff10b-0000000000000091",
nc="1", cnonce="ae122a8b549af2f0915de868abff55bacd7757ca",
response="29224d8f870a62ce4acc48033c9f6863"
You can extract single values from the header value. For example, to extract the realm
field, enter realm="
(including the "
character), in the Start substring
field and "
in the End substring
field. This leaves you with axway.com
to run the regular expression against. In this case, there is no need to Base64 decode the extracted substring.
If both Start substring and End substring fields are blank, the regular expression is run against the entire header value. Furthermore, if both fields are blank and the Base64 decode check box is selected, the entire header value is Base64 encoded before the regular expression is run against it.
While the above examples deal specifically with the HTTP authentication headers, the interface is generic enough to enable you to extract a substring from other header values.
Configure HTTP header threatening content regular expressions
The regular expressions entered in this section guard against the possibility of an HTTP header containing malicious content. The Enter Threatening Content Regular Expression table lists the Black list of regular expressions to run to ensure that the header values do not contain threatening content.
For example, to guard against an SQL DELETE
attack, you can write a regular expression to identify SQL syntax and add it to this list. The Threatening Content Regular Expressions
are listed in a table. All
of these expressions are run against all
HTTP header values in an incoming request. If the expression matches any
of the values, the filter fails.
If any regular expressions are configured in Configure HTTP header regular expressions, these expressions are run before the threatening content regular expressions. For example, if you have already configured a regular expression to extract the Base64-decoded attribute value, the threatening content regular expression is run against this value instead of the attribute value stored in the message.
You can add threatening content regular expressions using the Add button. You can edit or remove existing expressions by selecting them in the drop-down list, and clicking the Edit or Delete button.
You can enter the regular expressions manually or select them from the global Black list
library of threatening content regular expressions. This library is prepopulated with a number of regular expressions that scan for common attack signatures. These include expressions to guard against common SQL injection-style attacks (for example, SQL INSERT, SQL DELETE, and so on), buffer overflow attacks (content longer than 1024 characters), and the presence of control characters in attribute values (ASCII control characters).
Enter or select an appropriate regular expression to restrict the value of the specified HTTP header. You can add a regular expression to the library by selecting the Add/Edit button. Enter a Name for the expression followed by the Regular Expression.
JSON schema validation filter
The API Gateway can check that JavaScript Object Notation (JSON) messages conform to the format expected by a web service by validating requests against a specified JSON schema. A JSON schema precisely defines the items that constitute an instance of an incoming JSON message. It also specifies their data types to ensure that only appropriate data is allowed through to the web service.
For example, the following simple JSON schema requires that all requests sent to a particular web service use this format:
{
  "description":"A geographical coordinate",
  "type":"object",
  "properties":{
    "latitude":{"type":"number"},
    "longitude":{"type":"number"}
  }
}
If a JSON Schema Validation filter is configured with this JSON schema, and the API Gateway receives an incorrectly formed message, the API Gateway rejects that message.
For example, the following message would pass because it specifies the coordinates correctly as numbers:
{
  "latitude":55.22,
  "longitude":117.22
}
However, the following message would fail because it specifies the coordinates incorrectly as strings:
{
  "latitude":"55.22",
  "longitude":"117.22"
}
You can find the JSON Schema Validation filter in the Content Filtering category of filters in the Policy Studio. Drag and drop the filter on to the policy where you want to perform JSON schema validation.
API Gateway supports draft version 3 and draft version 4 of the JSON Schema specification. For more details on JSON schemas, see http://www.json-schema.org.
Configure the following settings:
Name: Enter an appropriate name for this filter to display in a policy.
Select which JSON schema to validate messages with: Select one of the following options:
- Use JSON schema file: Click the button on the right, and select a JSON schema to validate incoming messages from the tree in the dialog. To add a schema, right-click the JSON Schemas
node, and select Add Schema
to load the schema from a
.jsonfile. Alternatively, you can configure schemas under the Resources > JSON Schemas node in the Policy Studio tree. By default, the API Gateway provides the example JSON schemas available from http://www.json-schema.org. - Select the Use v4 draft validator to validate against draft version 4 of the JSON Schema specification, or select Use v3 draft validator to validate against draft version 3 of the JSON Schema specification. The default is v4.
- Use this class: Enter the Java class name used to specify the JSON schema (for example,
com.vordel.samples.GeoLocationTest), and enter the name of message attribute to store the created object (for example,my.geo.location).This option enables you to take incoming JSON message data and deserialize it into a Java object.
Example using a Java class
For example, to use a Java class for the geographical schema used in the previous section, perform the following steps:
-
Create the annotated Java class as follows:
package com.vordel.samples; import java.lang.String; import javax.xml.bind.annotation.XmlAttribute; import javax.xml.bind.annotation.XmlRootElement; @XmlRootElement public class GeoLocationTest { public GeoLocationTest() { } public int latitude; public int longitude; } -
Place this class in a JAR file, and put it in the API Gateway
ext/libdirectory. -
In the JSON Schema Validation filter window, enter
com.vordel.samples.GeoLocationTestin the Use this class field. -
Enter
my.geo.locationin the Store created object in message attribute field.
At runtime when the JSON message arrives, the API Gateway takes the JSON data and tries to instantiate a new GeoLocationTest
object. If this succeeds, the JSON Schema Validation
filter passes. However, if the object cannot be instantiated, the filter fails because the incoming data does not conform to the JSON schema specified by the annotated class.
Generate a JSON schema using Jython
The API Gateway also provides a Jython script to enable you to generate a JSON schema based on a specified Java annotated class. This script is available in the following directory of your API Gateway installation:
INSTALL_DIR/apigateway/samples/scripts/json/schemagenerator.py
Given an annotated Java .class
file, you can generate a schema from this and output a .json
schema file. This schema can then be imported into the API Gateway schema library and used subsequently for future validations.
For example, using the Java class from the previous section, you can generate the schema as follows:
sh run.sh json/schemagenerator.py com.vordel.samples.GeoLocationTest MyLocationSchema.json
This script requires that you specify the location of your JAR file. You can do this by setting the JYTHONPATH
environment variable, for example:
export JYTHONPATH=/home/user/mylocation.jar
Alternatively, if you have compiled your classes to /home/user/classes, specify the following:
export JYTHONPATH=/home/user/classes
For more details on using Jython, see http://www.jython.org/.
JSON schema validation filter exceptions
The JSON Schema Validation filter aborts with a CircuitAbortException if:
- Content body of the payload is not in valid JSON format
- Use this class option is selected to validate schema and the specified Java class is not found
- Use JSON schema file option is selected and the payload is not in valid JSON format
Message size filter
It is sometimes useful to filter incoming messages based not only on the internal content of the message but also on external characteristics of the message such as size. You can use the Message Size filter to configure the API Gateway to reject messages that are greater or less than a specified size.
This filter only rejects messages where the actual content size, after any truncation by the network layer, exceeds the limit configured in the filter. The network layer of API Gateway reads at most the value of the Content-Length header of any incoming request, before transmitting it to the application layer (Message Size filter in this case). This means that API Gateway is never vulnerable to a “size control by-pass” attack, with or without this filter activated, because the network layer truncation is always active.
For example, if you configure a Message Size filter with a limit of 200 bytes, and send a message with a Content-Length equal to 100 bytes, but with an actual content of 300 bytes, the filter does not reject the message. This is because API Gateway reads only 100 bytes from the message (the Content-Length) and therefore when the message arrives at the Message Size filter it does not exceed the limit of 200 bytes.
Note
You should not use the Message Size filter on HTTPGET
requests.
To configure the API Gateway to block messages of a certain size, complete the following fields:
At least:
Enter the size (in bytes) of the smallest message that should be processed. The default size is -1, which indicates that there is no minimum message size. You can also use a selector, for example, ${env.MIN.MESSAGE.SIZE} to set the message size.
At most:
Enter the size (in bytes) of the largest message that should be processed. The default size is -1, which indicates that there is no maximum message size. You can also use a selector, for example, ${env.MAX.MESSAGE.SIZE} to set the message size.
Use in Size Calculation: Select one of the following options to specify the portion of the message that is to be used when calculating the size of the message:
- Root body only: The API Gateway calculates the size of the message body excluding all other MIME parts (attachments).
- Attachments only: The API Gateway only calculates the size of all attachments to the message. This excludes the size of the root body payload from its calculation. The Message Size filter still works even when there are no attachments.
- Root body and attachments: The API Gateway includes the root body together with all other MIME parts when it calculates the size of the message.
Note
The message size measured by the API Gateway does not include HTTP headers.Timestamp validation filter
You can use the Validate Timestamp
filter to validate a timestamp that has been stored in a message attribute by a previous filter in a policy. For example, you can extract the value of a wsu:Created
element from a WS-Security token and store it in a created attribute using the Retrieve from Message
filter in the Attributes
category. You can then use the Validate Timestamp
filter to ensure that the created timestamp is not after
the current time.
Similarly, you can use the Retrieve from Message
filter to extract the value of the wsu:Expires
element and store it in a timestamp message attribute. You can then use the Validate Timestamp
filter to check that the timestamp is not before
the current time.
You can configure the drift time to resolve discrepancies between clock times on the machine that generated the timestamp, and the machine running API Gateway. If you are validating a Created
timestamp (Timestamp must be in the past
is selected), the time must be after the Created
time minus the drift time. Alternatively, if you are validating an Expires
timestamp (Timestamp must be in the future
is selected), the time now must be before the Expires
time plus the drift time.
Note
To validate the timestamp stored in a WS-Security Username Token or SAML assertion, you can use the WS-Security Username Token Authentication, SAML Authentication, SAML Authorization, or SAML Attribute filters. Furthermore, there is an implicit timestamp validation check performed by the Extract WSS Header filter, which you can use to validate a WS-Utility Timestamp that appears in a WSSHeader
block.
Complete the following fields to configure the API Gateway to validate a timestamp that has been stored in a message attribute:
Name: Enter a name for the filter to display in a policy.
Selector Expression to Retrieve Timestamp:
Enter the name of the selector expression that contains the value of the timestamp. Defaults to ${timestamp}. The specified selector is expanded at runtime to the corresponding message attribute value.
Note
You must configure a predecessor of this filter to extract the timestamp from the message and store it in the specified attribute (for example, the Retrieve from Message filter in the Attributes category.Format of Timestamp:
Enter the format of the timestamp that is contained in the specified message attribute. The default date/time format is yyyy-MM-dd'T'HH:mm:ss.SSS'Z', which can be altered if necessary. For more information on how to use this format, see the Javadoc for the java.text.SimpleDateFormat
class.
Timezone: Select the time zone to use to interpret the time stored in the message attribute selected above. The default option is GMT.
Drift (ms): Specify the drift time in milliseconds when determining whether the current time falls within a certain time interval. The drift time can be used to account for differences in the clock times of the machine running the API Gateway and the machine on which the timestamp was generated.
Timestamp must be in the past:
The time in the timestamp must be before
the time at which the server validates the timestamp. This is used for validating a timestamp that represents a Created
time (the created time must be before the validation time).
Timestamp must be in the future:
The time in the timestamp must be after
the time at which the server validates the timestamp. This is used for validating a timestamp that represents an Expires
time (the expiry time must be some time in the future relative to the validation time).
Content type filter
The SOAP Messages with Attachments specification introduced a standard for transmitting arbitrary files along with SOAP messages as part of a multipart message using Multipurpose Internet Mail Extensions (MIME). In this way, both XML and non-XML data, including binary data, can be encapsulated in a SOAP message.
API Gateway can accept or block multipart messages with certain MIME content types. For example, you can configure a Content Type
filter to block multipart messages with image/jpeg
type parts.
Allow or deny content types
The Content Type Filtering window lists the content types that are allowed or denied by this filter.
Allow Content Types: Use this option to accept most content types, but to reject a few specific types. To allow or deny incoming messages based on their content types, complete the following steps:
- Select the Allow content types radio button to allow multipart messages to be routed onwards. To allow all content types, you do not need to select any of the MIME types in the list.
- To deny multipart messages with certain MIME types as parts, select those types here. Multipart messages containing the selected MIME type parts are rejected.
Deny Content Types: To block multipart messages containing most content types, but to allow a small number of content types, select this option. To reject multipart messages based on the content types of their parts, complete the following steps:
- Select the Deny content types radio button to reject multipart messages. To block all multipart messages, you do not need to select any of the MIME types in the list.
- To allow messages with parts of a certain MIME type, select the check box next to those types. Multipart messages with parts of the MIME types selected here are allowed. All other MIME types are denied.
MIME types can be added by clicking the MIME Registered Types button.
Configure MIME types
The MIME Settings dialog enables you to configure new and existing MIME types. When a type is added, you can configure the API Gateway to accept or block multipart messages with parts of this type.
Click the Add button to add a new MIME type, or highlight a type in the table, and select the Edit button to edit an existing type. To delete an existing type, select that type in the list, and click the Remove button. You can edit or add types using the Configure MIME Type dialog.
Enter a name for the new type in the MIME Type field, and the corresponding file extension in the Extension field. You can optionally select from a list of body factories, in the Body Factory drop-down, to describe how the MIME type should be handled.
Schema validation filter
API Gateway can check that XML messages conform to the structure or format expected by the web service by validating those requests against XML schemas. An XML schema precisely defines the elements and attributes that constitute an instance of an XML document. It also specifies the data types of these elements to ensure that only appropriate data is allowed through to the web service.
For example, an XML schema might stipulate that all requests to a particular web service must contain a <name> element, which contains at most a ten character string. If the API Gateway receives a message with an improperly formed <name> element, it rejects the message.
You can find the Schema Validation filter in the Content Filtering category of filters in Policy Studio. Drag and drop the filter on to a policy to perform schema validation.
Select the schema
To configure the XML schema to validate messages against, click the Schema to use tab. You can select the schema from the WSDL for the current web service, and specific schemas from the global cache of WSDL and XML schema documents. Both validation mechanisms can be selected at the same time. Configure the following options:
Use Schema from WSDL of web service:
Select this option to dynamically use the appropriate SOAP operation schema from the current web service context. When this option is selected, this filter has an additional required message attribute named webservice.context, which must be provided. This enables you to share this filter to perform validation across multiple web services.
Select which XML Schema to validate message with: Select this option to use schemas from the global cache. This is the default option. Click the browse button, and select a schema from the tree view. You can select multiple schemas under the XML Schema Document Bundles and the WSDL Document Bundles nodes. Click the check box next to the schema document to select the schema. You can also select a particular version of a schema by clicking the check box next to the version.
To add a new schema, right-click the XML Schema Document Bundles
User-defined Catalog node, and select Add Schema. Alternatively, you can add schemas under the Resources node in the Policy Studio tree.
Tip
If you have a WSDL file that contains an XML schema, you can use this schema to validate messages by importing the WSDL file into the Web service repository. The Import WSDL wizard automatically adds any XML schemas contained in the WSDL to the global cache under the Resources > WSDL Document Bundles node.Select which part of the message to match
To configure which part of the message to validate, click the Part of message to match tab.
A portion of the XML message can be extracted using an XPath expression. API Gateway can then validate this portion against the specified XML schema. For example, you might need to validate only the SOAP Body element of a SOAP message. In this case, enter or select an XPath expression that identifies the SOAP Body element of the message. This portion should then be validated against an XML schema that defines the structure of the SOAP Body element for that particular message.
Click the Add or Edit buttons to add or edit an XPath expression using the Enter XPath Expression dialog. To remove an expression, select the expression in the XPath Expression field and click the Delete button.
You can configure XPath expressions manually or using a wizard.
Schema validation advanced settings
The following settings are available on the Advanced tab:
Allow RPC Schema Validation: When the Allow RPC Schema Validation check box is selected, the filter makes a best attempt to validate an RPC-encoded SOAP message. An RPC-encoded message is defined in the WSDL as having an operation with the following characteristics:
- The
styleattribute of the<soap:operation>element is set todocument. - The
useattribute of the<soap:body>element is set torpc.
For details on the possible values for these attributes, see the WSDL specification.
The problem with RPC-encoded SOAP messages in terms of schema validation is that the schema contained in the WSDL file does not necessarily fully define the format of the SOAP message, unlike with document-literal
style messages. With an RPC-encoded operation, the format of the message can be defined by a combination of the SOAP operation name, WSDL message parts, and schema-defined types. As a result, the schema extracted from a WSDL file might not be able to validate a message.
Another problem with RPC-encoded messages is that type information is included in each element that appears in the SOAP message. For such element definitions to be validated by a schema, the type declarations must be removed, which is precisely what the Schema Validation filter does if the check box is selected on this tab. It removes the type declarations and then makes a best attempt to validate the message.
However, as explained earlier, if some of the elements in the SOAP message are taken from the WSDL file instead of the schema (for example, when the SOAP operation name in the WSDL file is used as the wrapper element beneath the SOAP Body element instead of a schema-defined type), the schema is not able to validate the message.
Inline MTOM Attachments into Message:
Message Transmission Optimization Mechanism (MTOM) provides a way to send binary data to Web services in standard SOAP messages. MTOM leverages the include mechanism defined by XML Optimized Packaging (XOP), whereby binary data can be sent as a MIME attachment (similar to SOAP with Attachments) to a SOAP message. The binary data can then be referenced from within the SOAP message using the <xop:Include>
element.
The following SOAP request contains a binary image that has been Base64-encoded so that it can be inserted as the contents of the <image>
element:
<?xml version="1.0" encoding="UTF-8"?>
<soap:Envelope xmlns:soap="http://schemas.xmlsoap.org/soap/envelope/">
  <soap:Body>
    <uploadGraphic xmlns="www.example.org">
      <image>/aWKKapGGyQ=</image>
    </uploadGraphic>
  </soap:Body>
</soap:Envelope>
When this message is converted to an MTOM message by API Gateway
the Base64-encoded content from the <image>
element is replaced with an <xop:Include>
element. This contains a reference to a newly created MIME part that contains the binary content. The following request shows the resulting MTOM message:
POST /services/uploadImages HTTP/1.1
Host: API Tester
Content-Type: Multipart/Related;boundary=MIME_boundary;
type="application/xop+xml";
start="<mymessage.xml@example.org>";
start-info="text/xml"
--MIME_boundary
Content-Type: application/xop+xml;
charset=UTF-8;
type="text/xml"
Content-Transfer-Encoding: 8bit
Content-ID: <mymessage.xml@example.org>
<?xml version="1.0" encoding="UTF-8"?>
<soap:Envelope xmlns:soap="http://schemas.xmlsoap.org/soap/envelope/">
  <soap:Body>
    <uploadGraphic xmlns="www.example.org">
      <image>
        <xop:Include xmlns:xop='http://www.w3.org/2004/08/xop/include'
        href='cid:http://example.org/myimage.gif'/>
      </image>
    </uploadGraphic>
  </soap:Body>
</soap:Envelope>
--MIME_boundary
Content-Type: image/gif
Content-Transfer-Encoding: binary
Content-ID: <http://example.org/myimage.gif>
// binary octets for image
--MIME_boundary
When attempting to validate the MTOM message with an XML schema, it is crucial that you are aware of the format of the <image>
element. Will it contain the Base64-encoded binary data, or will it contain the <xop:include>
element with a reference to a MIME part?
For example, the XML schema definition for an <image>
element might look as follows:
<xsd:element name="image" maxOccurs="1" minOccurs="1"
type="xsd:base64Binary"
xmime:expectedContentTypes="*/*"
xsi:schemaLocation="http://www.w3.org/2005/05/xmlmime"
xmlns:xmime="http://www.w3.org/2005/05/xmlmime"/>
In this case, the XML schema validator expects the contents of the <image>
element to be base64Binary. However, if the message has been formatted as an MTOM message, the <image>
element contains a child element, <xop:Include>, that the schema knows nothing about. This causes the schema validator to report an error and schema validation fails.
To resolve this issue, select the Inline MTOM Attachments into Message
check box on the Advanced
tab. At runtime, the schema validator replaces the value of the <xop:Include>
element with the Base64-encoded contents of the MIME part to which it refers. This means that the message now adheres to the definition of the <image>
element in the XML schema (the element contains data of type base64Binary).
This standard procedure of interpreting XOP messages is described in XML-binary Optimized Packaging (XOP) specification.
Report schema validation errors
When a schema validation check fails, the validation errors are stored in the xsd.errors API Gateway message attribute. You can return an appropriate SOAP Fault to the client by writing out the contents of this message attribute.
For example, you can do this by configuring a Set Message
filter to write a custom response message back to the client. Place the Set Message
filter on the failure path of the Schema Validation
filter. You can enter the following sample SOAP Fault message in the Set Message
filter. Notice the use of the ${xsd.errors}
message attribute selector in the <Reason>
element:
<?xml version="1.0" encoding="UTF-8"?>
<env:Envelope xmlns:env="http://www.w3.org/2003/05/soap-envelope">
<env:Body>
  <env:Fault>
    <env:Code>
      <env:Value>env:Receiver</env:Value>
        <env:Subcode>
        <env:Value xmlns:fault="http://www.axway.com/soapfaults">
          fault:MessageBlocked
        </env:Value>
        </env:Subcode>
    </env:Code>
    <env:Reason>
      <env:Text xml:lang="en">
        ${xsd.errors}
      </env:Text>
    </env:Reason>
    <env:Detail xmlns:fault="http://www.axway.com/soapfaults"
      fault:type="faultDetails">
    </env:Detail>
  </env:Fault>
</env:Body>
</env:Envelope>
At runtime, the error reported by the schema validator is set in the message. The following example shows a SOAP Fault containing a typical schema validation error:
<?xml version="1.0" encoding="UTF-8"?>
<env:Envelope xmlns:env="http://www.w3.org/2003/05/soap-envelope">
<env:Body>
  <env:Fault>
    <env:Code>
      <env:Value>env:Receiver</env:Value>
      <env:Subcode>
      <env:Value xmlns:fault="http://www.axway.com/soapfaults">
      fault:MessageBlocked
      </env:Value>
      </env:Subcode>
    </env:Code>
    <env:Reason>
      <env:Text xml:lang="en">
      [XSD Error: Unknown element 'id' (line: 2, column: 8)]
      </env:Text>
    </env:Reason>
    <env:Detail xmlns:fault="http://www.axway.com/soapfaults"
      fault:type="faultDetails">
    </env:Detail>
  </env:Fault>
</env:Body>>
</env:Envelope>
The following figure shows how to use the Set Message
filter to return a customized SOAP Fault in a policy. If the Schema Validation
filter succeeds, the message is routed on to the target web service. However, if the schema validation fails, the Set Message
filter (named Set Custom Fault Message) is invoked. The filter sets the contents of the xsd.errors
message attribute (the schema validation errors) to the custom SOAP Fault message as shown in the example error. The Reflect
filter (named Return SOAP Fault) then writes the message back to the client.
Selector expression validation filter
The Validate Selector Expression filter can use regular expressions to check values specified in selectors (for example, message attributes, Key Property Store, or environment variables). This enables you to make decisions on what to do with the message at runtime. Filters configured in a policy before the Validate Selector Expression filter can generate message attributes and store them in the message.
For example, you could use the Validate Selector Expression
filter to specify that if the attribute value is X, route the message to service X.
You can configure the following sections on the Validate Selector Expression window:
- Enter Regular Expression:
You can configure selectors that are checked against a regular expression from the global library (White list), or against a manually configured expression. This check ensures that the value of the selector is acceptable. For example, if you know that a message attribute-based selector named
${my.test.attribute}must have a value ofABCD, a regular expression of^ABCD$is an exact match test. - Enter Threatening Content Regular Expression: You can select threatening content regular expressions from the global library (Black list) to run against each configured selector. These regular expressions identify common attack signatures (for example, SQL injection attacks, ASCII control characters, XML entity expansion attacks, and so on).
You can configure the global White list and Black list libraries of regular expressions under the Environment Configuration > Libraries node in the Policy Studio tree.
Configure selector regular expressions
The Enter Regular Expression table displays the list of configured selectors, together with the White list of regular expressions that restrict their values. For this filter to run successfully, all configured selector checks must have values matching the configured regular expressions.
The Selector column shows the name configured for the selector. The Regular Expression column shows the name of the regular expression that the API Gateway uses to restrict the value of the named selector. A number of common regular expressions are available from the global White list library.
You can configure regular expressions by clicking Add, Edit, or Delete. The Configure Regular Expression dialog enables you to add or edit regular expressions to restrict the values of message attributes. To configure a regular expression, perform the following steps:
- Enter the selector in the Selector Expression
field (for example,
${my.test.attribute}). - Select whether this attribute is Optional or Required. If it is Required , the attribute must be present in the request. If the attribute is not present, the filter fails. If it is Optional, the attribute does not need to be present for the filter to pass.
- You can enter the regular expression to restrict the value of the attribute manually or select it from the global White list library of regular expressions in the Expression Name drop-down list. A number of common regular expressions are provided (for example, alphanumeric values, dates, and email addresses).
- You can add a regular expression to the library by selecting the Add/Edit button. Enter a Name for the expression followed by the Regular Expression.
The Advanced section enables you to extract a portion of the attribute value that is run against the selector. The extracted substring can also be Base64 decoded if necessary.
Configure selector threatening content regular expressions
The regular expressions entered in this section guard against message attributes containing malicious content. The Enter Threatening Content Regular Expression table lists the Black list of regular expressions that are run against all message attributes.
For example, to guard against a SQL DELETE
attack, you can write a regular expression to identify SQL syntax and add to this list. The Threatening Content Regular Expressions
are listed in a table. All
of these expressions are run against all
message attributes configured in the Regular Expression
table above. If the expression matches any
attribute values, the filter fails.
If any regular expressions are configured in Configure selector-based regular expressions, these expressions are run before the threatening content regular expressions. For example, if you have already configured a regular expression to extract the Base64-decoded attribute value, the threatening content regular expression is run against this value instead of the attribute value stored in the message.
Click Add to add threatening content regular expressions. You can edit or remove existing expressions by selecting them in the list, and clicking Edit or Delete. You can enter regular expressions manually or select them from the global Black list library of threatening content regular expressions.
This library is prepopulated with regular expressions that scan for common attack signatures. These include expressions to guard against common SQL injection-style attacks (for example, SQL INSERT, SQL DELETE, and so on), buffer overflow attacks (content longer than 1024 characters), and ASCII control characters in attribute values.
Enter or select an appropriate regular expression to scan all message attributes for threatening content. You can add a regular expression to the library by selecting Add or Edit. Enter a Name for the expression followed by the Regular Expression.