Example: Configure OAuth (External) security for a front-end API
3 minute read
In this example, the OAuth server returns a JWT bearer, and API Gateway analyzes this JWT to grant or refuse access to the resource.
Here is a sample payload from the JWT returned by the OAuth server:
{
 "jti": "6723520f-abe9-45ec-8b6f-5092455342a4",
 "exp": 1568363943,
 "nbf": 0,
 "iat": 1568363643,
 "iss": "https://oauthnserver/auth/realms/oauth",
 "aud": "account",
 "sub": "c4884fd3-fe51-43ae-8119-dd32ccb49981",
 "typ": "Bearer",
 "azp": "client",
 "auth_time": 0,
 "session_state": "1015c238-5760-4d59-9cec-e8b6c5877a37",
 "scope": "openid email profile",
 "email_verified": false,
 "preferred_username": "user"
}
API Manager needs the following information:
oauth.token.client_idwhich is theazpparameteroauth.token.scopeswhich are in thescopeparameteroauth.token.validwhich can be verified by using theexpparameter to see if the token is expired or not.
Configure a token information policy
Follow these steps in Policy Studio.
Import a certificate
First, import the certificate to use to sign the JWT under Environment Configuration > Certificates and Keys > Certificates.
Configure the token information policy
Next, configure a token information policy similar to this example:
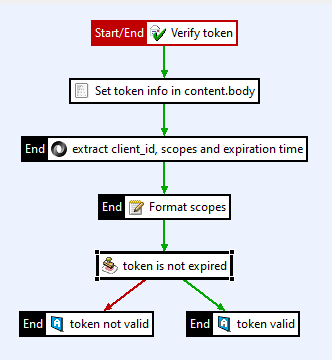
This example policy processes the JWT using the following filters:
-
Verify the JWT using a JWT Verify filter:
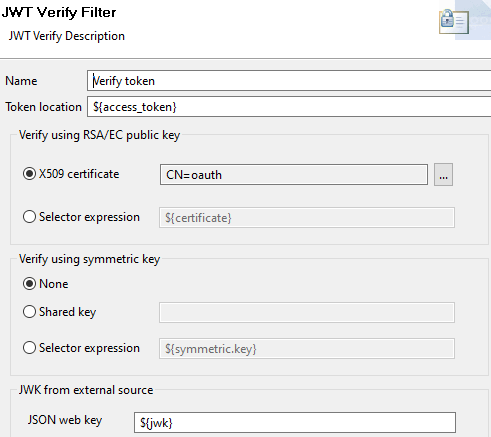
- API Manager returns the token in the
access_tokenattribute, so set Token location with an${access_token}selector. - Use the X509 certificate you imported earlier.
- API Manager returns the token in the
-
The payload of the JWT is now available in the
jwt.bodyattribute, but it needs to be set in thecontent.bodyattribute to extract information from it. Use a Set Message filter:
-
Use a JSON Path filter to extract the required information:
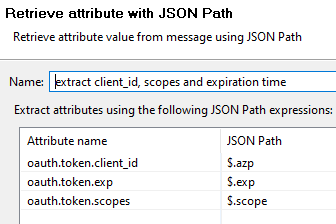
oauth.token.client_idis extracted from$.azpoauth.token.scopesis extracted from$.scopeoauth.token.expis extracted from$.exp- Everything is unmarshalled as
java.lang.String
-
The scopes in the token are space separated, but API Manager needs them to be comma separated. Use a String Replace filter to format the attribute:
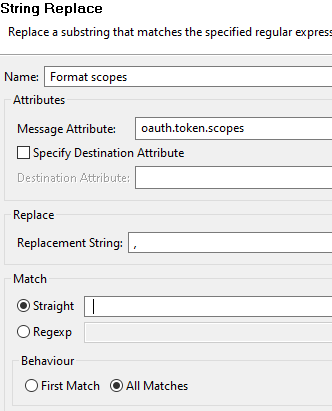
- The filter changes the
oauth.token.scopesattribute - It replaces space characters (specified in the Match > Straight field) with commas (specified in Replacement string field)
- The filter changes the
-
Validate the expiration time of the token with a Validate Timestamp filter:
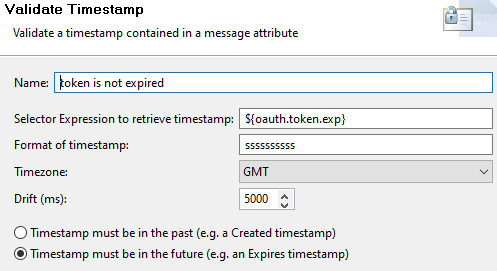
- The timestamp is in the attribute
oauth.token.exp - The timestamp is in seconds with 10 digits, so its format is
ssssssssss - It is valid if in the future
- The timestamp is in the attribute
-
If the token is not expired, use a Set Attribute filter to set the
oauth.token.validattribute totrue. (Set it tofalseif the token is expired).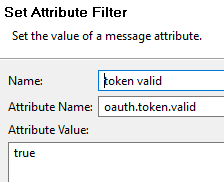
Set the policy for API Manager
Finally, set this policy in the API Manager settings configuration under Server Settings > API Manager > OAuth Token Information Policy.
Configure the security device on the front-end API
Follow these steps in API Manager:
- In the front-end API to be secured, select the OAuth (External) security device.
- Set the Token information policy to the policy you created earlier.
- Update the Grant Type tab with your OAuth server URLs.
- In the application that is granted access to your API, add the
client_idto verify under Authentication > External credentials.
Test the configuration
When the configuration is complete you can request a token from your OAuth server and access your API using it, for example:
curl --header "Authorization: Bearer my.JWT.token" https://apimanager:8065/api/example