Configure policies
14 minute read
Configure policies manually
This section describes how to use Policy Studio to configure an API Gateway policy manually. It also applies to cases where a web service definition is not available in a Web Services Description Language (WSDL) file, meaning that the policy used to protect a web service must be configured manually.
However, the recommended way to configure a policy to protect a web service is to import the WSDL file for that service. If your web service has WSDL-based definitions, see Configure policies from WSDL files.
The following steps outline how to manually create a policy to protect a web service and then test it.
Create the policy
To create a policy manually, complete the following steps:
-
Right-click the Policies node in the Policy Studio tree, and select the Add Policy menu option.
-
Enter a suitable name (for example
TestPolicy) for the new policy in the Name field, and click the OK button. The new policy is now visible in the tree. -
Click the new policy in the tree to start configuring the filters for the policy. You can easily configure the policy by dragging the required filters from the filter palette on the right of Policy Studio, and dropping them on to the policy canvas.
Most policies attempt to check characteristics of the message, such as message size and format, and attempt to authenticate or authorize the sender of the message. When the message successfully passes all configured filters, it is usually routed on to the protected web service.
For demonstration purposes, this example creates a simple policy consisting of two filters. The first filter checks the size of the message, and the second echoes the request message back to the client if it is below a certain size.
-
Expand the Content Filtering category of filters from the filter palette, and drag and drop the Message Size filter on to the canvas.
-
Enter
10in the At least field and1000in the At most field to make sure that only messages between 10 bytes and 1000 bytes are reflected back to the client. Select all other defaults, and click the Finish button. -
Right-click the newly added filter, and select the Set as Start menu option to indicate that this is the first filter to be executed in this policy. The icon for the filter changes to indicate that it is the start of the policy.
-
Open the Utilities category of filters, and drag the Reflect filter onto the canvas. Drop it on to the previously configured Message Size filter. Select the defaults for the Reflect filter, and click the Finish button.
Because you dropped the Reflect filter on to the Message Size filter, both filters are automatically linked with a success path. This means that if the first filter runs successfully, the next filter on the success path is executed. To link in more filters, add the filters to the canvas, and click the Success Path button at the top of the palette. Click the first filter followed by the second filter in the success path to link both filters.
You can also configure failure paths for filters in the same way. Failure paths are followed when the checks configured in the filter fail.
This completes the configuration of the simple policy.
Create a new relative path
You must now create a Relative Path on the API Gateway instance, which maps incoming requests on a particular URI to the new policy. Complete the following steps:
- In the Policy Studio tree, select Environment Configuration > Listeners > API Gateway.
- Right-click the Default Services node, and select Add Relative Path.
- On the Configure Relative Path dialog, enter a suitable URI (for example,
TestPolicy) on which to receive requests that are to be processed by the new policy. - To map requests received on this URI to our new policy, select the
/TestPolicypolicy from the list of policies in the tree. Click the OK button when finished.
Deploy to API Gateway
Before the new configuration changes can take effect, you must deploy them to API Gateway. You can do this by clicking the Deploy button on the right of the toolbar. Alternatively, press the F6 key.
Test the policy
You can use the tool of your choice to send SOAP requests to the new policy. You should send requests of different sizes to the following URL, assuming a default installation of API Gateway running on the local machine:
http://localhost:8080/TestPolicy
Request messages that fall between the configured size are reflected to the client. Those that fall outside of the configured size are blocked, and a SOAP Fault is returned to the client.
Next steps
Try running more complicated checks on request messages by adding new filters to the TestPolicy. Try also adding failure paths to the original Message Size filter to handle messages that fall outside of the 10-1000 byte range.
Use the Help button on each filter window to find out more about the configuration fields that are available on each window.
Configure global policies
Global policies enable you to label policies with specific roles in the API Gateway configuration. For example, you can label a specific policy such as XML Threat Policy as a Global Request policy. This policy can be executed globally on the request path for all messages passing through API Gateway.
Using a global policy in this way enables you to use the same policy on all requests, and for multiple services. It also means that you can change the labeled global policy to a different policy without needing to rewire any existing policies.
For example, using a Policy Shortcut Chain filter in a policy enables you to delegate to one or more policies to perform specific tasks, before continuing execution of the remaining filters in the current policy. Using this approach to encapsulate specific functionality in a policy facilitates modularity and reusability when designing API Gateway policies. This enables you to build up a policy library of reusable routines over time.
Each shortcut in a Policy Shortcut Chain points to a specific policy, which is called at each point in the execution chain. However, consider a policy whose role is to be called first in all message handling contexts before any context-specific policies are run, and call this the run-first role. To realize this, you must create a Policy Shortcut Chain with a link to the run-first policy as its first entry, the context-specific policy as its second link, and so on.
One of the shortcomings of this approach is that if you have set up a large number of Policy Shortcut Chain filters, each calling the run-first policy, and you need to change the run-first policy globally, you must update each Policy Shortcut Chain filter individually to point to the newly designated run-first policy. Similarly, if you wish to ignore the run-first Policy globally, you must remove the first entry in each filter.
Global policies enable you to label a specific policy in terms of its role. You can delegate to the policy using its label instead of a specific link to the policy. This indirection using a label makes it very easy to globally change which policy is delegated to, merely by moving the label from one policy to another. Each filter that refers to the policy using its label now resolves the label to the new policy without needing to change the filter configuration. Similarly, if the label is not applied to a specific policy, nothing is executed for this link.
Global policy roles
The following global policy roles have a reserved label and a specific meaning in the API Gateway policy framework:
| Role | Label | Description |
|---|---|---|
| Global Request Policy | system.policy.request |
Executed globally for all messages passing through the API Gateway on the request path. |
| Global Response Policy | system.policy.response |
Executed globally for all messages passing through the API Gateway on the response path. |
| Global Fault Handler Policy | system.policy.faulthandler |
If any policy aborts during execution, or a top-level policy fails and has not specified a Fault Handler filter, this policy is executed instead of the internal SOAP Fault filter. |
You can select specific policies with these roles under the Policies node in the Policy Studio tree. You can then create links to these roles when creating a Policy Shortcut Chain. These steps are explained in the next sections.
Select a global policy
To select a global policy, right-click a policy under the Policies node, and select one or more global policies (for example, Set as Global Request Policy, Set as Global Response Policy, or Set as Global Fault Handler Policy). These policies are executed globally for all messages passing through API Gateway.
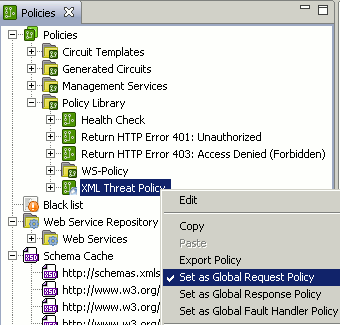
The following example shows the XML Threat Policy set as the Global Request Policy. The policy node labeled for the specific role is displayed with a globe icon:
When you have selected the policy for a specific role, you can then reference the labeled policy in a Policy Shortcut Chain filter, or at the service level in a relative path or web service resolver. Referencing a labeled policy is different from referencing a specific policy directly. Referencing a policy directly involves selecting a specific policy to execute in the chain. Referencing a labeled policy means selecting a filter by its label only.
The main advantage of this approach is that you can configure a policy to run in a policy shortcut chain in a specific role, and then select a different policy as the global policy for that role. All references to the global policy label in the various shortcut chain filters are changed to use the newly selected policy, without requiring you to modify each policy shortcut chain filter individually to explicitly point to a different policy.
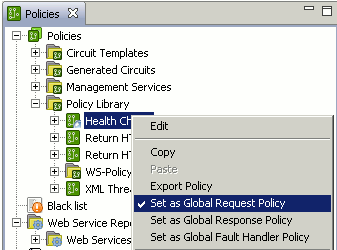
Selecting another policy in a global role deselects the previously selected policy. The following example shows the Health Check set in the global role, and the XML Threat Policy is no longer selected:
Note
You cannot select a policy for a specific role if, in doing so, you create a loop in the policies. For example, if a Policy Shortcut Chain filter has a reference to a labeled policy, and the filter’s parent policy is marked as the labeled policy, the filter would call back to itself in a loop. This error is caught, and a trace line is output to Policy Studio Console view.Configure global policies in a policy shortcut chain
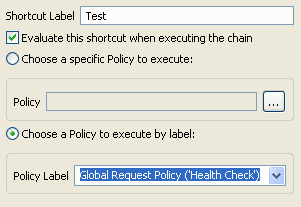
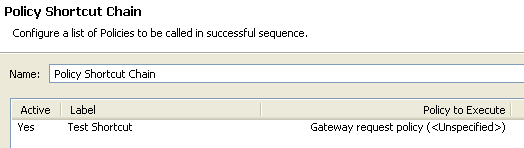
When adding a policy shortcut in a Policy Shortcut Chain filter, you can select to call a labeled policy instead of selecting a specific policy. The following example from the Add a new Shortcut to a Policy dialog shows adding a shortcut to the Global Request Policy (Health Check) policy label:
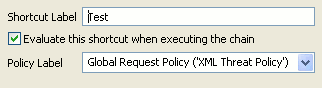
Then if you select a different policy as the request policy in the Policy Studio tree, when you subsequently view this shortcut in the chain filter, you see that the details for the shortcut have changed. The following example from the Edit the Shortcut to the Policy dialog shows the policy label changed to Global Request Policy (XML Threat Policy).
Note
If you remove a label from a policy by deselecting it in the Policy Studio tree, any reference to that labeled policy is not called when evaluating the shortcut in the chain, irrespective of whether Evaluate this shortcut when executing the chain is selected (the Active status column in the table view). This corresponds with the behavior for a specific policy in the chain. If a link to a policy is not set for a shortcut, the link is not evaluated.In this example, the table shows that the shortcut is configured to point to the labeled policy, but the label does not resolve to a policy (for example, it is unspecified because there is no policy in the specified role):
Configure global policies for a service
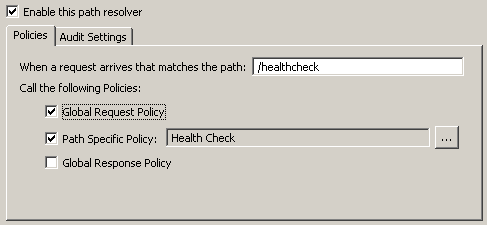
Under the Environment Configuration > Listeners node, you can also configure global policies at the service level to run on a specific relative path or web service resolver when messages are received by API Gateway. A relative path binds a policy to a specific relative path location (for example /healthcheck). A web service resolver maps messages destined for a specific web service to a Service Handler or Web Service Filter.
You can configure a global policy at the service level to run as part of a policy chain invoked when incoming messages are received by API Gateway. The following example shows the Global Request Policy configured to run first on the /healthcheck relative path:
For more details, see Configure relative paths.
Show global policies
To view the currently configured global policies, right-click the Policies root tree node, and select Show Global Policies. This displays all currently configured global policies in the context menu, for example:

If there are no global policies configured, the Show Global Policies menu item is not available.
Configure policy assemblies
In certain cases, you might need to convert a policy into a modular reusable piece of functionality that can be called from other policies.
For example, you have a complex policy that creates a WS-Security UsernameToken, inserts it into the message, and subsequently creates an XML Signature over the token and SOAP body. Depending on the message recipient, the content might need to be signed using slightly different settings. One service might require a <sp:Basic128/> algorithm suite, while another might require <sp:Basic256/>.
Similarly, subtle differences in security requirements might require the token and signature to be generated differently. For example:
- Use a basic or digest password for the
UsernameToken - Insert a
<dsig:CarriedKeyName>into the XML-Signature - Create an enveloped or enveloping signature
- Include a
<wsse:BinarySecurityToken> - Use one signing key over another
- Sign different parts of the message
If you need to create separate policies for such cases, interoperating with different vendor services can become arduous. This involves creating several complicated policies that might only differ in one field in each filter. To avoid this duplication, you can create a policy assembly that inserts the WS-Security UsernameToken into the message and generates the XML-Signature.
However, instead of explicitly configuring fields mentioned above (for example, enveloped or enveloping signature, include a <wsse:BinarySecurityToken>, or signing key to use), the policy assembly can use selectors for these fields, which are configured dynamically at runtime.
The policy assembly advertises that it requires configuration details to be called generically from other policies. For example, it requires the key to sign the message. By templating the signing policy as a policy assembly, and making it available to call from other policies like any other filter, the caller must set the signing key for the policy assembly. In this way, different policies that require a signed UsernameToken can call the same policy assembly. By using selectors to pass in different signing keys, messages are signed using the appropriate key for each calling policy.
When a policy has been configured as a policy assembly, it is displayed in the Policy Studio filter palette, and you can drag and drop it into any policy that requires the functionality in the assembly. You must configure any fields required by the policy assembly when it is dragged and dropped on to the canvas of another policy.
Configure a policy assembly
To configure a policy as a policy assembly in Policy Studio, perform the following steps:
- Right-click the policy in the tree on the left, and select Policy Assembly > Create.
- Specify the following settings on the General tab:
- Palette Category: Enter the filter palette category in which to display the policy assembly (for example,
Monitoring). - Palette Icon: Enter the path to the palette icon to display for the policy assembly (for example,
C:\Axway\apigateway\icons\monitor.ico).
- Palette Category: Enter the filter palette category in which to display the policy assembly (for example,
- The Input tab lists all required message attributes for the policy assembly. You can enter user-friendly names for each attribute to be displayed in the Policy Activation filter for the policy assembly (for example,
HTTP Headersfor thehttp.headersattribute). - The Output tab lists the generated message attributes for the policy assembly. To add a generated attribute, click Add, and enter the following details:
- Expression: Enter the selector expression for the attribute (for example,
${content.body}). - Attribute Type: Enter the message attribute type (for example,
com.vordel.mime.Body). - Output Attribute Name: Enter the message attribute generated by the policy assembly (for example,
content.body).
- Expression: Enter the selector expression for the attribute (for example,
- When finished, click OK.
- Click the Deploy button in the toolbar to deploy the newly created policy assembly to API Gateway.
Apply a policy assembly
When a policy is configured as a policy assembly, it is available for reuse in the Policy Studio filter palette. Dragging and dropping the policy assembly on to the policy canvas displays the Policy Activation Filter window for that policy assembly. This enables you to specify any required message attributes and filter-level monitoring settings.
Specify required attributes
The Required Attributes tab enables you to set the configuration fields required by the policy assembly (for example, those configured with selectors for dynamic configuration). Click Add to specify the following fields:
- Required Attribute: Enter the name of the required attribute for display (for example,
HTTP Header). - Raw Attribute Name: Enter the message attribute name (for example,
http.headers). - Attribute Type: Enter the message attribute type (for example,
com.vordel.mime.HeaderSet). - Value/Selector: Enter a message attribute value or selector (for example,
${http.headers}).
Specify monitoring settings
The Traffic Monitor tab enables you to set the following filter-level monitoring settings:
- Record outbound transactions: Select whether to record outbound message transactions sent from API Gateway to remote hosts. This is enabled by default.
- Record policy path: Select whether to record the policy path for the message transaction, which shows the filters that the message passes through. This is enabled by default.