Configure a highly available Cassandra cluster
8 minute read
Cassandra HA in a production environment
To tolerate the loss of one Cassandra node and to ensure 100% data consistency, API Gateway requires at a minimum the following Cassandra cluster configuration running in a production class environment:
- Three Cassandra nodes (with one seed node)
- Other nodes contact the seed node when joining the Cassandra cluster to get required cluster information, therefore you must start the seed node first.
- It is not recommended to make all Cassandra nodes a seed, as they produce traffic overhead.
Replication factorsetting set to3for the system_auth and API Management keyspaces, so each node holds 100% of the data.- Without this configuration, the user permissions are not replicated to other nodes. Therefore, they cannot be checked, and requests to them are rejected. In this scenario, if the node that stores the user permissions goes down, the client (API Manager) cannot login to other nodes, and the cluster becomes unavailable.
QUORUMread/write consistency to ensure that you are reading from a quorum of Cassandra nodes (two) every time.Caution
Eventualconsistency is not supported in a production environment due to a risk of stale or missing data.
If one Cassandra node fails or needs to be restarted, the cluster continues to operate with the remaining two nodes. This configuration applies to all supported use cases (for example, API Manager and API Gateway custom KPS, OAuth, and client registry data).
Preparing a Cassandra HA environment
The following general guidelines apply to configuring a Cassandra HA cluster:
- Decide on the number of Cassandra nodes, and install and configure the Cassandra database on each node.
- Decide on the number of gateway nodes, and install and configure them (local or remote to Cassandra).
- It is recommended that you configure a Cassandra HA cluster with three Cassandra nodes, and at least two API Gateway instances (local or remote). For details, see Cassandra deployment architectures.
- Create a HA API Gateway environment.
- Configure the Cassandra client settings in Policy Studio for the API Gateway group.
Example of a HA setup using three Cassandra nodes
This section shows how to configure a three nodes Cassandra HA cluster.
Configure the Cassandra seed node
Perform the following steps to configure a seed node:
-
Assign one of the nodes as the seed node, and connect to it via SSH.
-
Update the
CASSANDRA_HOME/conf/cassandra.yamlfile manually or using thesetup-cassandrascript.Manually:
seed_provider, parameters, seeds: IP_SEED_NODE
start_native_transport: true
start_rpc: false
native_transport_port: 9042
listen_address: IP_SEED_NODE
rpc_address: IP_SEED_NODE
authenticator: org.apache.cassandra.auth.PasswordAuthenticator
authorizer: org.apache.cassandra.auth.CassandraAuthorizer
Using the
setup-cassandrascript:setup-cassandra --seed --own-ip=<IP_SEED_NODE> --nodes=3 --cassandra-config=CONFIG_FILE -
Start Cassandra.
-
Verify the
CASSANDRA_HOME/logs/system.logdoes not contain any errors or warnings. -
Run the
nodetool statuscommand to verify that one node is present inUNstatus, and that the IP address is correct.
Configure the additional Cassandra nodes
The procedure to configure additional nodes uses the seed node that you have previously configured.
-
Connect to the additional node via SSH, and update the
CASSANDRA_HOME/conf/cassandra.yamlfile. Manually:seed_provider, parameters, seeds: IP_SEED_NODE start_native_transport: true start_rpc: false native_transport_port: 9042 listen_address: IP_NODE_N rpc_address: IP_NODE_N authenticator: org.apache.cassandra.auth.PasswordAuthenticator authorizer: org.apache.cassandra.auth.CassandraAuthorizerUsing the
setup-cassandrascript:setup-cassandra --seed-ip=<IP_SEED_NODE> --own-ip=<IP_NODE_n> --cassandra-config=<PATH_TO_CASSANDRA.YAML> -
Start Cassandra.
-
Verify the
CASSANDRA_HOME/logs/system.logdoes not contain any errors or warnings. -
Run the
nodetool statuscommand to verify that the new node is present inUNstatus, and that the IP address is correct.
You must repeat these steps for each additional node.
Multi-DC Cassandra cluster
For more complex Cassandra cluster deployments, the following information is important:
- The parameter
listen_addressis used for the internal Cassandra cluster communication using the Gossip protocol. You can either use the parameterlisten_addressor thelisten_interface. Ensure that the assigned IP address is reachable from all other nodes in the cluster. - The
rpc_addressis used for Cassandra clients like API Manager to connect to the node. This IP address might be different to thelisten_addressas it must be reachable for local clients only.
Create a new Cassandra database user
From the command line, execute the following commands to create a new user:
./cqlsh <IP_NODE_1> -u cassandra -p cassandra
 ALTER KEYSPACE "system_auth" WITH REPLICATION = { 'class': 'SimpleStrategy', 'replication_factor': 3 };
 CREATE ROLE <USERNAME> WITH PASSWORD '<PASSWORD>' AND SUPERUSER = false AND LOGIN = true;
 QUIT;
./cqlsh <IP_NODE_1> -u <ADMIN_USERNAME> -p <PASSWORD>
 GRANT CREATE ON ALL KEYSPACES TO <USERNAME>;
 GRANT ALTER ON ALL KEYSPACES TO <USERNAME>;
 GRANT DROP ON ALL KEYSPACES TO <USERNAME>;
 GRANT SELECT ON ALL KEYSPACES TO <USERNAME>;
 GRANT MODIFY ON ALL KEYSPACES TO <USERNAME>;
 QUIT
Alternatively, run the create user script located at INSTALL_DIR/apigateway/samples/cassandrauser. To use the script, follow these steps:
-
Copy the
cassandrauserfolder to your Cassandra node. -
Open the
/conf/apigw-create-user-tool.inifile in the editor of your choice. -
Set the property
cqlsh_binwith the path to Cqlsh, for example,<CASSANDRA_HOME>/bin/cqlshand save your changes. -
Run the script
createuser.shby passing the username and password, and by setting non-superuser access and login access true. For example:./createuser.sh -u <USERNAME> -p <PASSWORD> -s false -l true
By default, the script creates a user with privileges to CREATE, ALTER, DROP, SELECT, and MODIFY tables on all keyspaces. This subset of permissions is the minimum required for API Manager operations.
The createuser.sh script accepts the following options:
-s <true|false>: Sets superuser access.-l <true|false>: Sets login access.-k <KEYSPACE_NAME>: Set privileges on a specific keyspace.-h: Displays the help.
Configure the Cassandra client connection
This section assumes that you have already set up a HA API Gateway environment. For details, see API Gateway Administrator Guide.
In Policy Studio, open your gateway group configuration.
- Select Server Settings > Cassandra > Authentication, and enter the cassandra database user name and password.
- Select Server Settings > Cassandra > Hosts, and add a host for each Cassandra node in the cluster.
- Select Server Settings > Cassandra > Keyspace, and set the Initial replication factor option to
3. - Deploy the configuration to the group.
Configure API Gateway Cassandra client settings
To update the Cassandra client configuration for API Gateway, perform the following steps:
Configure the API Gateway domain
- Ensure API Gateway has been installed on the gateway 1 and gateway 2 nodes. For details, see the API Gateway Installation Guide.
- Ensure an API Gateway domain has been created on the gateway 1 node using
managedomain. For more details, see Configure an API Gateway domain.
Configure the API Gateway Cassandra client connection
In Policy Studio, open your gateway group configuration.
- Select Server Settings > Cassandra > Authentication, and enter your Cassandra user name and password (both default to
cassandra). - Select Server Settings > Cassandra > Hosts, and add an address for each Cassandra node in the cluster (
ipA,ipBandipCin this example).
You can automate these steps by running the updateCassandraSettings.py script against a deployment package (.fed).
Configure the API Gateway Cassandra consistency levels
-
For the Complete setup type installation, configure Cassandra consistency levels by ensuring that the API Server KPS collection has been created under Environment Configuration > Key Property Stores.
If you installed the Custom or Standard setup, you must configure OAuth or API Manager settings in Policy Studio to create the required KPS collections. For more details, see:
-
Select Environment Configuration > Key Property Stores > API Server > Data Sources > Cassandra Storage, and click Edit.
-
In the Read Consistency Level and Write Consistency Level fields, select QUORUM.
-
Repeat this step for each KPS collection using Cassandra (for example, Key Property Stores > OAuth, or API Portal for API Manager). This also applies to any custom KPS collections that you have created.
-
If you are using OAuth and Cassandra, you must also configure quorum consistency for all OAuth2 stores under Libraries > OAuth2 Stores:
- Access Token Stores > OAuth Access Token Store
- Authorization Code Stores > Authz Code Store
- Client Access Token Stores > OAuth Client Access Token Store
By default, OAuth uses EhCache instead of Cassandra.
Deploy the configuration
- Click Deploy in the toolbar to deploy this configuration to the API Gateway group.
- Restart each API Gateway in the group.
Configure API Manager Cassandra client settings
To update the Cassandra client configuration for API Manager, perform the following steps:
-
Ensure the API Gateway and API Manager components have been installed on the gateway 1 and gateway 2 nodes. These can be local or remote to Cassandra installations. For details, see the API Gateway Installation Guide.
-
Ensure an API Gateway domain, group, and instance have been created on the gateway 1 node using
managedomain. For more details, see Configure an API Gateway domain in the API Gateway Administrator Guide. -
Start the first gateway instance in the group. For example:
startinstance -n "my_gw_server_1" -g "my_group" -
Configure the Cassandra connection on the gateway 1 node. For details, see Configure the API Gateway Cassandra client connection.
-
Configure the Cassandra consistency levels for your KPS Collections. For details, see Configure the API Gateway Cassandra consistency levels.
-
In the Policy Studio tree, select Server Settings > API Manager > Quota Settings, and ensure that Use Cassandra is selected.
-
Under Cassandra consistency levels, in both the Read and Write fields, select
QUORUM: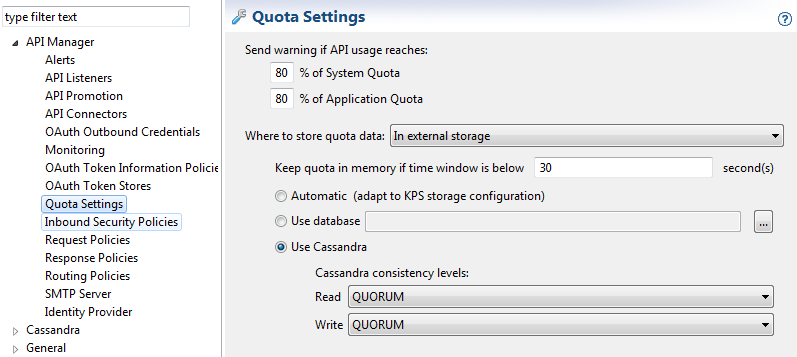
-
Add the gateway 2 host machine to the domain using
managedomain. -
Create the second gateway instance in the same group on the gateway 2 node.
Note
Do not start this instance, and do not configure API Manager for this instance in Policy Studio. -
Before starting the second API Manager-enabled instance, ensure that each instance has unique ports in the
envSettings.propsfile. For example:-
Edit the
envSettings.propsfile for the gateway instance in the following directory:INSTALL_DIR/apigateway/groups/<group-n>/<instance-m>/conf/envSettings.props -
Add the API Manager ports. For example, the defaults are:
#API Manager Port
env.PORT.APIPORTAL=8075

#API Manager Traffic Port
env.PORT.PORTAL.TRAFFIC=8065
-
-
Start the second API Gateway instance. For example:
startinstance -n "my_gw_server_2" -g "my_group" -
On startup, this instance receives the API Manager configuration for the group. It now shares the same KPS and Cassandra configuration and data, and uses the ports specified in the
envSettings.propsfile.