Manage data maps
6 minute read
Data maps enable you to define how to map XML and JSON messages to other XML and JSON message formats. Mappings can be from XML to XML, XML to JSON, JSON to JSON, or JSON to XML.
To create a data map, you select one or more source (input) schemas and one target (output) schema. After creating the data map, you can use the Data Map Editor to define the mapping between the source and target schemas.
To manage data maps, use the Resources > Data Maps node in the Policy Studio tree.
Add data map
To define a new data map, follow these steps:
- Right-click the Data Maps node and select Add New Data Map. The Data Map dialog is displayed.
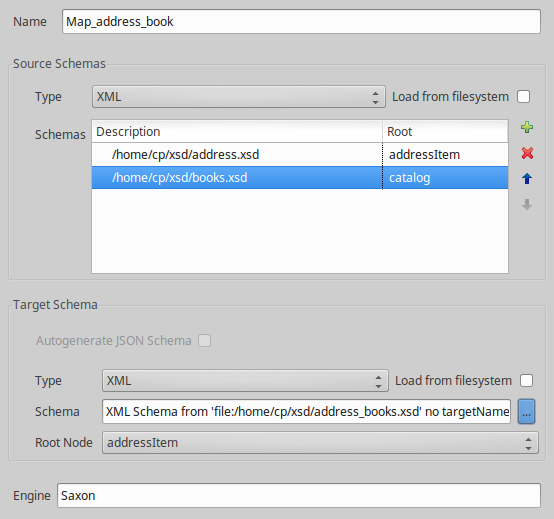
- Enter a unique Name for the data map.
- In the Source Schema Details section, click the Add button to select an input schema. You can add multiple input schemas, but all input schemas must be of the same type (either JSON or XML). You can also delete schemas and reorder schemas in the list. For more details on input schema settings, see Schema settings.
- In the Target Schema Details section, click the Browse button to select an output schema. For more details on output schema settings, see Schema settings.
- The read-only field Engine displays the XSLT processor used by the data map (for example,
Saxon). - When you have completed the fields, click OK to open the map for editing in the Data Map Editor Design view. The following example shows a map with two input schemas.
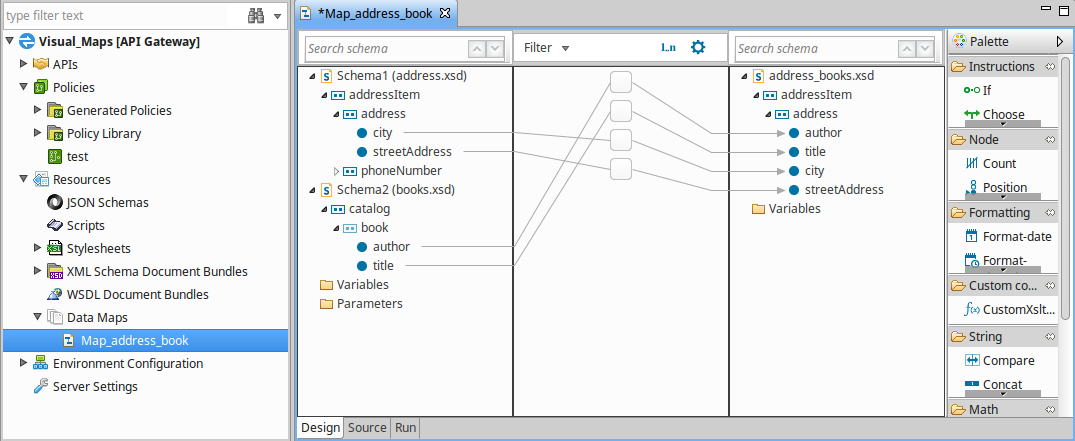
For more information on Visual Mapper and the Data Map Editor, see the API Gateway Visual Mapper User Guide.
Schema settings
The Source Schema Details and the Target Schema Details sections share the following common fields:
-
Type: Select the type of the schema, XML or JSON. Choose XML if the schema is defined by an XSD, or choose JSON if the schema is defined as a JSON schema. You can choose one of four possible schema types depending on the required mapping type:
- XML (source) to XML (target)
- JSON (source) to JSON (target)
- XML (source) to JSON (target)
- JSON (source) to XML (target)
Note
If you select multiple input schemas for a data map, the input schemas must be of the same type (either JSON or XML). -
Select the Load from filesystem check box if the schema definition is located in a file. If the type is XML, it is typical to select an XSD file. If the type is JSON, it is typical to select a JSON file that contains the JSON schema definition. Deselect this option to use an XSD or JSON schema that you have previously imported into API Gateway (for example, under Resources > JSON Schemas, Resources > XML Schema Document Bundles, or Resources > WSDL Document Bundles).
-
Schema:
- If you selected the Load from filesystem option you can select the schema file on the file system. If the Type is XML, you can select an XSD file containing the schema definition. If the Type is JSON, you can select a JSON file containing the JSON schema definition.
- If you did not select the Load from filesystem option, you can select from the schemas that you previously imported into API Gateway (for example, under Resources > JSON Schemas, Resources > XML Schema Document Bundles, or Resources > WSDL Document Bundles).
-
Root Node: The root node applies to XML schemas only. If there is more than one root element in the XML schema, you are presented with a list of all elements that exist at the root node level. You must select one of these elements for the mapping. If there is only one root element, this root element is listed and selected automatically.
Data map options
To open a data map for editing in the Data Map Editor, select the data map node under Resources > Data Maps in the Policy Studio tree. The Data Map Editor displays the content of the map and you can make changes. Any changes made to the map must be saved and redeployed.
Note
The schemas selected for the data map typically cannot change. To use a different schema, you must create a new data map. However, there is one exception to this: you can modify a JSON schema stored in Resources > JSON Schemas after you have created an associated data map. For more information, see Update previously imported JSON schemas.You can right-click on an existing data map node in the Policy Studio tree, and select one of the following options:
- Edit – Change the name of the data map or select a different version of the XML schema.
- Copy – Make a copy of the data map. Right-click the Data Maps node and select Paste to paste a copy of the map. A copy of the data map is created and it is opened in the Data Map Editor for editing.
- Export Data Map – Export the data map as API Gateway configuration data to an XML file. You can use File > Import > Import Configuration Fragment to reimport this data map at a later stage.
- Edit Source Schema – Allows you to select and edit a source schema.
- Edit Target Schema – Allows you to edit the target schema.
- Delete – Delete the data map. If policies exist that use this data map, you must delete them first.
- Show all references – Shows all objects that refer to this data map. Typically, you will see any policies associated with the data map.
Update previously imported JSON schemas
You can update a previously imported JSON schema (for example, if you add a new field to the JSON schema, the field will be visible when the associated Data Map is reloaded).
To delete or rename a field in the JSON schema, remove any references to this field (for example, links in the associated Data Map) before you change it in the schema. If you attempt to delete the previously imported JSON schema, a message is displayed that states there are Data Maps that depend on the JSON schema.
Use a data map in a policy
To use a data map in a policy, add an Execute Data Map filter.
A simple example is described in the following steps:
- Define a data map called
addressjsonxmlmapthat maps a JSON address schema to an XML address schema.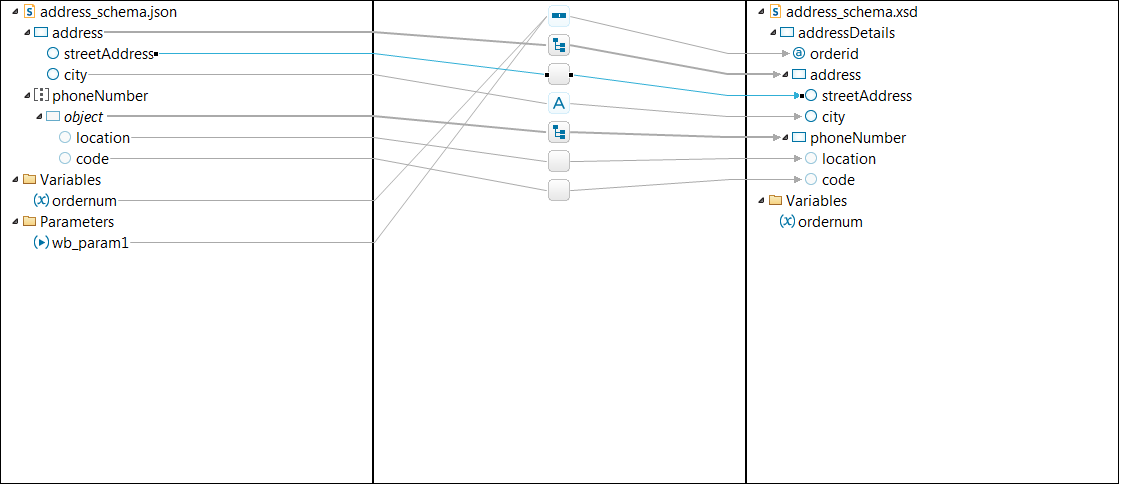
- Create a policy called
AddressMapcontaining an Execute Data Map filter that executes theaddressjsonxmlmapdata map. - Add a relative path for the
AddressMappolicy so that all requests received by API Gateway on the path/maps/transformaddressare processed by theAddressMappolicy. On the HTTP Method tab of the path resolver, set the method toPOST.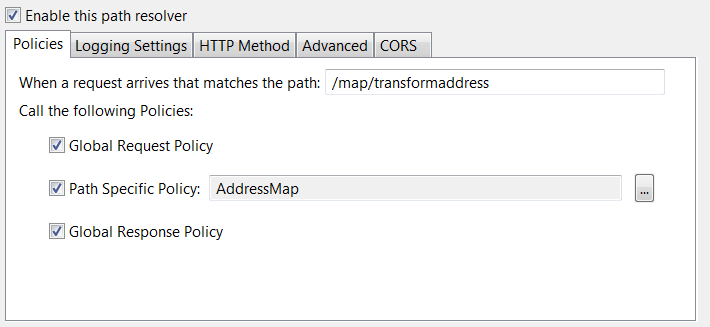
- Use a REST client such as POSTMAN to send a POST request to API Gateway containing an address in JSON format. The response should be the address mapped to XML format according to the data map you defined.
For example, send a POST request to the URL:
http://localhost:8080/map/transformaddress
If the body of the request contains the following JSON formatted address:
{
  "address": {
    "streetAddress": "21 2nd Street",
    "city": "New York"
  },
  "phoneNumber": [
    {
      "location": "home",
      "code": 44
    }
  ]
}
The mapping defined by the addressjsonxmlmap data map results in the following response (an XML formatted address):
<?xml version="1.0" encoding="UTF-8"?>
<addressDetails orderid="12345POST">
    <address>
        <streetAddress>21 2nd Street</streetAddress>
        <city>NEW YORK</city>
    </address>
    <phoneNumber>
        <location>home</location>
        <code>44</code>
    </phoneNumber>
</addressDetails>