Customize API Manager
14 minute read
Create a custom API portal
For deeper customization and integration with your website, use Axway API Portal to create a branded and customized self-service web portal, which enables API consumers to consume APIs that you have exposed. This portal enables API consumers to register user profiles and applications, manage credentials, browse front-end APIs and documentation, monitor application use of APIs, access blogs and forums, and so on.
API Portal is implemented as a stand-alone CMS-based portal, which you can run using the default Axway branding and functionality, or customize and extend to meet your specific requirements and those of your target API consumers. You can deploy the internet-facing API Portal separately from API Gateway and API Manager, with a dedicated web interface to limit potential security breaches.
For more details, see the following API Portal documentation:
Customize API Manager generated email
API Manager automatically generates emails by default to confirm actions such as user registration or client application approval. For example, for user registration, you can customize the contents of the following file:
INSTALL_DIR/apigateway/system/conf/apiportal/email/register-user.template.html
Customize the generated email header
The following example shows the default Axway-branded email header in the register-user-template.html
file:
<img src="cid:${email.image.logo}" alt="http://www.axway.com" border="0" id="headerImage campaign-icon" />
The following example shows a rebranded custom email header:
<img src="https:/www.acme-corporation.com/portal/images/header.gif" alt="http://www.acme-corporation.com" border="0" id="headerImage campaign-icon"/>
Customize the generated email footer
The following example shows the default Axway-branded email footer in the register-user-template.html
file:
<em>Copyright © 2018 Axway, All rights reserved.</em><strong>http://www.axway.com</strong>
The following example shows a rebranded custom email header:
<em>Copyright © 2018 Acme Corporation, All rights reserved.</em><strong>http://www.acme-corporation.com</strong>
Customize the generated email logo
The generated email includes a company logo as an attachment. You should replace the following default logo file with your custom company logo file:
INSTALL_DIR/apigateway/system/conf/apiportal/email/images/logo.png
The logo file must be named logo.png and be attached to the email or it will fail to send.
Customize generated email templates
The following email template files include references to www.axway.com, and should be customized to suit your environment:
api-app-req-template.htmlapprove-api-app-req-template.htmlapprove-apipublish-template.htmlapprove-app-template.htmlapprove-user-template.htmlcreate-app-template.htmlcreate-registration-token.htmlcreate-user-template.htmlnew-password-template.htmlpending-approve-user-template.htmlregister-user-templatereject-api-app-req-template.htmlreject-apipublish-template.htmlreject-app-template.htmlreject-user-template.htmlrequest-apipublish-template.htmlremove-api-app-access-template.htmlreset-password-template.htmltrial-new-password-template.html
Email template variables
The generated email template files include replacement variables (for example, email.image.logo, user.email, and so on). These variables are a read-only set, which means that you cannot add new variables, and changing the name of a variable is not supported. However, you can use these variables as needed if customizing generated emails.
All of the email template files have access to the following common variables:
email.fromemail.bounceAddressemail.subjectemail.image.logoapimanager.nameapimanager.hostnameapimanager.portapiportal.nameapiportal.hostnameapiportal.portapiportal.requestportal.nameportal.hostnameportal.portappowner.usernameappowner.emailuser.roledelegate.usermngmt.settingself.reset
Some additional variables are only used in specific template files, which you can view in each file. For example, the api-app-req-template.html file also contains:
oadmin.nameuser.nameuser.emailapi.nameapp.name
Customize API Manager data
API Manager organization, user, application, and API objects support user-defined fields called custom properties. These custom properties are stored with all other object properties in the API Manager persistence layer (defaults to Apache Cassandra).
You can set and retrieve custom properties in the same way as the default out-of-the-box Organizations, Application Developers, Applications, or API pages in API Manager, and you can extend the respective user interface screens to enable viewing and editing of these custom properties. When configuring user objects, you can set the custom properties during user registration.
You can configure custom properties using the following object in your API Manager configuration:
customPropertiesConfig: {
   user: {
      // custom properties...
   },
   organization: {
      // custom properties...
   },
   application: {
      // custom properties...
   },
   api: {
      // custom properties...
   }
}
You can edit this information in the following file:
INSTALL_DIR/apigateway/webapps/apiportal/vordel/apiportal/app/app.config
For more info on how to configure custom properties, see API Manager custom properties.
Add a custom property to organizations
The following example adds a new field for organizations that enables the user to register the Skype ID for an organization. To add a custom property to organizations, perform the following steps:
-
Insert the following example configuration fragment into the
organizationproperty:customPropertiesConfig: { organization: { // custom properties skypeid: { label: 'Skype' } } } -
After updating the file, log in to API Manager.
-
Press Ctrl-F5 to refresh.
The Organizations page in API Manager will now contain the new custom property.
Example request using a custom property
Using the skypeid custom property, the following example HTTP request creates an organization with this custom property:
POST /api/portal/v1.0/organizations/ HTTP/1.1
content-type: application/json
Authorization: Basic YXBpYWRtaW5AbG9jYWxob3N0OmNoYW5nZW1l
User-Agent: Jakarta Commons-HttpClient/3.1
Host: localhost:8075
Content-Length: 145
{
    "name" : "MyOrg",
    "description" : "My organization.",
    "phone" : "+353 (1) 6742000",
    "email" : "myorg@axway.com",
    "skypeid" : "MYORG",
    "enabled" : true
}
The following example HTTP request updates an organization with this custom property:
PUT /api/portal/v1.0/organizations/c85cf2e6-cb5e-4f37-afb2-5f0d250e40f2 HTTP/1.1
content-type: application/json
Authorization: Basic YXBpYWRtaW5AbG9jYWxob3N0OmNoYW5nZW1l
User-Agent: Jakarta Commons-HttpClient/3.1
Host: localhost:8075
Content-Length: 238

{
    "id" : "c85cf2e6-cb5e-4f37-afb2-5f0d250e40f2",
    "name" : "MyOrg",
    "description" : "My organization.",
    "phone" : "+353 (1) 6742000",
    "email" : "org2@axway.com",
    "skypeid" : "myorg",
    "enabled" : true,
    "restricted" : false,
    "createdOn" : 1367424410635
}
Add a custom property to users
To add a custom property to users, insert the following example configuration fragment into the user property in the app.config
file:
customPropertiesConfig: {
    user: {
       // custom properties
        skypeid: {
            label: 'Skype'
        }
    }
}
The Application Developers page in API Manager will now contain the new custom property.
Add a custom property to applications
Similarly, to add a custom property to applications, insert the following example configuration fragment into the application
property in the app.config file:
customPropertiesConfig: {
    application: {
        // custom properties
        skypeid: {
            label: 'Skype'
        }
    }
}
The Applications page in API Manager will now contain the new custom property.
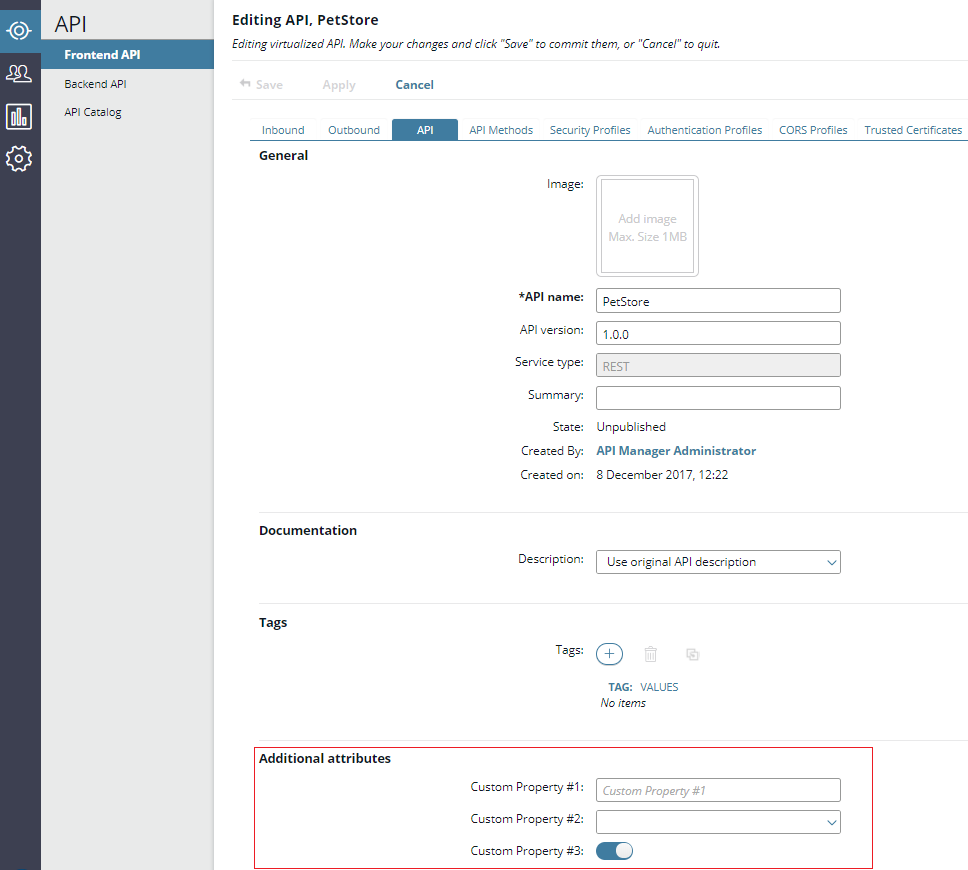
Add a custom property to APIs
To add custom properties for APIs, insert the following example configuration fragment into the api property in the app.config
file:
customPropertiesConfig: {
    api: {
        // custom properties
        customProperty1: {
           label: 'Custom Property #1',
           permissions: {
              admin: { read: true, write: true, visible:true },
              oadmin: { read: true, write: true, visible:true },
              user: { read: true, write: false, visible:true }
            }
         },
         customProperty2: {
            label: 'Custom Property #2',
            type: 'select',
            permissions: {
               admin: { read: true, write: true, visible:true },
               oadmin: { read: true, write: true, visible:true },
               user: { read: true, write: false, visible:true }
            },
            options: [
               { value: '1', label: 'Value 1' },
               { value: '2', label: 'Value 2' },
               { value: '3', label: 'Value 3' }
             ]
          },
         customProperty3: {
            label: 'Custom Property #3',
            type: 'switch',
            permissions: {
               admin: { read: true, write: true, visible:true },
               oadmin: { read: true, write: true, visible:true },
               user: { read: true, write: false, visible:true }
          },
          options: [
              { value: true, label: 'ON' },
              { value: false, label: 'OFF' }
           ]
       }
    }
}
The API tab for a front-end API in API Manager will now contain these new custom properties. For example:
Tip
In all cases, after updating yourapp.config file, log in to API Manager, and press Ctrl-F5 to refresh the API Manager screen.
Export and import of custom properties in API collections
When exporting an API collection from API Manager, and custom properties are configured, these custom properties are present in the API collection export file.
When importing an API collection containing custom properties, the custom properties are persisted to Apache Cassandra using the API Gateway KPS, and are returned in REST API calls for the front-end API. If the custom properties have also been configured in app.config, they are displayed when editing the front-end API. However, if the custom properties have not been configured in app.config, they are not displayed when editing the front-end API (despite the values being returned in REST API calls), and remain so until app.config is updated, and API Manager is refreshed.
Custom property message attributes
When configured, custom properties are available to API Manager request, routing, and response policies using the following message attribute:
${api.custom.properties}
This attribute stores the custom properties as name-value pairs as java.util.HashMap<String,String>. You can access the value of a custom property named customProp1 using the following selector:
${api.custom.properties.customProp1}
For more details, see Retrieve custom properties.
Custom property options
Custom properties are customPropertiesConfig fragments with a unique name (for example, skypeid). You can specify the following options.
label
Required. Friendly name for the property displayed in API Manager (for example, label:'My Custom Property').
type
Optional. Can be one of the following:
custom: Text field (default)switch: On/off switch fieldselect: Drop-down list fieldnumber: Numeric field
For example, use type:select to specify a custom property as a drop-down list.
disabled
Optional. Can be false or true. Overrides the permissions option. Defaults to disabled:false.
permissions
Optional. Read, write, and visibility permissions per-user role. By default, the property is read, write, and visible for all roles. The following shows an example:
permissions:{
    admin:{ read:true, write:true, visible:true },
    oadmin:{ read:true, write:true, visible:true },
    user:{ read:true, write:true, visible:true }
},
Note
If the visible field is false the custom property is not displayed in the UI, regardless of what the read field is set to. The permissions defined here only effect the API Manager UI, meaning that if write is set to false, the REST API can still be used to modify the User, Organization, Application, and API entities, circumventing the restrictions set for the UI.options
Optional. Required for the switch and select options. The following shows an example:
options:[
    {value:true, label:'One'},
    {value:'ii', label:'Two'},
    {value:3, label:'Three'}
    ],
required
Optional. Can be false or true. Defaults to required:false.
help
Optional. Help text for a property, that is displayed in API Manager (for example, help:'This is help text').
regex
Optional. It is used for validating property values.
Regex expression example:
^[0-9A-F]{8}-[0-9A-F]{4}-[4][0-9A-F]{3}-[89AB][0-9A-F]{3}-[0-9A-F]{12}$
minValue
Optional. Used for validating numeric property values. Can be an integer, a floating point number, or a string representation of an integer or a floating point number. minValue and maxValue should be of the same type to avoid unexpected behavior during validation. Scientific notation is not supported.
Example: minValue: 0.1
maxValue
Optional. Used for validating numeric property values. Can be an integer, a floating point number, or a string representation of an integer or a floating point number. minValue and maxValue should be of the same type to avoid unexpected behavior during validation. Scientific notation is not supported.
Example: maxValue:0.9
decimalPlaces
Optional. Specifies the number of decimal places to be used when validating a numeric field. Default value is 0, indicating a whole number.
Example: decimalPlaces: 0
defaultValue
Optional. Specifies a default value for a property. Can be a string, a number, or a boolean value.
Example: defaultValue: 0.5
error
Optional. Specifies an error message which will appear when an input validation fails.
Example: error: 'Enter a valid Version 4 UUID'
custom
Optional. A free-form object to allow extending the schema of a custom property.
As an example, for API Portal, permissions can be overridden for oadmin and user roles using:
    custom: {
        apiportal: {
            permissions: {
                oadmin: { read: true, write: false },
                user: { read: true, write: false }
            }
        },
        authorization: { type: 'basic', realm: 'portal' },
        required: true
    }
}
Display custom properties
API Manager exposes a GET /config/customproperties REST service to view the custom properties meta data, such as property options and their values, specified in the app.config for the following objects:
APIUserOrganizationApplication
As an example, you can call this service to display the custom properties in the API Portal UI. The following example HTTP request retrieves the custom properties meta data:
Request URL: /api/portal/v1.3/config/customproperties
Request Method: GET
Status Code: 200
pragma: no-cache
x-correlationid: Id-73f6e75c46717166a757e8a7 0; Id-73f6e75c4771cea806ea078b 0
content-type: application/json
cache-control: no-cache, no-store, must-revalidate
expires: 0

{
  "user":{"skypeid":{"label":"Skype","type":"custom","disabled":false,"required":false,
  "permissions":{"oadmin":{"read":true,"write":true,"visible":true},"user":{"read":true,"write":true,"visible":true},"admin":{"read":true,"write":true,"visible":true}}}},
  "organization":{},
  "application":{"skypeid":{"label":"Skype","type":"custom","disabled":false,"required":false,"help":"This is help test",
  "permissions":{"oadmin":{"read":true,"write":true,"visible":true},"user":{"read":true,"write":true,"visible":true},"admin":{"read":true,"write":true,"visible":true}},
  "defaultValue":"Test Skype Account"}},
  "api":
  {"customProperty1":{"label":"Custom Property #1","type":"custom","disabled":false,"required":false,"help":"This is help text",
  "permissions":{"oadmin":{"read":true,"write":true,"visible":true},"user":{"read":true,"write":false,"visible":true},"admin":{"read":true,"write":true,"visible":true}}}
}
Retrieve custom properties
You can retrieve API Manager custom properties at runtime using API Gateway filters and KPS selectors.
Retrieve custom properties for organizations
You can use the Read Organization filter to retrieve custom properties for organizations. This filter automatically populates custom attributes and makes them available to your policy. In this filter, the Organization selector represents the primary key, and enables the organization details to be retrieved from the Cassandra database using the KPS:
${apimgmt.organization.id}
After a successful read, the custom property is available in the resulting attribute, which is configured using Name of attribute to set. For example, with an Organization Selector of ${apimgmt.organization.id}, and a Name of attribute to set attribute set to ${myOrg}, you can access customProperty1 using the following value:
${myOrg.customProperty1}
Retrieve custom properties for applications
You can use the Read Application filter to retrieve custom properties for applications. This automatically populates custom attributes and makes them available to the policy. In this filter, the Application ID selector represents the primary key, which enables the application details to be retrieved from the Cassandra database using the KPS:
${authentication.application.id}
After a successful read, the custom property is available in the resulting attribute, which is configured using Name of attribute to set. For example, with an Application ID Selector of ${authentication.application.id}, and a Name of attribute to set attribute set to ${myApp}, you can access customProperty1 using the following value:
${myApp.customProperty1}
Retrieve custom properties for users
You can use the Read Application Developer filter to retrieve custom properties for API consumer users. This automatically populates custom attributes and makes them available to the policy. In this filter, the Application Developer ID selector represents the primary key, which enables the user details to be retrieved from the Cassandra database using the KPS:
${apimgmt.appdeveloper.id}
After a successful read, the custom property is available in the resulting attribute, which is configured using Name of attribute to set. For example, with an Application Developer ID Selector of ${apimgmt.appdeveloper.id}, and a Name of attribute to set attribute set to ${myUser}, you can access customProperty1 using the following value:
${myUser.customProperty1}
Retrieve custom properties for APIs
You can retrieve custom properties for APIs by directly querying the KPS using selectors. For example, if a custom property named skypeId is configured, you can retrieve this using:
${kps.PortalVirtualizedAPI["2a461cba-f060-4829-ba43-9d8200369e62"].customProperties.skypeId}
In this case, 2a461cba-f060-4829-ba43-9d8200369e62 is the ID of the virtualized API.
The following example uses a message attribute for the ID:
${kps.PortalVirtualizedAPI[alert.apiIdList].customProperties.internalId}
Note
Custom properties cannot be encrypted. This means that any sensitive data stored in custom properties will be sent in the clear.Customize API Manager password validation
API Manager enables you to perform custom password validation based on a specified regular expression. For example, you can test for a mix of lowercase, uppercase, and special characters for the API Manager user registration and change password flows. If the password characters validate, this returns true. Otherwise, this returns a specified error message, or false.
You can customize password validation for the API Manager user registration and change password flows by editing the following files:
-
To customize password validation for user registration, you must edit the following file:
INSTALL_DIR/apigateway/webapps/apiportal/vordel/apiportal/app-login/app.configNote
API Portal complies only with the rules set in/app-login/app.configfile for all flows where the user is forced to change their password. -
To customize password validation for password changing, you must edit the following file:
INSTALL_DIR/apigateway/webapps/apiportal/vordel/apiportal/app/app.config
Configuration steps
In each of the app.config files, perform the following steps:
-
Specify a custom regular expression in the
validatePasswordmethod. For example:validatePassword:function(password) { return /(?=.*\d)(?=.*[a-z])(?=.*[A-Z]).{6,}/.test(password); }, -
Specify a custom validation message for invalid passwords in the next section. For example:
invalidPasswordMessage:'Password must include uppercase, lowercase, and special characters.', -
After updating these files, enter the API Manager URL, for example:
https://localhost:8075 -
Press Ctrl-F5 to refresh the page, then log in to API Manager.
Customize API Gateway Manager URL for testing
API Manager enables you to specify the location of the API Gateway Manager web console that is used for testing. For example, this enables the Try method button to link to the specified API Gateway Manager console for viewing the transaction log.
To specify the location of the API Gateway Manager console, perform the following steps:
-
Edit the following file:
INSTALL_DIR/apigateway/webapps/apiportal/vordel/apiportal/app/app.config -
Enter the location of the API Gateway Manager console. For example:
nodemanager:'https://localhost:8090', -
After updating the file, log into API Manager.
-
Press Ctrl-F5 to refresh.
Customize Amplify menu header
You can configure API Manager and API Gateway Manager menu headers to enable features like search, help, and link to the Amplify platform. The menu header displays all features by default, but you can choose to hide some or all of them.
- Search: Allows you to search by any term in multiple Axway portals, for example, documentation, support, blog, community, and so on.
- Help: Displays a list of links to Axway’s portals, for example, documentation, support, blog, community, and so on.
- Platform: Redirects you to the Amplify platform portal.
The menu is located in the app.config file, and it is enabled by default:
connectedServicesMenu: {
    headerOffline: false,
    showSearch: true,
    showHelp: true,
    showPlatform: true
}
To customize the menu header, perform the following steps:
-
Edit the following files, accordingly to your product:
- API Manager:
INSTALL_DIR/apigateway/webapps/apiportal/vordel/apiportal/app/app.config - API Gateway Manager:
INSTALL_DIR/apigateway/webapps/emc/vordel/manager/app/app.config
- API Manager:
-
Change the value of the properties.
Amplify menu header properties
The connectedServicesMenu object groups the connected services properties. You can configure the following properties.
headerOffline: Specifies whether to render the connected services menu in offline mode. If set totrue, it hides the Search, Help, and Platform menu options, regardless of what theshowSearch,showHelporshowPlatformproperties are set to.showSearch: Specifies whether to show the Search menu option. Defaults totrue.showHelp: Specifies whether to show the Help menu option. Defaults totrue.showPlatform: Specifies whether to show the Platform menu option. Defaults totrue.
Custom development
Web application developers can use the API Manager REST API to perform custom development. For example, you can use this REST API to view and update the configured users, organizations, applications, and to monitor events related to API Portal and API Manager. For more details, see the API Manager REST APIs.