Multi-datacenter configuration
21 minute read
This section explains the following for each data type:
- If the data can be replicated across the datacenters (for example, by deploying in both datacenters or automatic replication).
- How to configure the replication (for example, by configuring Apache Cassandra, Ehcache, or RDBMS).
- How to install and configure API Gateway and API Manager in multiple datacenters, and how to optimize performance.
For details on recommended architecture, see Multi-datacenter deployment.
API Management configuration
The recommended configuration for each data type and its replication between datacenters is as follows:
API Gateway data
- API Gateway configuration: You must deploy the API Gateway group configuration in both datacenters.
- API Gateway logs: Does not apply (local file-based data only).
- API Gateway traffic monitoring: Does not apply (local file-based data only).
- API Gateway KPS custom tables: Automatic. It is recommended to use Cassandra with replication between datacenters. See Configure Cassandra for multiple datacenters, or your RDBMS documentation.
- API Gateway OAuth token store: It is recommended to use Ehcache, and to generate and use OAuth tokens in the same datacenter only. You should configure sticky sessions in your load balancer. See Configure Ehcache in multiple datacenters.
- API Gateway throttling counters: It is recommended to configure at least one distributed cache per datacenter and to avoid replication between datacenters. You should configure sticky sessions in your load balancer. See Configure Ehcache in multiple datacenters.
- API Gateway custom cache: It is recommended to configure at least one distributed cache per datacenter and to avoid replication between datacenters. You should configure sticky sessions in your load balancer. See Configure Ehcache in multiple datacenters.
API Manager data
- API Manager catalog, client registry, web-based settings: Automatic. It is best to use Cassandra with replication between datacenters. See Configure Cassandra for multiple datacenters.
- API Manager quota counters: In memory only, or automatic when using external storage (Cassandra or RDBMS). See Configure API Manager quota in multiple datacenters. See also Configure Cassandra for multiple datacenters, or your RDBMS documentation.
- API Manager metrics: Automatic. See your RDBMS documentation.
API Gateway Analytics data
- API Gateway Analytics configuration: You must deploy the group configuration on both datacenters. For details on automating deployment processes, see the API Gateway DevOps Deployment Guide.
- API Gateway Analytics metrics: See your RDBMS documentation.
Configure Cassandra for multiple datacenters
Cassandra is required to store data for API Manager and to store custom KPS tables for API Gateway. For details on the recommended Cassandra architecture, see Multi-datacenter deployment architecture.
Note
You must install and configure Cassandra on each node from each datacenter installing and configuring API Gateway and API Manager.Prerequisites
The following prerequisites apply to Cassandra in a multi-datacenter production environment:
- Ensure that Cassandra version 3.11.11 is installed.
- You must have at least three Cassandra nodes per datacenter. Cassandra must be installed on each node in the cluster, but it should not be started until the Cassandra cluster is fully configured. For more information, see Install an Apache Cassandra database.
- Configure
JAVA_HOMEto a JRE 1.8 installation. - Each Cassandra node must have Python 2.7.x installed.
- Time must be synchronized on all servers.
- Determine a naming convention for each datacenter and rack, for example:
DC1,DC2RACK1,RACK2,RACK3Caution
The rack names must be exactly the same in each datacenter. You should choose the names carefully because renaming a datacenter is not possible.
- Determine the seed nodes. You must have at least two Cassandra seed nodes per datacenter.
- Choose a unique name for the Cassandra cluster.
- To avoid firewall issues, you must open the following ports to allow bi-directional communication among the nodes:
7001: Cassandra TLS/SSL inter-node cluster communication7199: Cassandra JMX monitoring port (only enabled onlocalhostfor security reasons, you must use SSH to connect the machine).9042: CQL native client port (only required for an API Gateway or API Manager client connection to Cassandra)
Configure your cassandra.yaml file
On each node in the cluster, you must configure the following properties in the CASSANDRA_HOME/cassandra/conf/cassandra.yaml file:
Configure multi-datacenter settings
Configure the following settings in cassandra.yaml:
cluster_name: Your chosen cluster name, common across both datacenters (for example,cassandra-cluster1)num_tokens:256endpoint_snitch:GossipingPropertyFileSnitch-seeds: Internal IP address for all seed nodes. Each datacenter should have its own seed node IP addresses first, followed by the other datacenters seed nodes. This is critical for replication. For example:- DC1 seed nodes:
192.168.10.1,192.168.10.2 - DC2 seed nodes:
192.168.20.1,192.168.20.2 - DC1 configuration:
-seeds:192.168.10.1,192.168.10.2,192.168.20.1,192.168.20.2
- DC2 configuration:
-seeds:192.168.20.1,192.168.20.2,192.168.10.1,192.168.10.2
- DC1 seed nodes:
listen_address: Specify the private IP address of the current node that you are configuring.broadcast_address: Specify the public IP address of the node. For example, this is important when using a VPN with Network Address Translation (NAT) of IP addresses. Communication between datacenters can only take place using an external IP address.start_native_transport:truenative_transport_port:9042
Note
You must removecassandra-topology.properties from cassandra/conf/. This is not needed when GossipingPropertyFileSnitch is set and could cause conflicts.
Configure authentication settings
It is recommended to enable authentication. Set the following properties:
authenticator:org.apache.cassandra.auth.PasswordAuthenticatorauthorizer:org.apache.cassandra.auth.CassandraAuthorizer
Note
When these properties are set, you must change the default Cassandra user.Configure TLS/SSL traffic encryption
It is recommended to enable inter-node and client-to-node TLS/SSL encryption. API Management supports TLS v1.2.
Node-to-node encryption:
To enable node-to-node TLS/SSL traffic encryption, set the following properties:
server_encryption_options:
internode_encryption:allkeystore:my-server-keystore.jkskeystore_password:MY_KEYSTORE_PASSWORDtruststore:my-server-truststore.jkstruststore_password:MY_TRUSTSTORE_PASSWORDrequire_client_auth:true
Client-to-node encryption:
To enable client-to-node SSL traffic encryption, set the following properties:
client_encryption_options:
enabled:trueoptional:falsekeystore:my-client-keystore.jkskeystore_password:MY_KEYSTORE_PASSWORDtruststore:my-client-truststore.jkstruststore_password:MY_TRUSTSTORE_PASSWORDrequire_client_auth:true
Configure your cassandra-rackdc.properties file
Configure the cassandra/conf/cassandra-rackdc.properties file with your chosen datacenter and rack names for each node, and set prefer_local=true.
Caution
The rack names must be exactly the same in each datacenter. You should choose the names carefully because renaming a datacenter is not possible.For example:
| Node | Setting in cassandra-rackdc.properties |
|---|---|
| DC1, node1 | dc=DC1 rack=RACK1 prefer_local=true |
| DC1, node2 | dc=DC1 rack=RACK2 prefer_local=true |
| DC1, node3 | dc=DC1 rack=RACK3 prefer_local=true |
| DC2, node1 | dc=DC2 rack=RACK1 prefer_local=true |
| DC2, node2 | dc=DC2 rack=RACK2 prefer_local=true |
| DC2, node3 | dc=DC2 rack=RACK3 prefer_local=true |
Start your Cassandra nodes
When you have configured cassandra.yaml and cassandra-rackdc.properties on all nodes, you can start the seed nodes one at a time, followed by the remaining nodes in each datacenter.
Configure cqlsh for TSL/SSL encryption
If the Cassandra cluster has been configured to use client-to-node TSL/SSL encryption, you must configure all clients connecting to the cluster (including cqlsh) to use TSL/SSL. cqlsh is a Python-based command line client for executing Cassandra Query Language (CQL) commands.
To configure cqlsh for TSL/SSL, you must provide the following certificates in a cqlshrc file:
certfile.pem: Contains the CA or server certificate of the Cassandra node. This is specified inmy-client-keystore.jks.usercert.pem: Contains the client certificate forcqlsh. This needs to be added to the Cassandra truststore:my-client-truststore.jksuserkey.pem: Contains the private key of client certificate forcqlsh. This cannot contain a passphrase.
A sample is provided in cassandra/conf/cqlshrc.sample:
When TSL/SSL has been configured, run the following command:
./cqlsh -u cassandra -p MY_PASSWORD --ssl --cqlshrc=MY_CQLSHRC_FILE 192.168.10.1
Configure the default system_auth keyspace
When all nodes are online, if authentication is enabled, you must set the replication strategy and replication factor for the system_auth keyspace to ensure that credentials are shared across the cluster. You can do this using the cqlsh tool from the cassandra/bin directory.
Note
You must set the replication strategy toNetworkTopologyStrategy, and ensure the replication factor is set to the number of nodes per datacenter (for example, 3).
Naming is case sensitive and the keyspace definition must use the snitch-configured datacenter names used in cassandra-rackdc.properties.
For example, on Cassandra node 1 in DC1, perform the following steps:
-
Navigate to the
cassandra/bindirectory -
Log in to
cqlshusing the IP address of the current node. For example:./cqlsh -u cassandra -p cassandra 192.168.10.1 -
Run the following command:
ALTER KEYSPACE "system_auth" WITH REPLICATION = {'class' : 'NetworkTopologyStrategy', 'DC1' : n, 'DC2' : n};In this example,
nis the number of nodes per datacenter. -
Run
nodetool repairon each node as follows:./nodetool repair -pr system_auth -
Change the default Cassandra user. For more information, see Configuring authentication documentation.
Configure API Management in multiple datacenters
When the Cassandra cluster has been set up, you can proceed with installing API Gateway and API Manager. You must have at least two API Gateway instances per datacenter.
Configure the first API Gateway node
On the first API Gateway host in DC1, perform the following steps:
-
Install API Gateway and API Manager using the API Gateway installer. Do not select Cassandra, which has already been installed. For more details, see Install API Manager.
-
Register the Admin Node Manager using the
managedomaincommand inINSTALL_DIR/apigateway/posix/bin. -
Start the Admin Node Manager using the
nodemanagercommand. -
Add the API Gateway instance and group using the
managedomaincommand. -
Before starting the API Gateway instance, add the Cassandra host names and IP addresses as environment variables in your
envSettings.propsfile located inINSTALL_DIR/apigateway/conf. For example:env.CASS.NAME1=Host 10.1 env.CASS.NAME2=Host 10.2 env.CASS.NAME3=Host 10.3 env.CASS.HOST1=192.168.10.1 env.CASS.HOST2=192.168.10.2 env.CASS.HOST3=192.168.10.3 env.CASS.REPL.FACTOR=DC1:3;DC2:3; -
Start the API Gateway using the
startinstancecommand inINSTALL_DIR/apigateway/posix/bin. -
Configure the API Gateway to connect to the Cassandra cluster. In the Policy Studio tree, select Server Settings > Cassandra, and configure the following:
- Keyspace: Name of the API Gateway Cassandra keyspace to be created when deployed. Defaults to
x${DOMAINID}_${GROUPID} - Initial replication strategy: Network Topology Strategy
- Initial replication:
${env.CASS.REPL.FACTOR} - Hosts: Add the environment variable settings that you set in
envSettings.props. For example:
- Authentication: Enter the Cassandra user name and password that you configured earlier. See Configure the default system_auth keyspace.
- Security: Select Enable SSL, and select a trusted certificate and client certificate. For example:
- Keyspace: Name of the API Gateway Cassandra keyspace to be created when deployed. Defaults to
-
Select File > Configure API Manager to configure API Manager settings.
-
For all KPS collections, update the read and write consistency levels to LOCAL_QUORUM. For example, in the Policy Studio tree, select Environment Configuration > Key Property Stores > API Server > Data Sources > Cassandra Storage, and click Edit.
-
Repeat this step for each KPS collection using Cassandra (for example, Key Property Stores > OAuth and API Portal for API Manager). This also applies to any custom KPS collections that you have created.
-
Click Deploy in the toolbar to deploy the updated configuration.
Note
Policy Studio may need a longer transaction timeout in the Admin Node Manager server settings than the default time (4 minutes), especially for the first deploy that creates the API Manager Cassandra tables. In this case, it is recommended to increase the timeout to at least 10 minutes. See the API Gateway Administrator Guide for more details. If Policy Studio shows a timeout error, the back-end would still complete and the success status can be verified in the API Manager instance trace file.Update the Cassandra replication settings for the new API Gateway keyspace
Note
This set up is only needed if the initial deployment did not set the multi-datacenter replication values.When the new API Gateway keyspace has been deployed, you must update its replication strategy and replication factor in the same way as the default system_auth keyspace. This time instead of the system_auth keyspace name, use the name of the newly created keyspace.
Perform the following steps:
-
On Cassandra node 1 in DC1, navigate to the
CASSANDRA_HOME/cassandra/bindirectory. -
Log in to
cqlshusing the IP address of the current node. For example:./cqlsh 192.168.10.1 -
Run the following command:
ALTER KEYSPACE "KEYSPACE_NAME" WITH REPLICATION = {'class' : 'NetworkTopologyStrategy', 'DC1' : 3, 'DC2' : 3}; -
On each node, run
nodetool repair -pr.Tip
In a production environment, you should schedule weekly node repairs as a best practice.
Configure the remaining API Gateway nodes
When the API Gateway keyspace has been deployed and its replication updated, you can register the remaining hosts and add API Gateway instances using the managedomain command. Alternatively, you can do this using the API Gateway Manager web console.
Note
You should always add one API Gateway instance at a time to the group.Configure the API Gateway environment variables in DC1
For each additional API Gateway instance in DC1, add the following to envSettings.props before starting the instance:
env.CASS.NAME1=Host 10.1
env.CASS.NAME2=Host 10.2
env.CASS.NAME3=Host 10.3
env.CASS.HOST1=192.168.10.1
env.CASS.HOST2=192.168.10.2
env.CASS.HOST3=192.168.10.3
env.CASS.REPL.FACTOR=DC1:3;DC2:3;
# API Manager Port
env.PORT.APIPORTAL=8075
# API Manager Traffic Port
env.PORT.PORTAL.TRAFFIC=8065
Configure the API Gateway environment variables in DC2
For each API Gateway instance in DC2, add the following settings to envSettings.props before starting the instance:
env.CASS.NAME1=Host 20.1
env.CASS.NAME2=Host 20.2
env.CASS.NAME3=Host 20.3
env.CASS.HOST1=192.168.20.1
env.CASS.HOST2=192.168.20.2
env.CASS.HOST3=192.168.20.3
env.CASS.REPL.FACTOR=DC1:3;DC2:3;
# API Manager Port
env.PORT.APIPORTAL=8075
# API Manager Traffic Port
env.PORT.PORTAL.TRAFFIC=8065
Add the load balancer host to API Management whitelists
For each API Gateway host, you must add the external load balancer host to the whitelists for the Node Manager and API Manager to ensure that it will be accepted in the datacenter.
Add load balancer host to Node Manager whitelist
You can do this by creating an API Gateway project based on the Node Manager configuration and adding the external load balancer host to the Node Manager whitelist as a servlet property:
-
In Policy Studio, select File > New Project.
-
Enter a project Name, and click Next.
-
Select From existing configuration for the project starting point, and click Next.
-
Click the browse button, select the following directory, and click Finish:
INSTALL_DIR/apigateway/conf/fed -
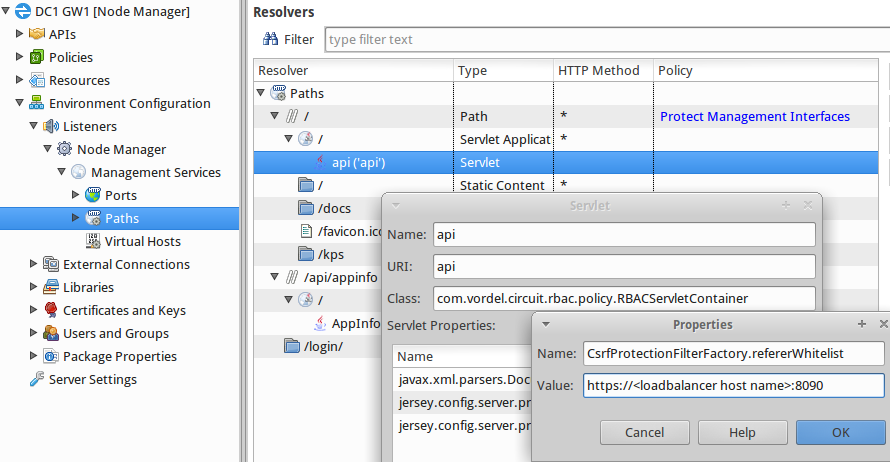
In the Policy Studio tree, select Environment Configuration > Listeners > Node Manager > Management Services > Paths.
-
In the pane on the right, right-click the api servlet, and select Edit.
-
In the Servlet dialog, click Add, and enter the following in the Properties dialog:
- Name:
CsrfProtectionFilterFactory.refererWhitelist - Value:
https://LB_HOSTNAME:8090
- Name:
-
Right-click the AppInfo Service servlet, click Edit, and add the same whitelist setting as a property (see previous step).
-
When complete, the configuration is automatically saved to the
apiprojectsdirectory used by Policy Studio for your project. To get the Node Manager to read this change, you must copy the contents of yourapiprojectssubdirectory toapigateway/conf/fed. -
Finally, you must restart the Node Manager for the configuration changes to be picked up.
The following shows an example of configuring the api servlet setting in Policy Studio:
Note
You must ensure that every Node Manager has been updated to accept the load balancer host name.You can also add multiple load balancer hosts to the whitelist. For example:
- Name:
CsrfProtectionFilterFactory.refererWhitelist - Value:
https://dc1-lb.example.com:8090|https://dc2-lb.example.com:8090
Add load balancer host to API Manager whitelist
You can do this by creating a new project from an API Gateway instance and adding the external load balancer host to the API Manager whitelist as a servlet property:
- In Policy Studio, select File > New Project from an API Gateway instance.
- Enter a project Name, and click Next.
- In the Connection Details for the datacenter, enter the load balancer host name in the Host field and your credentials, and click Next.
- Select the server instance in the datacenter that you wish to update, and click Finish.
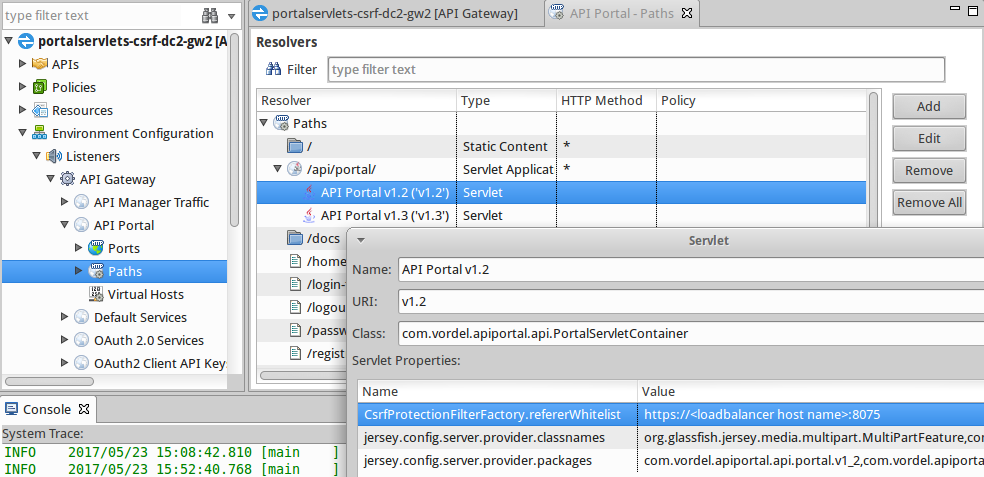
- In the Policy Studio tree, select Environment Configuration > Listeners > API Gateway > API Portal > Paths.
- In the pane on the right, right-click the API Portal v1.2 (‘v1.2’) servlet, and select Edit.
- In the Servlet dialog, click Add and enter the following in the Properties dialog:
- Name:
CsrfProtectionFilterFactory.refererWhitelist - Value:
https://<LB_HOSTNAME>:8075
- Name:
- Repeat steps 6 and 7 for API Portal v1.3 (‘v1.3’) servlet and API Portal v1.4 (‘v1.4’) servlet.
- When complete, deploy the configuration to all API Gateways using the load balancer that you added to the whitelist.
The following shows an example of configuring the API Portal v1.2 (‘v1.2’) servlet setting in Policy Studio:
API Manager Single Sign On in multiple datacenters
For API Manager Single Sign On (SSO), when you have multiple API Managers under a specific load balancer, the service-provider.xml file must be the same for all API Manager instances under that load balancer. For the Keycloak identity provider, this means that the same client ID maps to the SAML profile, and that the URL should match the load balancer host name instead of the API Gateway host name.
For example, you have two datacenter sites, apimgt.example.us and apimgt.example.eu. Each site has a separate client, load balancer, and service-provider.xml file, and this file is shared by all API Manager instances under that load balancer.
For more details on API Manager SSO, see Configure API Manager SSO.
Prevent simultaneous design-time changes in multiple datacenters
If you are using API Management in two or more datacenters at design time, there is a chance that changes made to the same object simultaneously could overwrite each other and potentially put the datacenters out of sync. This is because you cannot to predict the order in which any changes are applied due to the many different variables involved.
In this case, the data would likely become inconsistent between datacenters, and it would be difficult to know that an issue had occurred. There is also no guarantee that they would correctly synchronize at any time in the future. For this reason, it is best to make any design-time changes or updates to objects in your API Management system in one datacenter only.
Optimize API Management performance in a multi-center environment
This section explains how to configure various API Gateway settings to optimize API Gateway and API Manager performance in a multi-center environment.
Increase maximum received bytes per transaction to optimize API Manager
You can configure global API Gateway settings under the Server Settings node in Policy Studio.
In a multi-datacenter environment with a large amount of APIs and data, you may need to increase the value of Maximum received bytes per transaction to optimize the performance of the API Manager web console (for example, when viewing APIs in the API catalog). The default value is 20 MB (20971520bytes). For example, you might need to increase this setting, depending on the number of APIs and the volume of data in your multi-datacenter environment.
To configure this setting, in the Policy Studio tree, select the Server Settings node, and click General in the right pane. To confirm updates, click Apply changes at the bottom right.
After changing any settings, you must deploy to the API Gateway for the changes to be enforced. Click the Deploy button in the toolbar, or press F6.
Increase API Manager polling time and events time for Cassandra replication
When API Manager is deployed in multiple datacenters, and changes to data stored in Cassandra are replicated across datacenters, there is a small risk that the API Gateway runtime in the datacenter where the data is replicated to might operate with outdated data. In this case, to update the data, you must restart all API Gateway instances in the affected datacenter.
To minimize this risk, you can use the esexplorer tool to increase the polling time in milliseconds in each API Gateway instance in the datacenter where the data is replicated to. The polling time value must be balanced with the need of having updated data in real time in the API Gateway runtime environment.
You must also change the Time To Live (TTL) of the API Manager events table to be consistent with Cassandra for failover situations. Cassandra uses a default value of three hours in its hinted handoff configuration.
To configure the API Manager polling time and events table settings, perform the following steps:
-
Change to the following directory:
INSTALL_DIR/apigateway/posix/bin -
Enter the
esexplorercommand. -
Select Store > Connect, and browse to the following file:
INSTALL_DIR/apigateway/groups/<group-name>/conf/<group-id>/configs.xml -
Select System Components > Portal Config in the tree on the left.
-
Select the vapiPollerPeriodMs setting in the pane on the right. Double-click the default value of
200, and enter a value in the range of1000to30000milliseconds.Note
As a general rule, the higher the value of the polling time setting, the lower the risk of outdated data in the API Gateway runtime. However, it will take longer to update the data in the replicated datacenter. -
Select the vapiEventTTLMs setting on the right, and double-click to enter a value of
10800000milliseconds (3 hours). This is consistent with the default value of themax_hint_window_in_mssetting in thecassandra.yamlfile. -
When you have completed these settings, you can open the updated API Gateway project in Policy Studio and deploy the updates to all the API Gateway instances in the affected datacenter.
Increase Node Manager timeout for longer API Gateway startup
In a multi-datacenter environment, it may take longer for API Gateway to start. By default, the API Gateway active timeout is set to 4 mins. However, it may take longer for an API Gateway instance to start up in a multi-datacenter environment. For example, this may result in the Node Manager throwing a 503 error saying that the API Gateway cannot restart.
To configure the Node Manager timeout for longer startup time, perform the following steps:
-
Change to the following directory:
INSTALL_DIR/apigateway/posix/bin -
Enter the
esexplorercommand. -
Select Store > Connect, and browse to the following file:
INSTALL_DIR/apigateway/conf/fed/configs.xml -
Select Default System Settings in the tree on the left.
-
Select the activeTimeout setting in the pane on the right. Double-click the default value of
240000(4 minutes), and enter a higher value to better suit your multi-datacenter environment. -
Select the maxTransTimeout setting on the right, and double-click to enter a higher value to suit your environment.
-
To update to all Node Managers in the group, you can copy the contents of the updated
apigateway/conf/feddirectory to the same directory on each node. Alternatively, you can run theesexplorertool on each node to update the Node Manager settings.
Configure Ehcache in multiple datacenters
Caching is replicated between API Gateway instances in each datacenter using the Ehcache distributed caching system. In the distributed cache, there is no master cache controlling all caches. Instead, each cache is a peer that needs to know where all the other peers are located. The examples in this section shows distributed caches for OAuth and Throttling. The cache settings are the same in both cases.
Note
You should configure at least one distributed cache per datacenter, and should not replicate Ehcache information between datacenters. You should also configure sticky sessions in your load balancer environment to optimize performance.Configure a distributed cache in each datacenter
In a distributed cache, each API Gateway has its own local copy of the cache and registers a cache event listener, which replicates messages to the other caches. This means that events on a single cache are duplicated across all other caches.
To add a distributed cache, perform the following steps:
-
Select the Environment Configuration > Libraries > Caches tree node, and click the Add button at the bottom right.
-
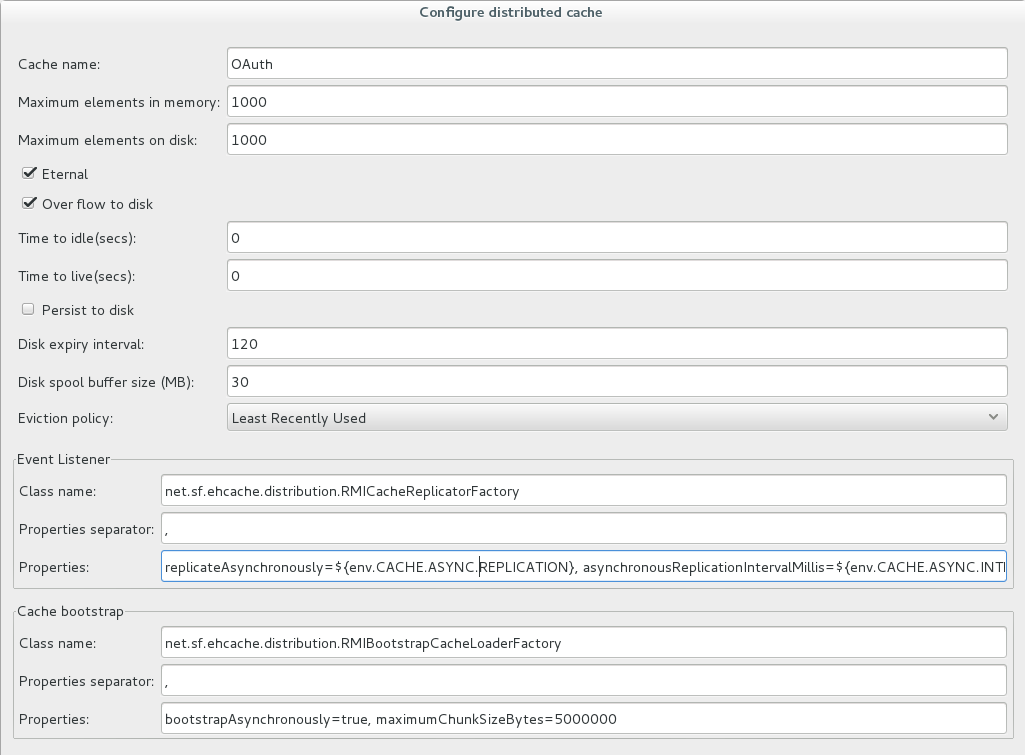
Select Add Distributed Cache from the menu, and configure the following settings on the Configure Distributed Cache dialog:
- Cache name: Enter a name for the distributed cache (for example,
OAuthorThrottling). - Event Listener: Properties: Enter the following setting using environment variables for the replication settings:
replicateAsynchronously=${env.CACHE.ASYNC.REPLICATION}, asynchronousReplicationIntervalMillis=${env.CACHE.ASYNC.INTERVAL}, replicatePuts=true, replicateUpdates=true, replicateUpdatesViaCopy=true, replicateRemovals=true - Cache name: Enter a name for the distributed cache (for example,
Note
It is best to setreplicateAsynchronously to true. The default asychronousReplicationIntervaleMillis value is 1000 ms if not specified. It is best to set this to the minimum of 10 ms.
You can leave all other settings on this dialog as default. For example, the required settings are displayed as follows in Policy Studio:
When the OAuth distributed cache has been configured, it can then be used by the OAuth Access Token Stores. For example, select Environment Configuration > Libraries > OAuth2 Stores > Access Token Stores > OAuth Access Token Stores, and right click to select Edit Access Token Store. Select Store in a cache, and click the browse button to select the OAuth distributed cache.
If the OAuth distributed cache is to be used by API Manager, you must also add it in Server Settings > API Manager > OAuth Access Token Stores.
Similarly, when a throttling distributed cache has been configured, it can then be used by the API Gateway Throttling filter.
Configure distributed cache settings for peer discovery in each datacenter
To configure global distributed cache settings for peer discovery, perform the following steps:
-
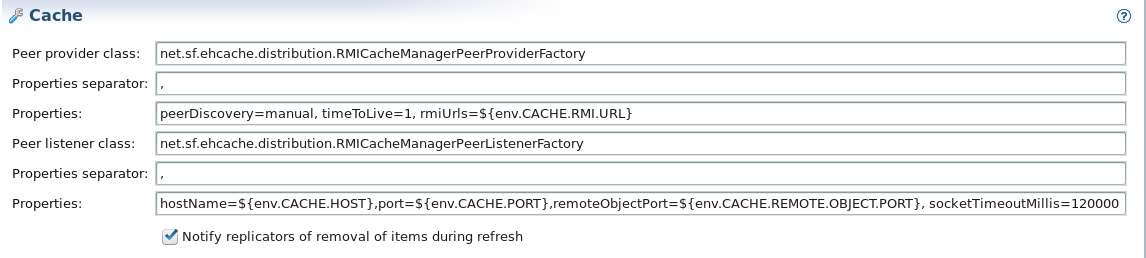
In Policy Studio, select the Server Settings node , and click General > Cache.
-
Configure the following settings:
-
Peer provider class: Properties: Enter the following setting using an environment variable for the cache URLs:
peerDiscovery=manual,timeToLive=1,rmiUrls=${env.CACHE.RMI.URL} -
Peer listener class: Properties: Enter the following setting using environment variables for the hosts and ports:
hostName=${env.CACHE.HOST},port=${env.CACHE.PORT},remoteObjectPort=${env.CACHE.REMOTE.OBJECT.PORT}
socketTimeoutMillis=120000
-
-
You can leave all other settings as default. For example, the required settings are displayed as follows in Policy Studio:
Set the environment variables on each API Gateway host
You must set the environment variables used in the distributed cache in the following file on each host machine:
INSTALL_DIR/apigateway/conf/envSettings.props
For example:
env.CACHE.RMI.URL=//192.168.10.11:40001/OAuth|//192.168.10.11:40001/Throttle
env.CACHE.HOST=192.168.10.10
env.CACHE.PORT=40001
env.CACHE.REMOTE.OBJECT.PORT=40002
env.CACHE.ASYNC.REPLICATION=true
env.CACHE.ASYNC.INTERVAL=10
Note
Theenv.CACHE.RMI.URL environment variable should only include URLs for host machines in the same datacenter.
Configure API Manager quota in multiple datacenters
API Manager quotas enable you to manage the maximum message traffic rate that can be sent by applications to APIs for back-end protection. You can use the Server Settings > API Manager > Quota Settings in Policy Studio to configure how API Manager quota information is stored. By default, quotas are stored in external storage, and automatically adapt to the configured KPS storage mechanism. However, you can also explicitly configure a storage mechanism of Cassandra, RDBMS, or in memory only.
API Manager quota storage
The following general guidelines apply to API Manager quota storage:
- Storing quota in memory only means that the quota calculation is performed by each API Gateway instance in each group between datacenters. If the quota duration is less than 30 seconds, in memory-only storage is automatically activated.
- It is best to use API Manager system quota (stored in Cassandra) when the back-end is shared between datacenters.
- It is best to use the API Gateway Throttling filter (stored in Ehcache) for back-end protection per datacenter.
Further details
For more details on using API Gateway environment variables in envSettings.props, see the API Gateway DevOps Deployment Guide.
For more details on Cassandra and Ehcache, see the following:
- http://ehcache.org/
- http://cassandra.apache.org/
- https://docs.datastax.com/en/cassandra-oss/3.x/index.html