Write a custom filter using the extension kit
17 minute read
Note
The following sections refer tojabber sample code that is no longer included in the code samples supplied with API Gateway. We recommend that you use this section only as a general guide for writing a custom filter using the extension kit.
In this approach, you write your custom filter using the API Gateway developer extension kit. This section details how to write a custom message filter, called the Jabber Filter (API Gateway runtime component and Policy Studio configuration component). It also shows how to configure it as part of a policy in Policy Studio and then demonstrates how the filter sends an instant message to an account on Google Talk.
The steps required to build, integrate, configure, and test the supplied JabberFilter and JabberProcessor sample classes are as follows:
Create the TypeDoc
A TypeDoc is an XML file that contains entity type definitions. Entity type definitions describe the format of data associated with a configurable item. For more details on entity types, see Entity types.
All TypeDocs for custom filters must:
- Extend the
Filtertype - Define a constant filter class (for example, JabberFilter)
- List the configuration fields for the entity
The following example shows how the TypeDoc lists the various fields that form the configuration data for the JabberFilter.
<entityStoreData>
  <entityType name="JabberFilter" extends="Filter">
      <constant name="class" type="string"
        value="com.vordel.jabber.filter.JabberFilter"/>
      <field name="fromEmailAddress" type="string" cardinality="1"/>
      <field name="password" type="string" cardinality="1"/>
      <field name="resourceName" type="string" cardinality="1"/>
      <field name="toEmailAddress" type="string" cardinality="1"/>
      <field name="messageStr" type="string" cardinality="1"/>
   </entityType>
</entityStoreData>
You can also provide internationalized log messages by specifying an <entity> block of type InternationationalizationFilter in the <entityStoreData> elements. For example:
<entityStoreData>
 <!-- Internationalization for logging / audit trail -->
 <entity xmlns="http://www.vordel.com/2005/06/24/entityStore"
   type="InternationalizationFilter">
    <key type="Internationalization">
        <id field="name" value="Internationalization Default"/>
    </key>
    <fval name="type">
        <value>JabberFilter</value>
    </fval>
    <fval name="logFatal">
        <value>Error in the Jabber Filter sending instant message.
          Error: ${circuit.exception}</value>
    </fval>
    <fval name="logFailure">
        <value>Failed in the Jabber Filter sending instant message</value>
    </fval>
    <fval name="logSuccess">
        <value>Success in the Jabber Filter sending instant message</value>
    </fval>
 </entity>
</entityStoreData>
Create the Filter class
A Filter class is responsible for returning the corresponding API Gateway runtime class and Policy Studio class.
The Filter class is responsible for the following tasks:
- Specifying the message attributes it requires, consumes, and generates.
- Returning the corresponding API Gateway runtime class (the Processor class).
- Returning the corresponding Policy Studio class.
The following code shows the members and methods of the JabberFilter class.
public class JabberFilter extends DefaultFilter {

    protected final void setDefaultPropertyDefs() {
         reqProps.add(new PropDef(MessageProperties.CONTENT_BODY,
          com.vordel.mime.Body.class));
    }

    @Override
    public void configure(ConfigContext ctx, com.vordel.es.Entity entity)
      throws EntityStoreException {
        super.configure(ctx, entity);
    }

    public Class getMessageProcessorClass() {
        return JabberProcessor.class;
    }

    public Class getConfigPanelClass() throws ClassNotFoundException {
        // Avoid any compile or runtime dependencies on SWT and other UI
        // libraries by lazily loading the class when required.
        return Class.forName("com.vordel.jabber.filter.JabberFilterUI");
    }
}
There are two important methods implemented in this class:
setDefaultPropertyDefsgetMessageProcessorClass
The setDefaultPropertyDefs method enables the filter to define the message attributes that it requires, generates, and consumes from the attributes message whiteboard.
The whiteboard contains all the available message attributes. When a filter generates message attributes, it puts them up on the whiteboard so that when another filter requires them, it can pull them off the whiteboard. If a filter consumes a message attribute, it is wiped from the whiteboard so that no other filter in the policy can use it.
The attributes are stored in sets of property definitions (Set<PropDef>). A property definition defines a property to type mapping. There are reqProps, genProps, and consProps, which are inherited from the Filter class.
In the case of the JabberFilter class, the content.body attribute, which is of type com.vordel.mime.Body, is required because the SOAP parameters must be extracted from the body of the HTTP request. The property definition is declared as follows:
protected final void setDefaultPropertyDefs() {
    reqProps.add(new PropDef(MessageProperties.CONTENT_BODY,
      com.vordel.mime.Body.class));
}
The next method is the getMessageProcessorClass method, which returns the API Gateway runtime component (the Processor class) that is associated with this Filter class. Each Filter class has a corresponding Processor class, which is responsible for processing the message.
Finally, the corresponding Policy Studio configuration class is returned by the getConfigPanelClass method, which in this case is the com.vordel.jabber.filter.JabberFilterUI class.
Create the Processor class
This is the API Gateway runtime component of the filter that is returned by the getMessageProcessorClass of the Filter class. The Processor class is responsible for performing the processing on messages. It uses the configuration data to process each message.
The following code shows how the Processor attaches to the Filter class and uses its data to process the message. It gets the configuration data using selectors to set up a connection to an XMPP server, creates a chat, and sends a message to a chat participant. The complete code for the class is available in the DEVELOPER_SAMPLES/jabber directory.
public class JabberProcessor extends MessageProcessor {

    …
    @Override
    public void filterAttached(ConfigContext ctx, com.vordel.es.Entity entity)
      throws EntityStoreException {
        super.filterAttached(ctx, entity);
        to = new Selector<String>(entity.getStringValue("toEmailAddress"),
          String.class);
        byte[] passwordBytes = entity.getEncryptedValue("password");
        if (passwordBytes != null) {
            try {
                passwordBytes = ctx.getCipher().decrypt(passwordBytes);
            } catch (GeneralSecurityException exp) {
             Trace.error(exp);
         }
        }
        String pass = new String(passwordBytes);
        password = new Selector<String>(pass, String.class);
        resourceName = new Selector<String>(entity.getStringValue("resourceName"),
          String.class);
        from = new Selector<String>(entity.getStringValue("fromEmailAddress"),
          String.class);
        messageStr = new Selector<String>(entity.getStringValue("messageStr"),
          String.class);
    }

    public boolean invoke(Circuit c, Message message)
      throws CircuitAbortException {
        XMPPConnection connection = null;
       try {
           ConnectionConfiguration config =
           new ConnectionConfiguration("talk.google.com", 5222, "gmail.com");
           connection = new XMPPConnection(config);
            SASLAuthentication.supportSASLMechanism("PLAIN", 0);
           connection.connect();
           connection.login(from.substitute(message), password.substitute(message),
             resourceName.substitute(message));
        } catch (org.jivesoftware.smack.XMPPException ex) {
            Trace.error("Error establishing connection to XMPP Server");
        }
       Chat chat = connection.getChatManager().createChat(to.substitute(message),
         new MessageListener(){
           @Override
           public void processMessage(Chat arg0,
             org.jivesoftware.smack.packet.Message arg1) {
               Trace.debug(arg1.getBody());
           }
       });
       try {
           chat.sendMessage(messageStr.substitute(message));
           connection.disconnect();
       } catch (org.jivesoftware.smack.XMPPException ex) {
           Trace.error("Error Delivering block");
       }
       return true;
    }
}
There are two important methods that must be implemented by every Processor class:
filterAttachedinvoke
The filterAttached method should contain any API Gateway server-side initialization or configuration to be performed by the filter, such as connecting to third-party products or servers.
The invoke method is responsible for using the configuration data to perform the message processing. This method is called by API Gateway as it executes the series of filters in any given policy. In the case of the JabberFilter, the invoke method uses the configuration data to set up a connection to an XMPP server, creates a chat, sends a message to a chat participant, and disconnects from the XMPP server.
The invoke method can have the following possible results:
- True
- If the filter processed the message successfully (for example, successful authentication, schema validation passed, and so on), the
invokemethod should return a true result, meaning that the next filter on the success path for the filter is invoked. False - If the filter processing fails (for example, the user was not authenticated, message failed integrity check, and so on), the
invokemethod should return false, meaning that the next filter on the failure path for the filter is invoked. CircuitAbortException - If for some reason the filter cannot process the message at all (for example, if it cannot connect to an Identity Management server to authenticate a user), it should throw a
CircuitAbortException. If aCircuitAbortExceptionis thrown in a policy, the designated fault processor (if any) is invoked instead of any successive filters on either the success or failure paths.
Create the declarative UI XML file
The declarative UI XML file encapsulates the design of the user interface of filters and dialogs. It includes the markup UI elements and bindings to create the Jabber filter dialog within Policy Studio.
For more information on using declarative XML, see Define user interfaces using declarative XML. For a complete listing of the available elements and bindings, see Declarative UI reference.
The following declarative XML shows the elements needed to create the Jabber filter dialog:
<ui>
 <panel columns="2">
  <NameAttribute />

  <!-- Connection settings -->
  <group label="CONNECTION_SETTINGS_LABEL"
    columns="2" span="2" fill="false">

    <TextAttribute field="fromEmailAddress"
      label="FROM_EMAIL_ADDRESS_LABEL"
      displayName="FROM_EMAIL_ADDRESS_DISP_NAME"/>
    <PasswordAttribute field="password"
      label="FROM_PASSWORD_LABEL"
      displayName="FROM_PASSWORD_DISP_NAME"/>
    <TextAttribute field="resourceName"
      label="RESOURCE_NAME_LABEL"
      displayName="RESOURCE_NAME_DISP_NAME"/>
  </group>

  <!-- Chat Settings -->
  <group label="CHAT_SETTINGS_LABEL"
    columns="2" span="2" fill="false">

    <TextAttribute field="toEmailAddress"
      label="TO_EMAIL_ADDRESS_LABEL"
      displayName="TO_EMAIL_ADDRESS_DISP_NAME"/>
    <TextAttribute field="messageStr"
      label="MESSAGE_LABEL"
      displayName="MESSAGE_DISP_NAME"/>
  </group>
 </panel>
</ui>
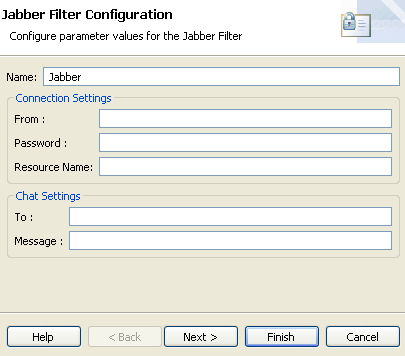
All declarative XML files start with <ui> elements. The preceding markup contains several <TextAttribute> elements and a <PasswordAttribute> element. Each element has a field attribute, which directly corresponds to the field definitions in the type definition, and a label attribute that correspond to localization keys in the resources.properties file.
The following figure shows the Jabber filter dialog that this XML creates.
Create the Policy Studio classes
The next step after defining the user interface is to write two GUI classes that enable the fields defined in the JabberFilter type definition to be configured. When the GUI classes and resources are built, the visual components can be used in Policy Studio to configure the filter and add it to a policy.
The following table describes the GUI classes and resources for the JabberFilter:
JabberFilterUI.java- This class lists the pages that are involved in a filter configuration window. Each filter has at least two pages: the main configuration page, and a page where log messages related to the filter can be customized. This class is returned by the
getConfigPanelClassmethod of theJabberFilterclass. JabberFilterPage.java- This class loads the declarative XML file which defines the layout of the visual fields on the filter’s main configuration window. For example, there are five fields on the configuration window for the Jabber Filter corresponding to the five fields defined in the entity type definition.
resources.properties- This file contains all text displayed in the GUI configuration window (for example, dialog titles, field names, and error messages). This means that the text can be customized or internationalized easily without needing to change the code.
jabber.gif- This image file is the icon that identifies the filter in Policy Studio, and is displayed in the filter palette.
The JabberFilterUI class, which is returned by the getConfigPanelClass method of the JabberFilter class, is responsible for the following:
- Listing the configuration pages that make up the user interface for the filter
- Naming the category of filters to which this filter belongs
- Specifying the name of the images to use as the icons and images for this filter
JabberFilterUI class
The code for the JabberFilterUI class is as follows:
public class JabberFilterUI extends DefaultGUIFilter
{
    public Vector<VordelPage> getPropertyPages() {
        Vector<VordelPage> pages = new Vector<VordelPage>();
        pages.add(new JabberFilterPage());
        pages.add(createLogPage());
        return pages;
    }

    public String[] getCategories() {
        return new String[]{_("FILTER_GROUP_JABBER")};
    }

    private static final String IMAGE_KEY = "jabberFilter";
    static {
        Images.getImageRegistry().put(IMAGE_KEY,
          Images.createDescriptor(JabberFilterUI.class, "jabber.gif"));
    }

    public String getSmallIconId() {
        return IMAGE_KEY;
    }

    public Image getSmallImage() {
        return Images.get(IMAGE_KEY);
    }

    public ImageDescriptor getSmallIcon() {
        return Images.getImageDescriptor(IMAGE_KEY);
    }
}
The following table describes the important methods:
public Vector getPropertyPages()- Initializes a Vector of the pages that make up the total configuration windows for this filter. Successive pages are accessible by clicking the Next button on the Policy Studio configuration window.
public String[] getCategories()- This method returns the names of the filter categories that this filter belongs to. The filter is displayed under these categories in the filter palette in Policy Studio. The Jabber Filter is added to the XMPP Filters category.
public Image getSmallImage()- The default image for the filter, which is registered in the static block in the preceding code, can be overridden by returning a different image here.
public ImageDescriptor getSmallIcon()- The default icon for the filter can be overridden by returning a different icon here.
A page only represents a single configuration window in Policy Studio. You can chain together several pages to form a series of configuration windows that together make up the overall configuration for a filter. By default, all filters consist of two pages: one for the filter configuration fields, and one for per-filter logging. However, more pages can be added if required. You can add additional pages to the configuration in the getPropertyPages method.
If you look at the getPropertyPages method of the JabberFilterUI class, you can see that the JabberFilterPage class forms one of the configuration windows (or pages) for the JabberFilter. The JabberFilterPage class is responsible for loading the declarative UI XML file that defines the layout of all the input fields that make up the configuration window for the JabberFilter.
JabberFilterPage class
The code for the JabberFilterPage class is as follows:
public class JabberFilterPage extends VordelPage
{
    public JabberFilterPage() {
        super("jabberPage");
        setTitle(_("JABBER_PAGE"));
        setDescription(_("JABBER_PAGE_DESCRIPTION"));
        setPageComplete(false);
    }

    public String getHelpID() {
        return "jabber.help";
    }

    public boolean performFinish() {
        return true;
    }

    public void createControl(Composite parent) {
        Composite panel =
          render(parent,
          getClass().getResourceAsStream("send_instant_message.xml"));
        setControl(panel);
        setPageComplete(true);
    }
}
There are four important interface methods that must be implemented in this class:
public JabberFilterPage()- The constructor performs some basic initialization, such as setting a unique ID for the page, and setting the title and description for the page. The text representing the page title and description are kept in the
resources.propertiesfile so that they can be localized or customized easily. public String getHelpID()- This method is called by the Policy Studio help system. There is a Help button on every configuration page in Policy Studio. When you click this button, the help system is invoked. Every page has a help ID (for example,
jabber_help) associated with it, which is mapped to an HTML help page. This mapping is defined in the following file under the directory where you have installed Policy Studio:
/plugins/com.vordel.rcp.policystudio.gateway.help_<version>/csh.xml
To define a mapping for the help page, follow these steps:
-
Open the
csh.xmlfile. -
Add the following XML to the file:
<context id="jabber_help"> <description>Jabber Filter</description> <topic label="Jabber Filter" href="Content/PolicyDevTopics/jabber.htm"/> </context> -
Create a help file called
jabber.htmto contain the help for the filter in HTML format. All URLs specified in thecsh.xmlfile are relative from the/plugins/com.vordel.rcp.policystudio.gateway.help_<version>directory of your Policy Studio installation.
public boolean performFinish()- This method gives you the chance to process the user-specified data before it is submitted to the entity store. For example, any validation on the data should be added to this method.
public void createControl(Composite parent)
This method is responsible for loading the declarative UI XML file that creates the configuration pages. Localization keys from the resources.properties file are used to give labels for the input fields in the XML file.
resources.properties file
Both the declarative UI XML file and the GUI classes use localized keys for all text that is displayed on the configuration window. This makes it easy to localize or customize all text displayed in Policy Studio. The localization keys and their corresponding strings are stored in the resources.properties file, which takes the following format:
#
# Palette category for Jabber filters
#
FILTER_GROUP_JABBER=XMPP Filters

#
# Properties for the JabberFilter Configuration Wizard
#
JABBER_PAGE=Jabber Filter Configuration
JABBER_PAGE_DESCRIPTION=Configure parameter values for the Jabber Filter

#
# Field labels and descriptions
#
CONNECTION_SETTINGS_LABEL=Connection Settings
FROM_EMAIL_ADDRESS_LABEL=From :
FROM_EMAIL_ADDRESS_DISP_NAME=Person sending the instant message
FROM_PASSWORD_LABEL=Password :
FROM_PASSWORD_DISP_NAME=Password of Person sending the message
RESOURCE_NAME_LABEL=Resource Name:
RESOURCE_NAME_DISP_NAME=Unique resource Name
CHAT_SETTINGS_LABEL=Chat Settings
TO_EMAIL_ADDRESS_LABEL=To :
TO_EMAIL_ADDRESS_DISP_NAME=Person receiving the instant message
MESSAGE_LABEL=Message :
MESSAGE_DISP_NAME=Message Content
The final resource is the jabber.gif file, which is displayed as the icon for the Jabber Filter in Policy Studio.
Build the classes
Perform the following steps to build the JAR file for the Jabber sample:
-
Change to the sample directory (
DEVELOPER_SAMPLES/jabber). -
Run the following command to compile the code and build the JAR:
ant -f build.xmlSee the
README.TXTfile for additional instructions. -
Add the new JAR and any third-party JAR files used by the Jabber classes (for example, the SMACK API JAR files) to the CLASSPATH for all API Gateways and Node Managers on a host by copying them to the
INSTALL_DIR/apigateway/ext/libdirectory. -
Alternatively, you can add the JARs to the CLASSPATH for a single API Gateway instance only, by copying them to the
INSTALL_DIR/apigateway/groups/GROUP_ID/INSTANCE_ID/ext/libdirectory. -
Add the new JAR and any third-party JAR files used by the Jabber classes (for example, the SMACK API JAR files) to the runtime dependencies in Policy Studio. Select Window > Preferences > runtime Dependencies, and click Add to browse to the new JAR and any third-party JARs, and add them to the list. Click Apply to save the changes.
-
The following figure shows the runtime dependencies.

-
Restart the API Gateway instances and Node Managers.
-
Restart Policy Studio using the following command:
policystudio -clean
The extension kit includes all of the associated resources and classes to create the Jabber Filter.
Custom filter dependencies
If your custom filter introduces a dependency on a new third-party library, you must first check if the required library is already available under the following directory and sub-directories:
INSTALL_DIR/apigateway/system/lib
Any JAR file that you add under the following directories will be pushed ahead of apigateway/system JAR files on the CLASSPATH:
INSTALL_DIR/apigateway/ext/libINSTALL_DIR/apigateway/groups/GROUP_ID/INSTANCE_ID/ext/lib
For example, API Gateway ships with specific versions of several Apache Commons JARs. Introducing conflicting versions of these JARs could adversely affect the ability of the API Gateway and Node Manager to function correctly.
Load the TypeDocs
You can register the type definition for the Jabber Filter with the entity store using Policy Studio. When the entity type is registered, any time API Gateway needs to create an instance of the Jabber Filter, the instance contains the correct fields with the appropriate types.
Register using Policy Studio
To register the type definition using Policy Studio, perform the following steps:
-
Start Policy Studio, and connect to the API Gateway.
-
Select File > Import > Import Custom Filters.
-
Browse to the
Typeset.xmlfile. A TypeSet file is used to group together one or more TypeDocs. This enables multiple TypeDocs to be added to the entity store in batch mode. TheJabberTypeSet.xmlfile includes the following:<typeSet> <!-- JabberFilter Typedoc --> <typedoc file="JabberFilterDesc.xml" /> </typeSet> -
When you import the TypeSet, the workspace refreshes. The new filter is available in the filter list.
-
To verify that the Jabber filter exists, select an existing policy in the Policy Studio tree, and you should see the XMPP Filters category in the palette, which contains the new custom Jabber filter.
Note
Another way to verify that your new filter has been installed is to use the ES Explorer. You can use the ES Explorer tool for browsing the entity types and entity instances that have been registered with the Entity Store. For more information, see Use the ES Explorer.Construct a policy
You can build policies using the policy editor in Policy Studio. To build a policy, you can drag message filters from the filters palette on the right on to the policy canvas. You can then link these filters using success paths or failure paths to create a network of filters.
Create the policy
To create a policy, perform the following steps:
-
In the Policy Studio tree, right-click the Policies node and select Add Policy.
-
Enter
Send Instant Messageas the name of the new policy in the dialog. -
Drag a Jabber filter from the XMPP group onto the policy canvas.
-
Enter the following in the Jabber filter dialog:
- Name: Name of the filter
- From: User email address
- Password: User password
- Resource Name: Resource name (for example,
apigateway) - To: Chat participant’s email address
- Message: Message to send
-
To check that the help is working correctly, click the Help button on the filter dialog.
In Create the classes, as part of the
getHelpmethod, you added a mapping to thecontexts.xmlfile (in the/plugins/com.vordel.rcp.policystudio.resources_<version>directory of your Policy Studio installation). After restarting Policy Studio, the Help button should function correctly. -
To add a Reflect Message filter, which echoes the client message back to the client, drag it from the Utility group onto the policy canvas.
-
Configure the Reflect Message filter as follows:
- Name: Enter a name for the filter (or use the default)
- HTTP response code status: Use the default value (
200)
-
Connect the Jabber node to the Reflect Message node with a success path.
-
Right-click the Jabber filter, and select Set as Start to set it as the start filter for the policy.
Invoke the policy
To configure the API Gateway to invoke the new policy, follow these steps:
- Under the Environment Configuration > Listeners node in Policy Studio, select the path (for example, API Gateway > Default Services > Paths).
- On the resolvers window on the right, click Add > Relative Path.
- Enter the following values on the dialog and click OK:
- When a request arrives that matches the path:
- Path Specific Policy: Click the browse button and select the policy. This sends all requests received on the path configured above to your newly configured policy.
- To deploy the new configuration to API Gateway, click the Deploy button on the toolbar or press F6 and follow the instructions.
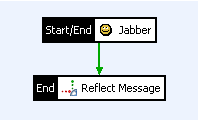
The following diagram shows the complete policy:
Test the policy
To test the configuration, follow these steps:
- Start API Tester.
- Click the arrow next to the Play icon and select Request Settings.
- In the Url field, enter to send the message to the relative path you configured above.
- Click Run to send the message to API Gateway.
Tip
Alternatively, you can test the policy by entering the URL into any web browser.API Gateway echoes the message back to the client using the Reflect Message filter after an instant message has been sent to an account on Google Talk. The following is an example of an instant message that appears on an account on Google Talk. This indicates that the newly added filter has worked successfully.
