Authentication and RBAC with Active Directory
10 minute read
This section uses the sample Protect Management Interfaces (LDAP) policy, meaning that the gateway uses an LDAP repository instead of the local Admin User store for authentication and RBAC of users attempting to access the gateway management services.
Note
If you have multiple Admin Node Managers in your topology, you must ensure that you apply the configuration changes to each Admin Node Manager.Create an Active Directory group
To create a new user group in Active Directory, perform the following example steps:
- Click Start > Administrative Tools > Active Directory Users and Computers.
- On the Users directory, right-click, and select New > Group.
- Enter the Group name (for example,
APIGatewayAdministrator).
You should add groups for the following default RBAC roles to give the LDAP users appropriate access to the API Gateway management services:
API Gateway AdministratorAPI Gateway OperatorDeployerKPS AdministratorPolicy Developer
These RBAC roles are located in the roles section of the following file:
INSTALL_DIR\apigateway\conf\acl.json

You can view the newly created groups using an LDAP browser.
Create an Active Directory user
You will most likely be unable to create an admin user with a default password because the default password is not strong enough to be accepted by Active Directory. Using Active Directory Users and Computers, perform the following steps:
-
On the Users directory, right-click, and select New > User.
-
Enter a user name (for example,
admin).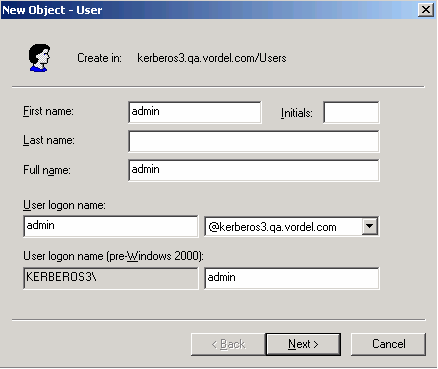
-
Click Next.
-
Enter a password (for example,
Axway123). -
Select User cannot change password and Password never expires.
-
Ensure User must change password at next logon is not selected.
-
Click Next.
-
Click Finish.
Add the user to the group
To make the user a member of the group using Active Directory Users and Computers , perform the following steps:
- Select the APIGatewayAdministrator group, right-click, and select Properties.
- Click the Members tab.
- Click Add.
- Click Advanced.
- Click Find Now.
- Select the
adminuser. - Click OK.
You can view the newly created user using an LDAP browser.
Note
ThememberOf attribute points to the Active Directory group. The user has an instance of this attribute for each group they are a member of.
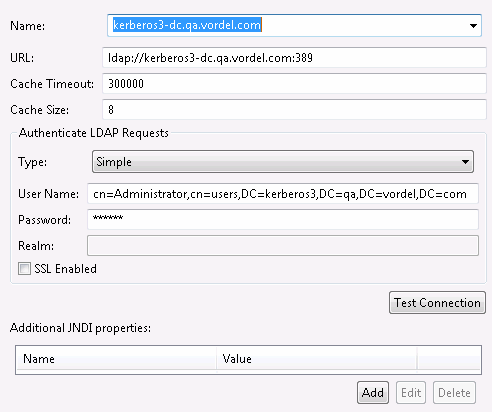
Create an LDAP connection
To create an new LDAP Connection, perform the following steps:
-
In Policy Studio, create a new project based on the Admin Node Manager configuration. For example:
INSTALL_DIR\apigateway\conf\fed -
In Policy Studio tree, select Environment Configuration > External Connections > LDAP Connections.
-
Right-click, and select Create an LDAP Connection.
-
Complete the fields in the dialog as appropriate. The specified User Name should be an LDAP administrator that has access to search the full directory for users. For example:
-
Click Test Connection to ensure the connection details are correct.
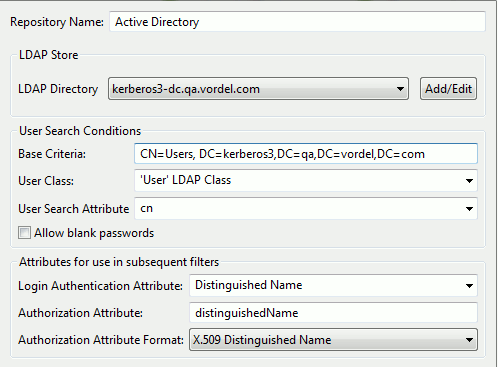
Create an LDAP repository
To create an new LDAP Repository, perform the following steps:
- In the Policy Studio tree, select Environment Configuration > External Connections > Authentication Repository Profiles > LDAP Repositories.
- Right-click, and select Add a new Repository.
- Complete the following fields in the dialog:
- Repository Name: Enter an appropriate name for the repository.
- LDAP Directory: Use the LDAP directory created in Create an LDAP connection.
- Base Criteria: Enter the LDAP node that contains the users.
- User Search Attribute: Enter
cn. This is the username entered at login time (in this case,admin). - Authorization Attribute: Enter
distinguishedName. This is the username entered at login time (admin). Theauthentication.subject.idmessage attribute is set to the value of this LDAP attribute (see example below). Theauthentication.subject.idis used as the base criteria in the filter that loads the LDAP groups (the user’s roles). This enables you to narrow the search to a particular user node in the LDAP tree. For more details, see the Retrieve Attributes from Directory Server filter in Configure a test policy for LDAP authentication and RBAC.
An example value of the authentication.subject.id message attribute is as follows:
CN=admin, CN=Users,DC=kerberos3,DC=qa,DC=vordel,DC=comn
Connect to other LDAP repositories
This topic uses Microsoft Active Directory as an example LDAP repository. Other LDAP repositories such as Oracle Directory Server (formerly iPlanet and Sun Directory Server) and OpenLDAP are also supported.
For an example of querying an Oracle Directory Server repository, see the Retrieve Attributes from Directory Server filter in Configure a test policy for LDAP authentication and RBAC. For details on using OpenLDAP, see Authentication and RBAC with OpenLDAP.
Configure a test policy for LDAP authentication and RBAC
To avoid locking yourself out of Policy Studio, you can configure an example test policy for LDAP authentication and RBAC, which is invoked when a test URI is called on the server (and not a management services URI). Policy Studio provides an example policy named Protect Management Interfaces (LDAP) when the Admin Node Manager configuration is loaded.
You must edit this policy to change it from using the sample LDAP connection to the one that you created in Create an LDAP connection. You must also change it from using the sample authentication repository to the authentication repository that you created in Create an LDAP repository. Then in Use the LDAP policy to protect management services, you must hook up this new LDAP policy to the / path.
Configure the example test policy
Perform the following steps:
-
In Policy Studio, create a new project based on the Admin Node Manager configuration. For example:
INSTALL_DIR\apigateway\conf\fed -
For the example policy, select Policies > Management Services > Sample LDAP Policies > Protect Management Interfaces (LDAP) when the Admin Node Manager configuration is loaded. This policy is summarized at a high-level as follows:
- Scripting Language filter returns
trueif the Node Manager is the Admin Node Manager. This enables subsequent HTTP authentication and RBAC, and updates the HTTP headers based on the user role. Otherwise, this filter calls the Call Internal Service (no RBAC) filter without updating the HTTP headers. - HTTP Basic Authentication filter verifies the user name and password against the LDAP repository configured in Create an LDAP repository.
- Retrieve Attributes from Directory Server filter finds the LDAP groups that the user belongs to using the LDAP directory connection configured in Create an LDAP connection.
- Management Services RBAC filter reads the user roles from the configured message attribute (
authentication.subject.role). This returnstrueif one of the roles has access to the management service currently being invoked, as defined in theacl.jsonfile. Otherwise, this returnsfalseand the Return HTTP Error 403:Access Denied (Forbidden) policy is called because the user does not have the correct role.
- Scripting Language filter returns
-
You must edit some HTTP-based filters and change them from using the Sample Active Directory Repository to using the repository that you created in Create an LDAP repository. This repository is referenced in the following filters in the example policy:
- Authenticate login attempt
- HTTP Basic
You can view all referenced filters by selecting Environment Configuration > External Connections > LDAP Repositories > Sample Active Directory Repository > Show all References.
-
You must edit the LDAP-based filters and change them from using the Sample Active Directory Connection to using the LDAP connection that you created in Create an LDAP connection. This repository is referenced in the following components in the example policy:
- Read Roles from Directory Server
- Re-Read Roles from Directory Server
- Sample Active Directory Repository
-
Similarly, you can view all referenced components by selecting Environment Configuration > External Connections > LDAP Repositories > Sample Active Directory Connection > Show all References.
Test the policy configuration
To test this policy configuration, perform the following steps:
-
Update the
acl.jsonfile with the new LDAP group, for example:"CN=APIGatewayAdministrator,CN=Users,DC=kerberos3,DC=qa,DC=vordel,DC=com" :[ "emc", "mgmt", "mgmt_modify", "dashboard", "dashboard_modify", "deploy" "config", "monitoring", "events", "traffic_monitor", "settings", settings_modify", "logs" ] -
Update the
adminUsers.jsonfile with the new role, for example:{ "name" :"CN=APIGatewayAdministrator,CN=Users,DC=kerberos3,DC=qa,DC=vordel, DC=com","id" :"role-8" } -
And increase the number of roles, for example:
"uniqueIdCounters" :{"Role" :9,"User" :2}, -
In the Policy Studio tree, select Environment Configuration > Listeners > Node Manager > Add HTTP Services, and enter a service name (for example,
LDAP Test). -
Right-click the HTTP service, and select Add Interface > HTTP.
-
Enter an available port to test the created policy (for example,
8888), and click OK. -
Right-click the HTTP service, and select Add Relative Path.
-
Enter a relative path (for example,
/test). -
Set the Path Specify Policy to the Protect Management Interfaces (LDAP) policy, and click OK.
-
Close the connection to the Admin Node Manager file, and restart the Admin Node Manager so it loads the updated configuration.
-
Use an API test client such as Postman or
curlto callhttp://localhost:8888/test. -
Enter the HTTP Basic credentials (for example, username
adminand passwordAxway123). If authentication is passed, the Admin Node Manager should return an HTTP 404 code (not found)
Note
Do not use the Admin Users tab in the API Gateway Manager to manage user roles because these are managed in LDAP.Use the LDAP policy to protect management services
If the authentication and RBAC filters pass, you can now use this policy to protect the management interfaces. To ensure that you do not lock yourself out of the server, perform the following steps:
-
Make a copy of the
/apigateway/conf/feddirectory contents from the server installation and put it into a directory accessible from Policy Studio. -
In Policy Studio, select File > New project, enter a name, and click Next.
-
Select From existing configuration, then click Next.
-
Browse to the copy of
/conf/fed, and click Finish to make a new project out of this config.Policy Studio then opens the project files located in
/apiprojects/YOUR_PROJECT_NAMEfor editing. This means that no change is applied to the original files, located in/conf/fed, and they can be used as a backup. -
Click Environment Configuration > Listeners > Node Manager > Management Services node, select the
/and the/configuration/deploymentsrelative paths, and set the Path Specify Policy to the Protect Management Interfaces (LDAP) policy. -
Remove the previously created
LDAP TestHTTP Services, and close the connection to the file. -
Copy all of the
.XMLand.MD5files from/apiprojects/YOUR_PROJECT_NAMEdirectory back to the Admin Node Manager’s/confdirectory.This overwrites the files that were previously in the
/confdirectory. -
Restart the Admin Node Manager process.
-
Start Policy Studio and connect to the Admin Node Manager using
adminand passwordAxway123(the LDAP user credentials). You should now be able to edit the gateway configurations as usual.
Add an LDAP user with limited access to management services
You can add an LDAP user with limited access to management services. For example, assume there is already a user named Fred defined in Active Directory. Fred has the following DName:
CN=Fred,CN=Users,DC=kerberos3,DC=qa,DC=vordel,DC=com
Fred belongs to an existing LDAP group called TraceAnalyzers. He can also belong to other LDAP groups that have no meaning for RBAC in the API Gateway. The TraceAnalyzers
LDAP group has the following DName:
CN=TraceAnalyzers,CN=Users,DC=kerberos3,DC=qa,DC=vordel,DC=com
The user Fred should be able to read server trace files in a browser. No other access to management services should be given to Fred.
Add limited access rights
You must perform the following steps to allow Fred to view the trace files:
-
Add the following entry in the
rolessection in theacl.jsonfile:"CN=TraceAnalyzers,CN=Users,DC=kerberos3,DC=qa,DC=vordel,DC=com" : [ "emc", "mgmt", "logs" ] -
Update the
adminUsers.jsonfile with the new role as follows:{ "name" :"CN=TraceAnalyzers,CN=Users,DC=kerberos3,DC=qa,DC=vordel, DC=com","id" :"role-8" }]And increase the number of roles, for example:
"uniqueIdCounters" : { "Role" :9, "User" :2 }, -
Restart the Admin Node Manager so that the
acl.jsonandadminUsers.jsonfile updates are picked up. -
Enter the following URL in your browser:
http://localhost:8090/ -
Enter user credentials for
Fredwhen prompted in the browser. -
The API Gateway Manager displays a Logs tab enabling access to the trace files that
Fredcan view.
Note
Fred is not allowed to access the server APIs used by the Policy Studio. If an attempt is made to connect to the server using the Policy Studio with his credentials, an Access denied error is displayed.
No other configuration is required to give user Fred the above access to the management services. Other users in the same LDAP group can also view trace files without further configuration changes because the LDAP group is already defined in the acl.json file.