Configure caching
13 minute read
In cases where a back-end service is serving the same request (and generating the same response) over and over again, it makes sense to use a caching mechanism. When a cache is employed, a unique identifier for the request is cached together with the corresponding response for this request. If an identical request is received, the response can be retrieved from the cache instead of forcing the service to reprocess the identical request and generate the same response. The use of caching in this way helps divert unnecessary traffic from the service and makes it more responsive to new requests.
For example, assume you have deployed a service that returns a list of cities in the USA from an external database, which is then used by a variety of web-based applications. Because the names and quantity of cities in the USA are relatively constant, if the service handles hundreds or thousands of requests every day, this is waste of processing time and effort, especially considering that the database that contains the relatively fixed list of city names is hosted on a separate machine to the service.
If you assume that the list of cities in the database does not change very often, it makes sense to use the API Gateway to cache the response from the service that contains the list of cities. Then when a request for this service is identified by the API Gateway, the cached response can be returned to the client. This approach results in the following performance improvements:
- The API Gateway does not have to route the message on to the service, therefore saving the processing effort required, and perhaps more importantly, saving the time it takes for the round trip.
- The service does not have to waste processing power on generating the same list over and over again, therefore making it more responsive to requests for other services.
- Assuming a naive implementation of database retrieval and caching, the service does not have to query the database (over the network) and collate the results over and over again for every request.
The caching mechanism used in the API Gateway offers full control over the size of the cache, the lifetime of objects in the cache, whether objects are cached to disk, and even whether caches can be replicated across multiple API Gateway instances.
Local caches
Local caches are used where a single API Gateway instance has been deployed. In such cases, you do not need to replicate caches across multiple running instances of the API Gateway.
Add a local cache
In the Policy Studio tree, you can add a local cache by selecting the Environment Configuration > Libraries > Caches node, and clicking the Add button at the bottom right of the window. Select Add Local Cache from the menu. You can configure the following fields on the Configure Local Cache dialog:
Cache Name: Enter a name for the cache.
Maximum Elements in Memory: Enter the maximum number of objects that can be in memory at any one time.
Maximum Elements on Disk: Sets the maximum number of objects that can be stored in the disk store at any one time. A value of zero indicates an unlimited number of objects.
Eternal: If this option is selected, objects stored in the caches never expire and timeouts have no effect.
Overflow to Disk: Select this option if you want the cache to overflow to disk when the number of objects in memory has reached the amount set in the Maximum Elements in Memory field above.
Time to Idle: Determines the maximum amount of time (in seconds) between accesses that an object can remain idle before it expires. A value of zero indicates that objects can idle for infinity, which is the default value. If the Eternal field is selected, this setting is ignored.
Time to Live: Sets the maximum time between when an object is created and when it expires. The default value is zero, which means that the object can live for infinity. If the Eternal field is selected, this setting is ignored.
Persist to Disk: If selected, the disk store is persisted between JVM restarts. This option is disabled by default.
Disk Expiry Interval: Configures the number of seconds between runs of the disk expiry thread. The default is 120 seconds.
Disk Spool Buffer Size:
Indicates the size of memory (in MBs) to allocate the disk store for a spool buffer. Writes are made to this memory and then asynchronously written to disk. The default size is 30 MB. If you get OutOfMemory exceptions, you can consider lowering this value. However, if you notice poor performance, you should increase the value.
Eviction Policy: Select the eviction policy that the cache uses to evict objects from the cache. The default policy is Least Recently Used. However, you can also use First in First Out and Less Frequently Used.
Distributed caches
If you have deployed several API Gateways throughout your network, you might need to employ a distributed cache. In this scenario, each API Gateway has its own local copy of the cache but registers a cache event listener that replicates messages to the other caches so that put, remove, expiry, and delete events on a single cache are duplicated across all other caches.
Add a distributed cache
You can add a distributed cache by selecting the Environment Configuration > Libraries > Caches tree node, and clicking the Add button at the bottom right of the window. Select Add Distributed Cache from the menu, and configure the following fields on the Configure Distributed Cache dialog:
Note that many of the settings for the distributed cache are identical to those for the local cache. The following fields are specific to the distributed cache.
Event Listener Class Name: Enter the name of the listener factory class that enables this cache to register listeners for cache events, such as put, remove, delete, and expire.
Properties Separator: Specify the character to use to separate the list of properties.
Properties:
Specify the properties to pass to the RMICacheReplicatorFactory. The following properties are available:
replicatePuts=true | falseDetermines whether new elements placed in a cache are replicated to other caches. Default istrue.replicateUpdates=true | falseDetermines whether new elements that override (update) existing elements with the same key in a cache are replicated. Default istrue.replicateRemovals=trueDetermines whether element removals are replicated. Default istrue.replicateAsynchronously=true | falseDetermines whether replications are asynchronous (true) or synchronous (false). Default isfalse.replicateUpdatesViaCopy=true | falseDetermines whether new elements are copied to other caches (true)or a remove message is sent (false). Default istrue.asynchronousReplicationIntervalMillis=[number of ms]The asynchronous replicator runs at a set interval of milliseconds. The default is 1000 and the minimum is 10. This property is only applicable ifreplicateAsynchronously=true.
Cache Bootstrap Class Name:
Specifies a BootstrapCacheLoader factory that the cache can call on initialization to prepopulate itself. The RMIBootstrapCacheLoader bootstraps caches in clusters where RMICacheReplicators are used.
Properties Separator: The character entered here is used to separate the list of properties listed in the field below.
Properties:
The properties listed here are used to initialize the RMIBootstrapCacheLoaderFactory. The following properties are recognized:
bootstrapAsynchronously=true | falseDetermines whether the bootstrap happens in the background after the cache has started (true), or if bootstrapping must complete before the cache is made available (false). Default istrue.maximumChunkSizeBytes=[integer]Caches can potentially grow larger than the memory limits on the JVM. This property enables the bootstrapper to fetch elements in chunks. The default chunk size is 5000000 (5 MB).
Global distributed cache settings
In a distributed cache, there is no master cache controlling all caches in the group. Instead, each cache is a peer in the group and needs to know where all the other peers in the group are located. Peer Discovery and Peer Listeners are two essential parts of any distributed cache system.
Edit global distributed cache settings for peer discovery
You can configure the global distributed cache settings by selecting the Server Settings node in the Policy Studio tree, and clicking General > Cache. You can configure the following fields:
Peer Provider Class: By default, the built-in peer discovery class factory is used:
net.sf.ehcache.distribution.RMICacheManagerPeerProviderFactory
Properties Separator: Specify the token used as the separator for the list of properties in the next field.
Properties: The properties listed specify whether the peer discovery mechanism is automatic or manual. If the automatic mechanism is used, each peer uses TCP multicast to establish and maintain a multicast group. This is the default option because it requires minimal configuration and peers can be automatically added and removed from the group. Each peer pings the group every second. If a peer has not pinged any of the other peers after 5 seconds, it is dropped from the group, while a new peer is admitted to the group if it starts pinging the other peers.
To use automatic peer discovery, ensure that the peerDiscovery setting is set to automatic. You can specify the multicast address and port using the multicastGroupAddress and multicastGroupPort settings. You can specify the time to live for multicast datagrams using the timeToLive setting.
Alternatively, you can configure a manual peer discovery mechanism, whereby each peer definitively lists the peers it wants to communicate with. This should only be used in networks where there are problems propagating multicast datagrams. To use a manual peer discovery mechanism, ensure the peerDiscovery setting is set to manual. The list of RMI URLs of the other peers in the group must also be specified, for example:
rmiUrls=//server2:40001/sampleCache1|//server2:40001/sampleCache2
Peer Listener Class: The peer listener class specified is responsible for listening for messages from peers in the group.
Properties Separator: Specify the token used to separate the list of properties.
Properties: The properties entered configure the way the listener behaves. Valid properties are as follows:
-
hostname (optional) Host name of the machine on which the listener is listening.
By default, this is set to
localhost, which maps to the local loopback address of127.0.0.1, which is not addressable from another machine on the network. If you intend this cache to be used over the network, you should change this address to the IP address of the network interface on which the listener is listening. -
port (mandatory) Specify the port on which the listener is listening, which by default is 40001.
-
socketTimeoutMillis (optional) Enter the number of seconds that client sockets wait when sending messages to this listener until they give up. The default is 2000 ms.
Notify replicators of removal of items during refresh: A server refresh automatically purges all items from the cache (for example, when configuration updates are deployed to the API Gateway). If this check box is selected, the contents of each peer in the group are also purged. This avoids a situation where a single peer is refreshed (and has its contents purged), but the other peers in the group are not purged. If this option is not selected, the refreshed peer attempts to bootstrap itself to the other peers in the group, resulting in the cache items becoming replicated in the refreshed cache. This effectively negates the effect of the server refresh and may result in inconsistent behavior.
Distributed caching example
This example describes how to configure Ehcache for three API Gateways:
- You have three API Gateway servers and two distributed caches.
- Each API Gateway server shares its cache with the other two servers.
Change Ehcache settings in Policy Studio
In Policy Studio, select the Server Settings node in the Policy Studio tree, and click General >Cache.
Edit the peer provider properties as follows:
peerDiscovery=manual,timeToLive=1,rmiUrls=${env.cache.rmiURL}
Edit the peer listener properties as follows:
hostName=${env.cache.IP},port=40001,socketTimeoutMillis=120000
Configure envSettings.props for each API Gateway server
Add the following settings to the envSettings.props file for each API Gateway server.
envSettings.props for API Gateway 1
env.cache.IP=10.0.0.1
env.cache.rmiURL=//10.0.0.2:40001/Cache1|//10.0.0.3:40001/Cache1|//10.0.0.2:40001/Cache2|//10.0.0.3:40001/Cache2
envSettings.props for API Gateway 2
env.cache.IP=10.0.0.2
env.cache.rmiURL=//10.0.0.1:40001/Cache1|//10.0.0.3:40001/Cache1|//10.0.0.1:40001/Cache2|//10.0.0.3:40001/Cache2
envSettings.props for API Gateway 3
env.cache.IP=10.0.0.3
env.cache.rmiURL=//10.0.0.2:40001/Cache1|//10.0.0.1:40001/Cache1|//10.0.0.2:40001/Cache2|//10.0.0.1:40001/Cache2
Example of caching response messages
This simple example shows how to construct a policy that caches responses from the service. It uses the request body to identify identical successive requests. If the API Gateway receives two successive requests with an identical message body, it returns the corresponding response from the cache instead of routing the request to the service. The following diagram illustrates the complete policy:
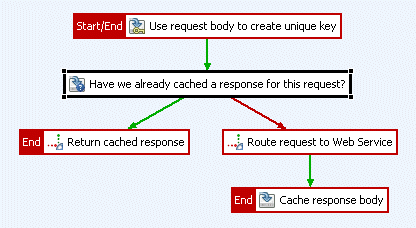
The logic of the policy is summarized as follows:
- The purpose of the first filter is to configure what part of the request you want to use to identify unique requests. This example uses the request body as the unique key, which is then used to look up the appropriate response message from the cache.
- The second filter looks up the request body in the response cache to see if it contains the request body. If it does, the response message that corresponds to this request is returned to the client.
- If it does not, the request is routed to the service, which processes it (by connecting to a database over the network and running a SQL statement) and returns a response to the API Gateway.
- The API Gateway then returns the response to the client and caches it in the response cache.
- When the next identical request is received by the API Gateway, the corresponding response is located in the responses cache and returned immediately to the client.
You must configure the following caching filters to achieve this policy. For convenience, the routing filters are not included in this example because the configuration options depend on your target service.
Create Key
This filter is used to decide what part of the request is used for a request to be considered unique. Different parts of the request can be identified internally using message attributes (for example, content.body
contains the request body). The following fields must be configured for this filter:
- Name: Use request body to create unique key
- Attribute Name:
content.body - Output attribute name:
message.key
Is Cached?
This filter looks up the cache to see if a response has been stored for the current request. It looks up the cache using the message.key attribute by default. The message.key
attribute contains a hash of the request message, and can be used as the key for objects in the cache. If the key is found in the cache, the value of the key (cached response for this request) is written to the content.body attribute, which can be returned to the client using the Reflect filter. You must configure the following fields:
- Name: Is a response for this request already cached?
- Cache containing key: Response Cache (assuming you have created a cache of this name)
- Attribute Containing Key:
message.key - Overwrite attribute name if found:
content.body
Reflect
If the Is Cached? filter passes, it retrieves the response from the cache and stores it in the content.body message attribute. The Reflect filter is used to return the cached response to the client.
Routing
If a response for this request could not be located in the cache, the API Gateway routes the request to the service, and waits for a response.
Cache Attribute
When the response has been received from the service, it should be cached for future use. The Cache Attribute filter is used to configure the key used to look up the cache and which aspect of the response message is stored as the key value in the cache.
Note
This example specifies the value of thecontent.body attribute to cache. Because this filter is configured after the routing filters, this attribute contains the response message. The value entered in the Attribute Key field should match that entered in the Attribute containing key field in the Is Cached?
filter.
You must configure the following fields:
- Name: Cache response body
- Cache to use: Response Cache
- Attribute key:
message.key - Attribute name to store:
content.body