Manage embedded ActiveMQ messaging
6 minute read
Use the Messaging view to manage JMS message queues, topics, subscribers, and consumers, and to monitor server connections.
For more details on Apache ActiveMQ, see http://activemq.apache.org/.
The Messaging view is disabled by default. Before you can use the features in this view, you must first enable the ActiveMQ messaging broker and configure a shared directory in Policy Studio. For more details, see Embedded ActiveMQ settings.
Manage messaging queues
The Queues tab displays the messaging queues that exist in the selected API Gateway instance, along with queue statistics. For example, these include the number of messages in the queue, the number of consumers, and so on:
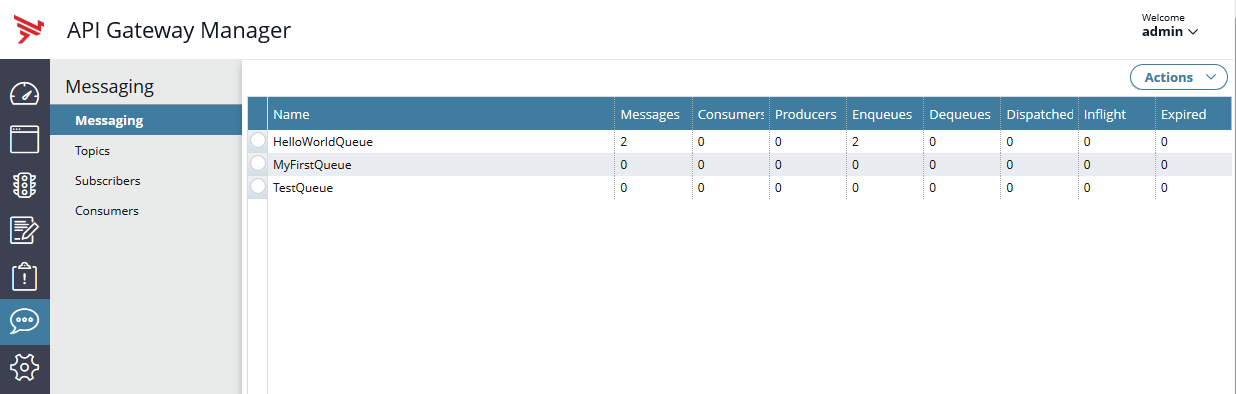
You can use the Actions drop-down menu on the right of the screen to perform the following tasks:
- Create a new queue
- Delete an existing queue
- Purge a queue (remove all its messages)
- Refresh the list of queues
For example, to create a new queue, select Actions > Create Queue, and enter a name for the queue in the dialog. The newly created queue is displayed in the list of queues.
Manage messages in a queue
When you select a queue name on the Queues tab, this displays the messages contained in the queue. For example:
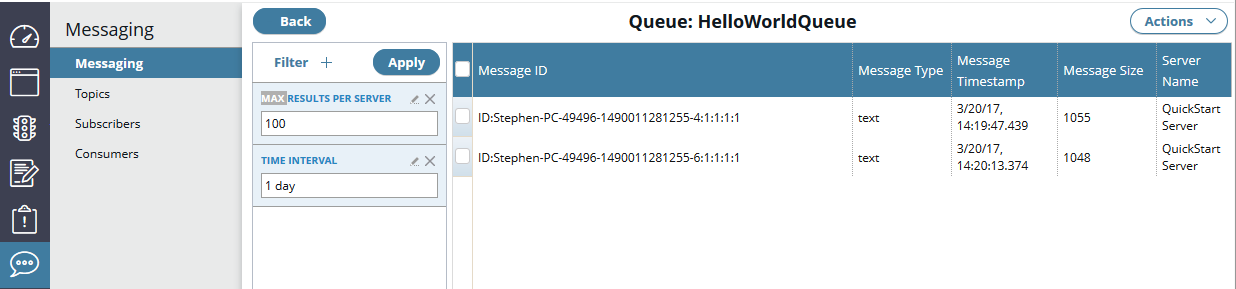
You can filter the messages displayed in this screen using the filter panel on the left. By default, you can configure the number of messages displayed, or the time interval for messages. Click the Filter button to add more viewing options (for example, JMS Message ID or JMS Type).
You can use the Actions drop-down menu on the right of the screen to perform the following tasks:
- Create a message in the queue
- Copy selected messages to a different queue
- Move selected messages to a different queue
- Delete selected messages from the queue
Create a new message
To create a new message in the selected queue, perform the following tasks:
-
Select Actions > Create Message, and complete the following Message Details:
- Destination API Gateway: Specifies the required destination gateway for the message (for example
APIGateway1). * Message Type: Specifies the required type of the message (TextorBinary). Defaults toText. - JMS Reply To: Specifies the optional destination to send a reply message to (for example, JMS queue or topic). It is the responsibility of the application that consumes the message from the queue (JMS consumer) to send the message back to the specified destination.
- Time to live: By default, the message never expires. However, if a message becomes obsolete after a certain period, you can set an optional expiration time (in milliseconds). If the specified value is
0, the message never expires. - JMS Delivery Mode: Select one of the following delivery modes:
- Persistent: Instructs the JMS provider to ensure that a message is not lost in transit if the JMS provider fails. A message sent with this delivery mode is logged to persistent storage when it is sent. This is the default mode.
- Non-persistent: Does not require the JMS provider to store the message. With this mode the message may be lost if the JMS provider fails.
- JMS Correlation ID: Specifies an optional identifier used to correlate response messages with the corresponding request messages. For example, you could enter the
${id}message attribute selector to correlate request messages with their correct response messages. - JMS Priority: Specifies an optional message priority level to deliver urgent messages first. Priority levels are from
0(lowest) to9(highest). If you do not specify a priority level, the default level is 4. - JMS Type: Specifies an optional user-defined message header that is defined as an arbitrary string. This is used to identify the message structure or payload (for example, the XML schema that the payload conforms to).
- Destination API Gateway: Specifies the required destination gateway for the message (for example
-
Click next to specify User-defined properties. Custom properties may be required for compatibility with other messaging systems. You can use message attribute selectors as property values. For example, you can create a property called
AuthNUser, and set its value to${authenticated.subject.id}. Other applications can then filter on this property—such as only consume messages whereAuthNUserequalsadmin. To add a new property, enter the property name and property value in the text box. You can click the green plus sign to add more properties. -
Click next to specify the message payload content. If you selected a Message Type of
Text, you can enter a Text Payload (for example,Hello World!). Alternatively, if you selected a Message Type ofBinary, click Select File, and browse to the file that you wish to send. -
Click Send.
View message contents
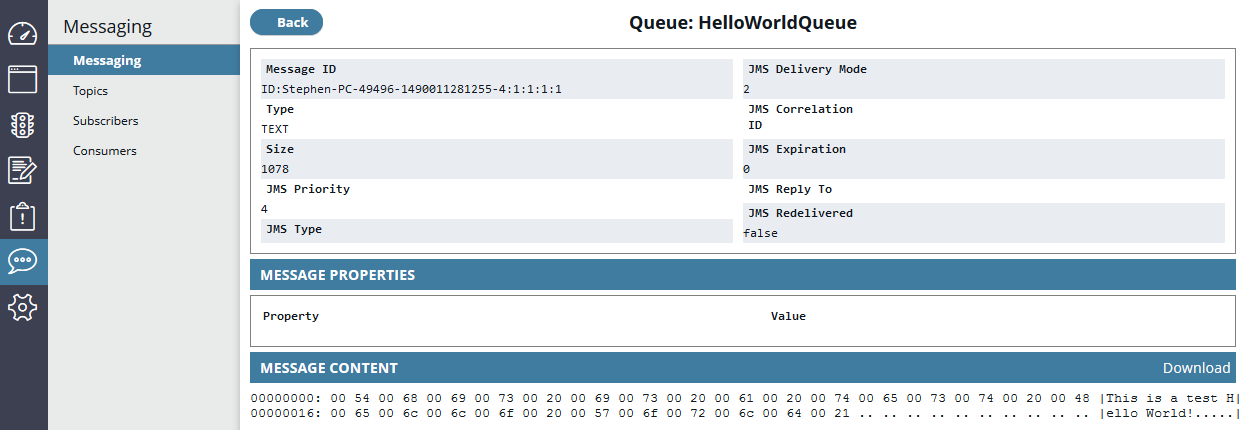
When you have created a message in a queue, the message is displayed in the list of messages on the Queues tab. You can click a message in the list to display a detailed view of the message properties and message body contents. To save the message body to a file, click the Download link on the bottom right of the screen.
Manage messaging topics
The Topics tab displays the messaging topics that exist in the selected API Gateway instance, or across the selected API Gateway group. The Actions drop-down menu on the right enables you to perform the following tasks:
- Create a new topic
- Delete a topic
- Refresh the list of topics
To create a new topic, select Actions > Create Topic, and enter the required topic name in the dialog.
Unlike queues, where messages posted to the queue are kept until someone reads them, messages posted to the topic are broadcasted to all topic subscribers, and then immediately removed from the topic. This means that when you click a newly created topic in the list, the Actions menu on the right includes only the Create Message action to enable you to post a new message to the topic. Delete or move actions are not required because the topic is always empty.
Manage messaging subscribers
The Subscribers tab displays the list of durable subscribers that have registered to receive messages from a specified publisher (for example, messaging topic). In this model, the subscriber and the publisher are not aware of each other. The Actions drop-down menu on the right enables you to perform the following tasks:
- Create a new subscriber
- Delete a subscriber
- Refresh the list of subscribers
Create a new subscriber
To create a new subscriber, select Actions > Create Subscriber, and complete the following details:
- Subscriber Name: Specifies a name for this subscriber (for example
HelloWorldTopicSubscriber). - Client ID: Specifies a unique client ID used for the subscriber connection. If you do not specify a client ID, one is generated by default (for example
ID:<hostname>-60862-1392656015480-28:1). The client ID is required for durable subscriptions, which enable a client to disconnect or fall over while consuming a topic, and retrieve any missed messages when it reconnects. To achieve this, the broker needs the client ID to identify which messages are pending consumption. - Destination: Specifies the JMS destination being subscribed to (for example, topic name).
- Selector: Specifies a JMS selector used to attach a filter to a subscription and perform content-based routing.
JMS selectors and filters in ActiveMQ are in no way related to API Gateway selectors and filters. JMS selectors are defined using SQL 92 syntax, and typically apply to message headers. For example: JMSType = 'car' AND color = 'blue' AND weight >250. For more details, see http://activemq.apache.org/selectors.html.
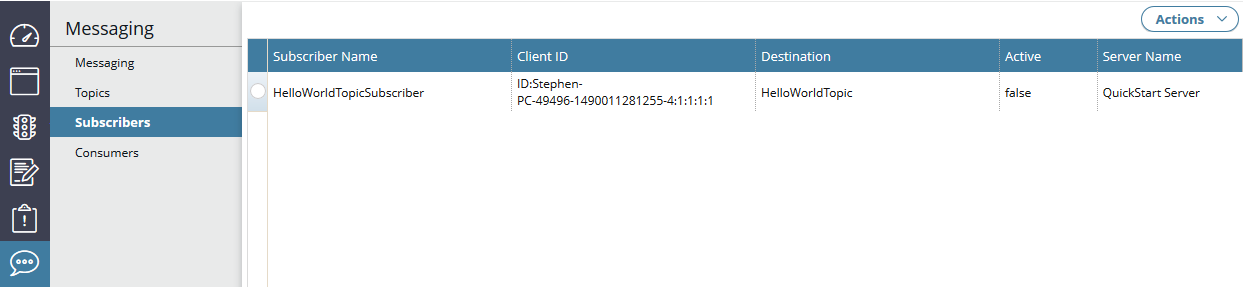
The following screen shows a newly created subscriber:
Manage messaging consumers
The Consumers tab displays the list of JMS consumers that are currently connected to this embedded ActiveMQ server. This includes details such as client and connection IDs, destination type and name, and server name.
Then when you click a consumer in the list, this displays more detailed information on that consumer. For example:
