Develop REST APIs in Policy Studio
10 minute read
Policy developers can use the REST API development wizard in Policy Studio to create new REST APIs based on existing back-end REST and non-REST APIs in an iterative development cycle. For example, this includes exposing a SOAP web service, or a cloud-based application as a REST API. Creating new REST APIs using Policy Studio is known as API development. You must specify a custom routing policy for REST API methods. You can specify optional policies for request and response processing as required.
The REST API Repository node in the Policy Studio tree stores information about REST APIs created using the REST API development wizard. When new REST APIs are added in the REST API Repository, they can then be registered in API Manager for consumption by API consumers and administration by API administrators.
APIs created using the REST API development wizard are registered by importing as a back-end API into API Manager. Registered APIs are governed by the API Gateway using policies defined in the client registry. API administrators can use API Manager to manage registered APIs, and API consumers can use API Manager to consume registered APIs in their client applications.
Note
You can use Policy Studio to create new REST APIs that route to custom policies. You must use API Manager to register a front-end REST API that routes to the destination REST API. For more details, see Virtualize REST APIs in API Manager.Virtualized REST APIs
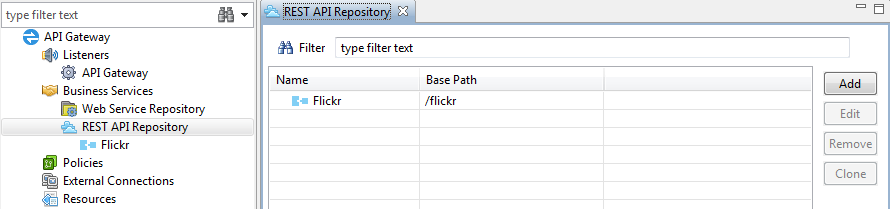
The REST API Repository is displayed under the APIs node in the Policy Studio tree. When a REST API is added to this repository, it becomes virtualized by the API Gateway. A virtualized REST API is assigned a path that gives it a namespace in a running API Gateway instance (for example, /flickr/v1). This means that all of its methods reside under a URL with that path (for example, /flickr/v1/photos). You can view the list of virtualized REST APIs by selecting the APIs node in the tree.
The following example shows a virtualized Flickr REST API:
Because the REST API encompasses an inbound listener and resolver in a running API Gateway instance, the paths associated with the API are also displayed in the tree (for example, under Environment Configuration > Listeners > API Gateway > Default Services > Paths). These REST API paths are read-only under the Listeners node. You can create or update these paths as described in Virtualize a REST API.
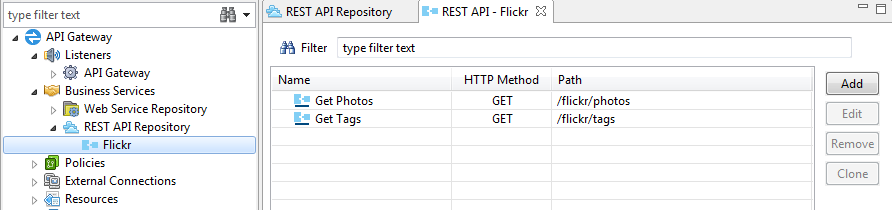
REST API methods
Each REST API consists of zero or more REST API methods. Each method can provide custom polices for request, routing, and response processing. You can view the list of methods for a virtualized REST API by clicking a specific API node under REST API Repository. The following example shows API methods for a virtualized Flickr API:
Virtualize a REST API
To virtualize a REST API in the repository, perform the steps described in this section.
Define the REST API
Perform the following steps to define the REST API:
-
Right-click the REST API Repository node, and select Add REST API to launch the wizard.
-
Enter a Name for the REST API (for example,
Flickr API). -
Enter a short Summary of the API functionality.
-
For a detailed Description, select to Manually enter a description in the text box. Alternatively, select to Specify markdown file location. The default location is
${environment.VINSTDIR}/docs/REST_API_NAME/REST_API_NAME.md.For details on writing documentation with Markdown, see http://daringfireball.net/projects/markdown/.
-
Enter the API Version. Defaults to
1.0. -
Click Next.
Specify exposure settings
Perform the following steps to configure how the REST API is exposed:
- Specify the details for the inbound path that accepts requests:
- Listening on HTTP: Select the HTTP Services group on which the API listens. Defaults to Default Services.
- Virtual Host: Click the browse button to select a virtual host in the dialog. If no virtual host has already been configured, right-click the HTTP service node (for example, Default Services), and select Add a Virtual Host.
- Base Path: Enter the base path prefix for the API (for example,
/flickr/v1). This is the path that the API Gateway listens on for messages for the REST API. This path gives the API a namespace in the running API Gateway instance, under which its methods can reside (for example,/flickr/v1/getPhoto).
- Click Finish.
Edit the REST API
When the REST API has been virtualized in the repository, it is displayed when you select the REST API Repository node. At any stage, you can select the REST API in the panel on the right, and click Edit to edit any of its configuration settings. Similarly, click Remove to remove the API from the repository.
Virtualize a REST API method
To virtualize a REST API method in the repository, perform the steps described in this section.
Define the method
Perform the following steps to define the REST API method:
-
Right-click a configured REST API node, and select Add API Method to launch the wizard.
-
Enter a Name for the REST API method (for example,
Photo Search). -
Enter a short Summary of the method functionality.
-
For a more detailed Description, select to Manually enter a description in the text box. Alternatively, select to Specify markdown file location. The default location is
${environment.VINSTDIR}/docs/REST_API_NAME/REST_API_METHOD_NAME.md.For details on writing documentation with Markdown, see http://daringfireball.net/projects/markdown/.
-
Click Next.
Specify exposure settings for the method
Perform the following steps to configure the exposure settings:
-
Specify the details for the inbound path that accepts requests:
- HTTP Method: Select the HTTP method (defaults to GET).
- Using path: Enter the path for the REST API method (for example,
/getPhoto).
You can also specify path parameters (for example, an inbound path of
/getPhoto/{userID}, whereuserIDis a variable part of the path). When you specify an inbound path parameter, the parameter (in this case,userID) is automatically added in the Inbound parameters table below.- Exposed on: Enter the base path that the method is exposed on. Defaults to the API base path (for example, /flickr/v1).
- Resolved using: Select whether the path is resolved using Exact path match (default) or Longest path match.
-
Under Inbound parameters, click Add to specify a path parameter exposed by the method, and enter values for the following settings:
- Name: Enter the parameter name (for example,
userID). - Description: Enter a short parameter description.
- Param Type: Select the parameter type from the list. Defaults to query.
- Data Type: Select the data type from the list. Defaults to
string. - Select whether the parameter is Required (unselected by default).
- Select whether to Allow Multiple parameters (unselected by default)
The inbound parameters entered in this table are displayed on the API Manager page for this REST API method. For more details, see Example inbound parameters.
- Name: Enter the parameter name (for example,
-
Select whether the inbound request should Fail if unspecified parameters are found (selected by default).
Checking for unspecified parameters is only supported for
QueryandFormparameters. It is not supported forHeaderparameters. -
Under Content Types, select whether I wish to check inbound content types based on the following settings.
If selected, choose whether to Allow Content Types or Deny Content Types, and select the types that you wish to allow or deny.
-
Under Error Response Codes, click Add to specify an error response exposed by the method, and enter values for the following settings:
- HTTP Response Code: Select or enter the response code name (for example,
400). - Reason: Select or enter the response code reason (for example,
Bad Request).
The response codes entered in this table are displayed on the API Manager page for this REST API method.
- HTTP Response Code: Select or enter the response code name (for example,
-
Click Next.
Configure policies and monitoring settings
You can specify the following policy and monitoring settings for the API method:
-
Select a required Routing policy, which configures how inbound requests are routed.
-
Click Next to select Monitoring options to configure how the API method is displayed in the API Gateway Manager and API Gateway Analytics consoles. Alternatively, click Finish.
The monitoring options are as follows:
- Monitor API Service usage:
Specifies whether to store message metrics for this API service. This is selected by default. - Message attribute:
Enter the message attribute to use to identify authenticated clients. The defaultauthentication.subject.idattribute stores the identifier of the authenticated user (for example, the user name or X.509 Distinguished Name).
- Monitor API Service usage:
-
Click Finish.
Edit the REST API method
When the API method has been virtualized in the repository, it is displayed under the REST API Repository node. At any stage, you can select the REST API method in the panel on the right, and click Edit to edit any of its configuration settings. Similarly, click Remove to delete the API method from the repository.
Example inbound parameters
The REST API method wizard enables you to virtualize REST API methods in the REST API Repository, and to specify any inbound path parameters.
For example, given a virtualized REST API such as the Yahoo Finance API, you can use the REST API method wizard to specify inbound stock quote URL path parameters, which can then be mapped to specific query string parameters. This enables you to expose an inbound path such as /stock/quote/{symbol}, and to map {symbol} to the s parameter in the query string. You can then make parameterized API calls such as the following at runtime:
finance.yahoo.com/d/quotes.csv?s=symbol&f=sb2b3jk
This call returns a stock quote such as the following at runtime:
AMZN 272.99 270.03 185.51 284.72
Supported parameter mappings
The REST API parameter mappings supported by the API Gateway are as follows.
Query string
- Query string to query string
- Query string to form body
- Query string to path
- Query string to header
Path
- Path to query string
- Path to form body
- Path to path
- Path to header
Form-encoded body
- Form body to query string
- Form body to form body
- Form body to path
- Form body to header
Header
- Header to query string
- Header to form body
- Header to path
- Header to header
You can configure any required mappings using request, routing, or response policies. For example, you can use a Set Header filter to map to a header parameter, or a Scripting or Set Message filter to map to a path or query parameter.
How to access parameter values at runtime
When inbound parameters are specified in your REST API, you can access their values on the API Gateway message whiteboard at runtime using the following selectors in your policies:
${params.path.param_name}${params.query.param_name}${params.form.param_name}${params.header.param_name}
The API Gateway parses the input parameters and auto-generates the message attributes. The configured mappings take these message attributes and use them for the output parameter values (query, form, path, or header).
JSON messages
When the message content is JSON, you can also access fields in the message body using ${params.body.field}. For example, given the following JSON message content:
{
   "id":"28a384e7-0b13-4679-ae1c-0c63666d3d8e"
   "activities": ["running", "swimming", "cycling"],
   "subObject":
     "foo": "bar",
     "hello": "world",
     "yetAnotherObject": {
        "array": ["a", "b", "c"],
        "val": "greetings from yetAnotherObject"
      }
    }
}
You can use the following selectors to access the JSON message body content in your policy at runtime:
| Selector | Value |
|---|---|
${params.body.id} |
28a384e7-0b13-4679-ae1c-0c63666d3d8e |
${params.body.activities[1]} |
swimming |
${params.body.subObject.hello} |
world |
${params.body.subObject.yetAnotherObject.array[0]} |
a |
Monitor APIs in API Gateway Manager
When you create an API in Policy Studio and register it in API Manager, you can use the API Gateway Manager web console to monitor the API at runtime.
When invoking a REST API developed in Policy Studio, by default, the authenticated subject displayed on the Traffic tab is blank:

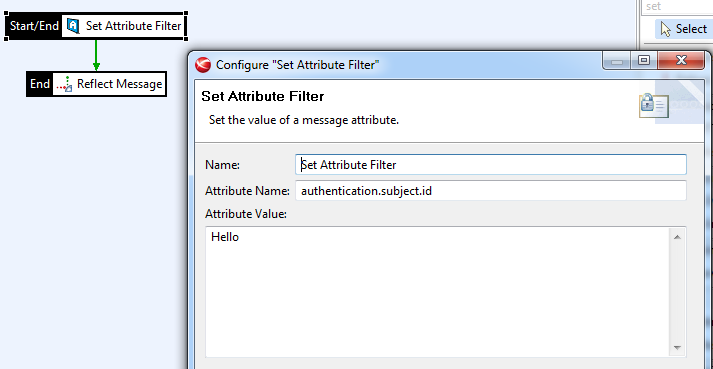
To override the default behavior, you must set the ${authentication.subject.id} message attribute in one of the policies configured for the API (request, routing, or response).
The following shows example shows how to configure this using a Set Attribute filter:
When configured in a policy, the subject is displayed in API Gateway Manager as follows:
