Customize API Portal look and feel
15 minute read
For internally-facing API deployments, you can deploy API Portal “as is” using the out-of-the-box Axway branding. This type of deployment requires no customization.
For external-facing API deployments, you may want to customize API Portal to provide a branded developer portal experience. This type of deployment contains a collection of style settings that can be configured in your account, including logos, colors, fonts or you can perform advanced modification of the layout and structure.
Supported API Portal customization
Customization can be performed at the following levels:
- Customization through configuration: Use the Joomla! Admin Interface (JAI) (
https://<API Portal host>/administrator) to change CSS stylesheets, templates, and layouts. These types of customizations can be upgraded and retained when you move to a new version. The customization does not modify the API Portal source code and is supported by Axway. - Customization through the addition of Joomla! extensions: The Joomla! CMS offers thousands of extensions that are available from their website. Axway supports only extensions that are delivered out of the box (EasyBlog and EasyDiscuss).
Prerequisites
To get started with customization, you need the following:
- API Portal installed and configured. For more details, see the API Portal Installation and Upgrade Guide.
- An API Portal user account. When you log in, the default API Portal web page is displayed, so you can check how the changes look to your end users.
- Basic understanding of Joomla! ThemeMagic. This feature enables you to change CSS stylesheets, templates, and layouts. For more advanced modifications, you can modify the PHP source code to customize API Portal, such as to change the functionality of pages and to extend by adding new pages.
Customize using Purity III template
This section describes how to customize your portal using the Purity III template.
Customize with ThemeMagic
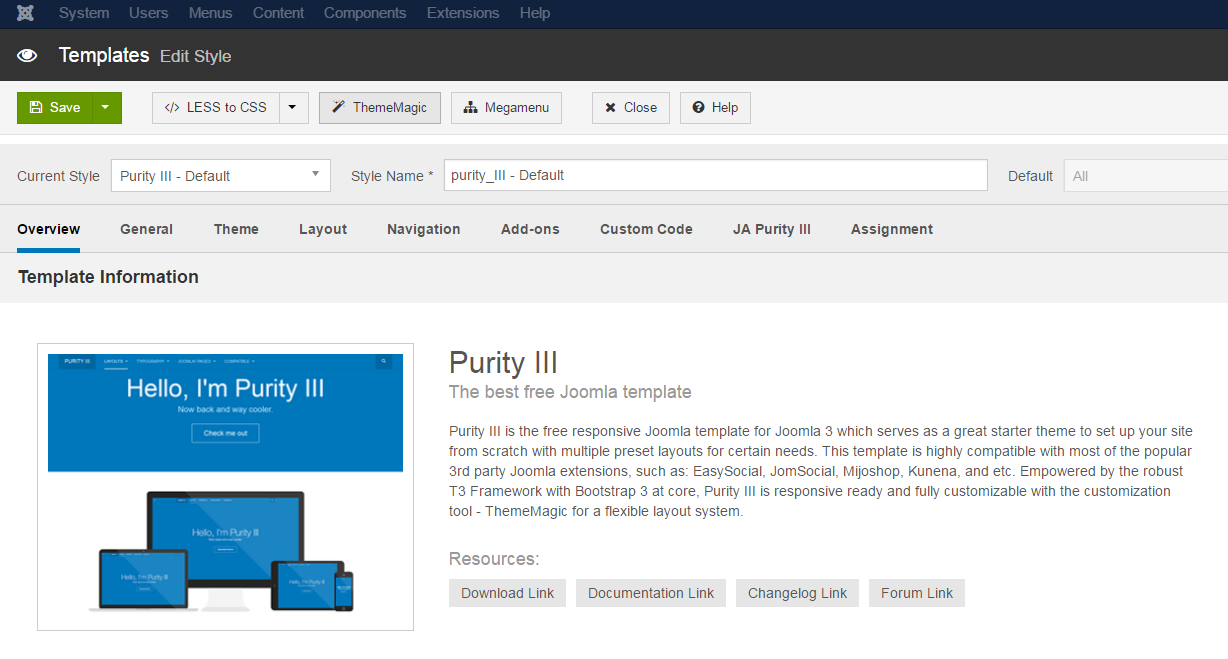
API Portal uses the Joomla! framework to extend the ThemeMagic feature. ThemeMagic is part of the Purity III template that is based on the T3 template framework. For more details on how to use and customize Purity III, see the official Purity III documentation.
With ThemeMagic, you have an administrative interface for creating or modifying themes, such as colors and fonts. Use the live preview to follow how your theme configuration looks before saving the changes. Themes are built using theming variables based on the Less language.
Open ThemeMagic
-
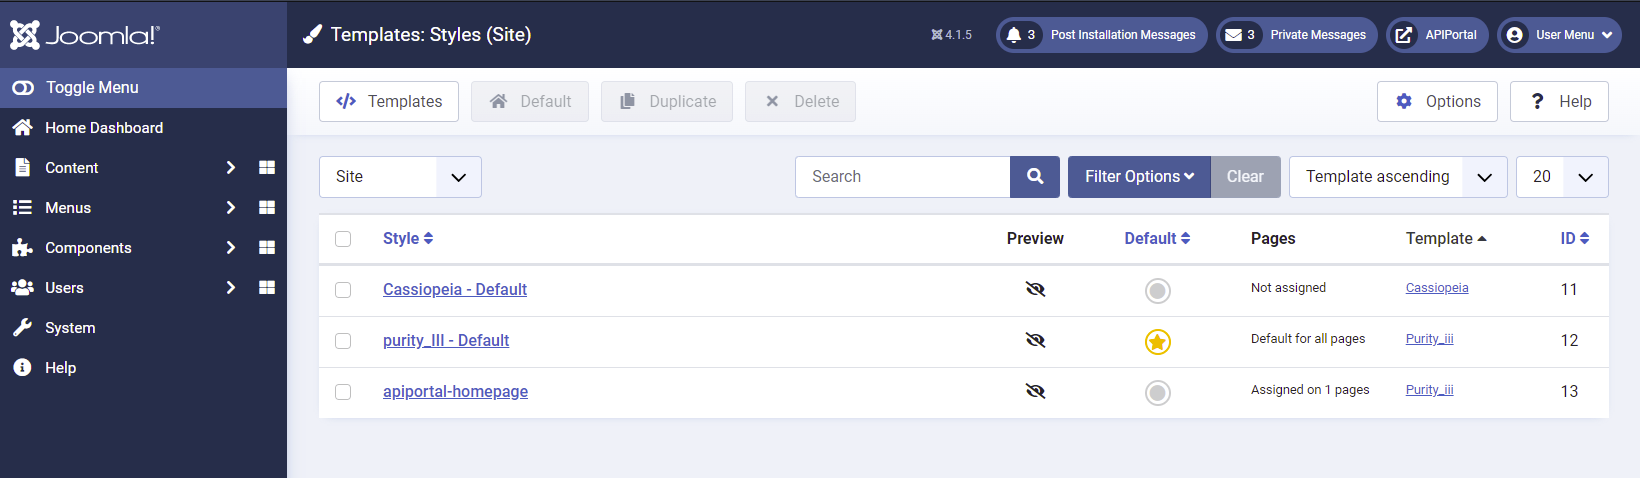
Log in to the Joomla! Administrator Interface (JAI), and click System > Site Templates.
-
Select the style Purity III - Default.
-
Select ThemeMagic. ThemeMagic opens your portal home page with theme variables are displayed on the left.
Note
The ThemeMagic button is no longer available in API Portal versions from May 2022 onwards, that is, after the migration to Joomla! 4.x. For more information, see Theme Customization in Joomla 4. -
In the ThemeMagic window, sign in to API Portal. You are now ready to start customizing your portal.

Create a new theme
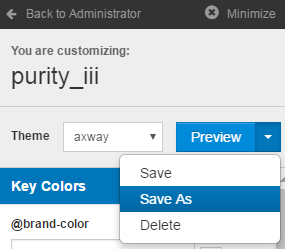
API Portal includes one theme named Axway. Create any additional themes from a copy of the Axway theme to ensure that they work properly.
-
Open the ThemeMagic tool, and ensure that the theme selected is the default Axway theme.
-
Click the drop-down next to the Preview button, and select Save As.
-
Enter a name for your theme, click Accept, and wait until the new theme is ready. A new folder is created for your new theme in
local/less/themes/. -
Ensure that the theme selected is your new theme, and change the theming variables on the left as needed to customize your theme.
-
To check how your changes look on the page, click Preview.
-
When you are happy with your theme, click the drop-down and select Save.
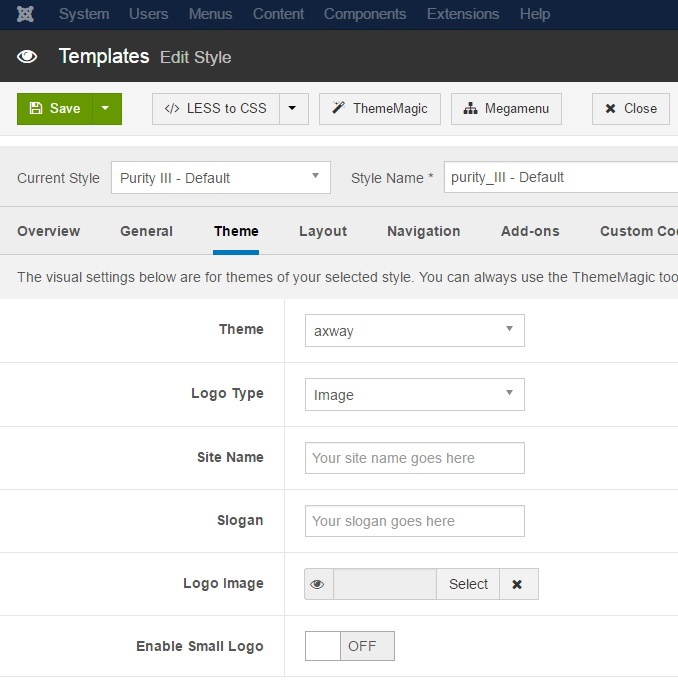
Theming variables
Theming variables are grouped into different levels:
- Key Colors: These variables control the base colors for all styles. The default key colors are sea blue and gray.
- Basic Colors: These variables control the colors of the major UI elements, such as buttons and menus. The default values for the basic colors are based on the key colors, but you can overridden these to control the styles of individual UI elements.
- Global Fonts and Headings: These variables control the typefaces and sizes of the main text elements
In addition, there are some other variables for fine-grain customization of the UI elements, if needed. Most of these variables are based on Basic Color variables.
Note
Variable names begin with the “@” character in Less language. In addition to variable values, you can also use Less expressions and functions to set the value of a theme variable.Use the new theme
- In JAI, click Sysytem > Site Templates Styles.
- Click Purity III - Default.
- Select the Theme page, and select your new theme from the Theme drop-down menu:
- Click Save, then click </> Less to CSS. This is the preferred option as it will only compile the theme you want to use.
Configuration files
API Portal includes files added to the Purity III template’s folders and files that replace those belonging to the Purity III template. All paths are relative to the Purity III template’s folder.
- Before updating the Purity III template or T3 framework, back up the Purity III files API Portal replaces. After the update, restore or merge the backed up files.
- Before updating the API Portal plugin, if you have customized the Axway theme or any of the mentioned configuration files, back up the files to avoid losing your customizations. After the update, you may have to merge the backed up files.
Added files
The following list details the added files:
less/themes/axway/template.less– Styles for the theme.less/themes/axway/variables.less– Theme values customized in a file editor.less/themes/axway/variables-custom.less– Theme values customized in the ThemeMagic. Do not edit this file manually.
Replaced Purity III files
The following list summarizes the replaced Purity III files:
thememagic.xml– Configuration for the ThemeMagic GUI.language/en-GB/en-GB.tpl_purity_iii.ini– Language strings displayed in the ThemeMagic GUI. In order to be utilized by ThemeMagic, this file must be copied to Joomla!’s main language folder,language/en-GB/en-GB.tpl_purity_iii.iniwhen the API Portal plugin is installed.less/variables.less– Global variables for the Purity III template. Default values for theming variables must be defined in this file.
Theme Customization in Joomla 4
If you are using Joomla! 4.x, the ThemeMagic button is no longer available from the Templates screen, and you must customize a new theme as follows:
-
Create a new Theme. All theme folders are located at
templates/purity_iii/less/themes/, under the API Portal installation. The easiest way to create a new theme is by creating a copy of/axwaytheme folder, and renaming it as, for example,/axway_copy. -
Select a new Theme. In JAI, click Sysytem > Site Templates Styles.
-
Click Purity III - style.
-
Select the Theme page, and select your newly created
axway_copytheme from the Theme drop-down menu. -
Customize your Theme. You can manually Customize CSS styles. For more information, see T3 Framework Layout documentation.
Customize your home page layout
apiportal-homepage layout is assigned to the home menu item by default. This layout is available from the apiportal-homepage template.
The home page consists of the following main sections:
- Menu
- Banner
- Tiles section
- Footer
To customize the layout of your portal:
- In JAI, click System > Site Templates Styles.
- Click apiportal-homepage.
- Customize the layout, and click Save.
For more details see T3 Framework Layout documentation.
Customize your banner
Change the banner of your portal using the Home Page Banner module.
To customize the banner:
-
In JAI, click System > Site Modules.
-
Search for Home Page Banner module.
-
Customize the following:
- Title - Free text field for the title of the banner. Defaults to Enter API Portal.
- Title colour - Colour picker to choose the color of the title.
- Sub-title - Free text field for the subtitle of the banner. Defaults to Explore and test our APIs.
- Subtitle colour - Colour picker to choose the color of the subtitle.
- Explore Button - Show / Hide Explore Button.
- Button text - Free text field for the button text.
- Button text colour - Colour picker to choose the color of the button text.
- Button has background - Yes / No.
- Link button to a menu item - Drop-down list with all menu items. Choose a page to link to when click the button. Defaults to Sign in page.
- Button border colour - Colour picker to choose the color of the button border.
- Border radius - Numbers only field for border radius of the button border. Defaults to 500.
- Background image - Change the background image of the banner. You can choose an image from the media manager or upload a new image.
- Text alignment - Choose one of the three options (left, center, right) to position the text and the button on the banner. The module position defaults to api-home-banner.
-
Click Save.
Customize the tiles
Modify the tiles in the home page using the Home Tiles module.
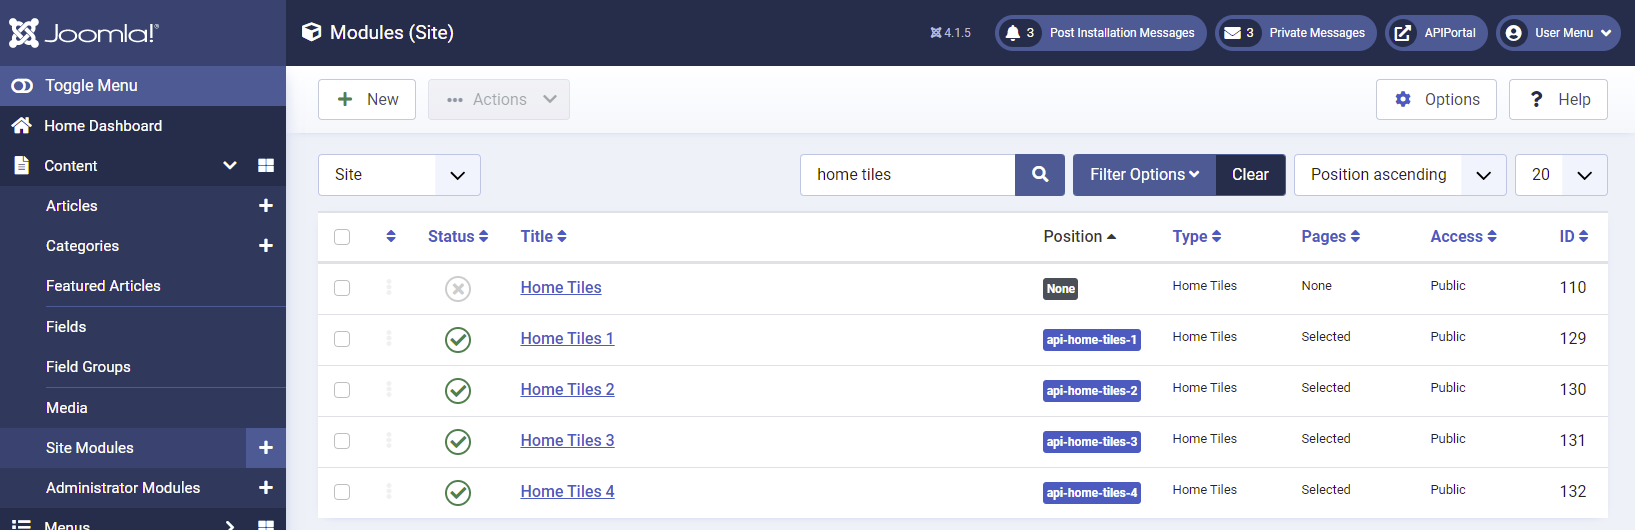
By default, there are four instances of this module:
- Home Tiles 1 (Explore&Test)
- Home Tiles 2 (Create)
- Home Tiles 3 (Manage & analyze)
- Home Tiles 4 (Connect with a community of developers)
To customize the tiles:
-
In JAI, click System > Site Modules.
-
Search for Home Tiles 1
-
Customize the following:
-
Title - Free text field for the title. Defaults to Explore & Test.
-
Title Colour - Colour picker to choose the colour of the title.
-
Description - Free text field for the description of the tile (The short text under the title).
-
Description colour - Colour picker to choose the colour of the description text.
-
Background image - Change the icon of the tile. You can choose an image from the media manager or upload a new image.
-
Background colour - Colour picker to choose the background colour of the whole tile. Defaults to white.
-
Tile has link:
- Menu item - Drop-down list with all menu items. Choose a menu item to link the Tile to (Defaults to the chosen option).
- Custom - Free text field. Enter any valid URL to link the tile to.
- No - No link at all.
-
The home page layout is designed to have up to six tiles, so positions api-home-tiles-5 and api-home-tiles-6 are available for use.
To add a new tile:
- In JAI, click System > Site Modules > New > Home Tiles.
- After finishing customizing, click Save or Save & close.
Customize using T4 template
This section describes how to customize your portal using the T4 template.
Customizations of template style
T4 template offers a variety of options for customizations by directly editing the template style. Before you start making changes, you must create a copy of the template styles.
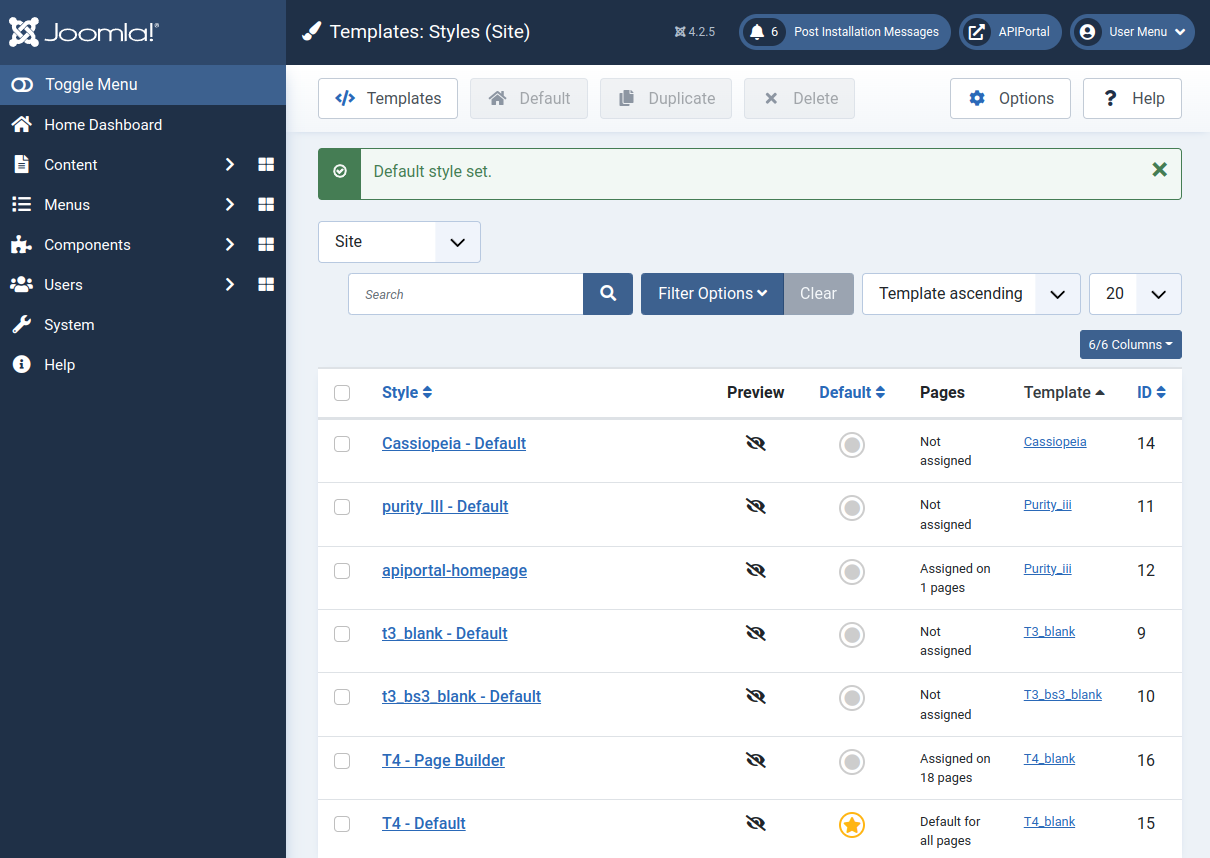
Duplicate T4 template styles
- In Joomla! Administrator Interface (JAI), click System > Site Template Styles.
- Select T4 - Default and T4 - Page Builder, then click the Duplicate button.
- Open the duplicate of T4 - Default and from the Overview sidebar menu, enable the Default toggle. From this tab you can also set Style name.
- Open the duplicate of T4 - Page Builder and click Menu assignment. Assign the menu items that you wish to be assigned to this template, then click Save. You can also change the Style name from the Overview sidebar menu.
As a result of this procedure, API Portal starts to use the duplicated templates.
T4 Template Style settings
Once the templates are duplicated, you can directly edit your copies. Some of the T4 Template Style settings are covered in the following sections.
Customize the theme color
You can change the basic colors of the theme by following the steps:
- In Joomla! Administrator Interface (JAI), click System > Site Template Styles.
- Open the duplicate of T4-PageBuilder template style.
- Click Theme Color from the sidebar menu.
- Clone the selected theme and edit the cloned theme.
- Setup the colors and click Save to save the template style.
Add custom CSS and SCSS
T4 template also allows you to add custom CSS/SCSS code to achieve the desired design for your API Portal.
- In Joomla! Administrator Interface (JAI), click System > Site Template Styles.
- Open the duplicate of T4-PageBuilder template style.
- Click Tools from the sidebar menu.
- From the Edit Custom SCSS section, click Edit.
- Select the Custom style tab from the dialog window.
- Add your CSS/SCSS code, then click Save and compile.
Customize with T4 PageBuilder
All pages in API Portal are built using T4 PageBuilder. T4 PageBuilder is a tool that provides an intuitive user interface with which you can customize page content and styling.
To edit a page with T4 Page Builder, follow these steps:
- In Joomla! Administrator Interface (JAI), click Components > T4 Page Builder > All Pages.
- Click Edit page to open PageBuilder.
The following image shows a preview of the page.
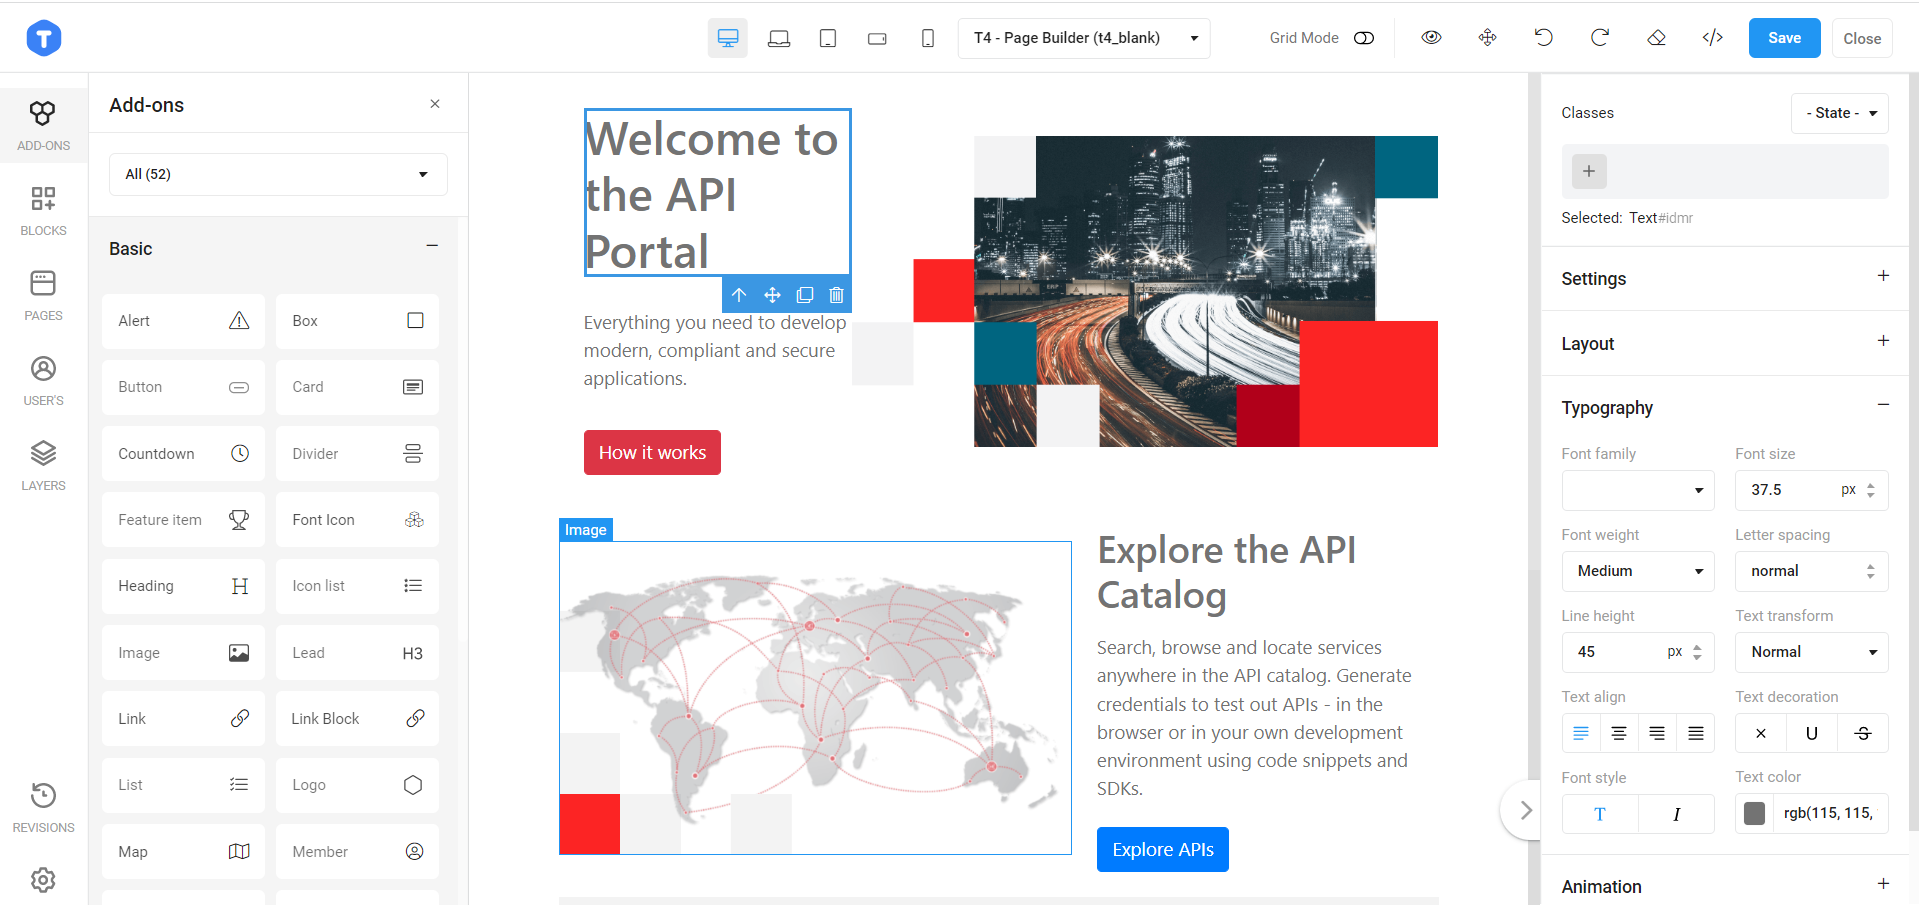
There is a toolbar at the top of the page to allow you to see the page in different resolutions. Also, there is a Code editor button from which you can add custom HTML and CSS code.
On the left-side menu, there is an Add-ons item, from which you can add new elements to the page by directly dragging-and-dropping them. You can also edit existing elements by clicking on them and changing their properties from the toolbar that is shown on the right-side.
For more information, see T4 Page Builder official documentation.
Note
With T4 Page Builder you can easily customize the static content. You cannot customize content coming from a Joomla module.Customizations with Joomla modules
API Portal uses Joomla modules to render dynamic content (APIs, Applications, Users). Each module provides configuration which gives you control over the content rendered by the module. You can see what configuration options a module provides by clicking Content > Site Modules, and opening a module.
Watch this video to learn more about applying your customizations and styling to the new T4 Template:
Customize your logo
Change the API Portal site logo using the Joomla! Media Manager.
Upload your image file
- In Joomla! Administrator Interface (JAI), click Content > Media.
- Select the place where you want to upload the image. For example: com_apiportal folder.
- Upload the image file you want to use, and select Save.
Link the logo to your template styles in Purity III template
To link your logo to template:
-
In JAI, click System > Site Templates Styles. A list of template styles is displayed.
-
Click on template style.
-
Go to the Theme tab, and click Select from Logo Image.
-
Navigate to the folder where the image was uploaded.
-
Select your logo from the list of the available image files, and click Insert.
Files in SVG format are not listed. In that case, you must enter the path to that image in Image URL. The path must start with the
images/segment. For example,images/path-to-logo/logo-filename.svg. -
Click Save.
Link the logo to your template styles in T4 template
To link your logo to template:
- In JAI, click System > Site Templates Styles. A list of template styles is displayed.
- Click on template style.
- Click on Site settings from the sidebar menu.
- Clone the selected site settings. Edit the cloned site settings.
- Click Select button from the Logo image field.
- Save the site settings.
- Save the template style.
Note
You must repeat this procedure to apply your logo to all your templates.Customize standard footer
You can customize API Portal standard footer content using the following modules: Footer, Logo - Footer, Legal Menu - Footer.
- In the JAI, click System > Site Modules.
- Click New to create a new module.
- From the list of module types, click Custom.
- From the right-side menu, select
Hideon the Show title option. - Set position:
- for Legal Menu - Footer module to footnav-1.
- for Logo - Footer to footer-logo.
- for Footer module to footer.
- Apply your desired changes.
- Click Save.
Customize the 404 error page
Customize a 404 error page for your API Portal.
Duplicate the template
Duplicate the current template to avoid losing your changes when you upgrade API Portal.
- In JAI, click System in the left sidebar.
- Under Templates click Site Templates, and click the Purity_III Details and Files template.
- Click Copy Template, add a name to the template, and click Copy Template.
- Click Save, then click Close.
Customize 404 page
Customize the message for your error page.
- In JAI, from the list of templates, click your newly created template.
- On the Editor tab, click error.php to edit this file.
- Customize the line describing the 404 page.
- Click Save & Close to save your changes.
- Click Close to leave the template page.
Assign your template as default for all pages
Assign your new template as the default template for API Portal pages.
- In JAI, click System in the left sidebar.
- Under Templates, click Site Templates Styles and click to open the newly created style for your template.
- Click the Theme tab, and select Axway for Theme.
- Click the Layout tab, and select Blog for Position & Responsive Configuration.
- Click Less to CSS.
- Click Save, then click Close.
- In the Default column, mark this style as default.
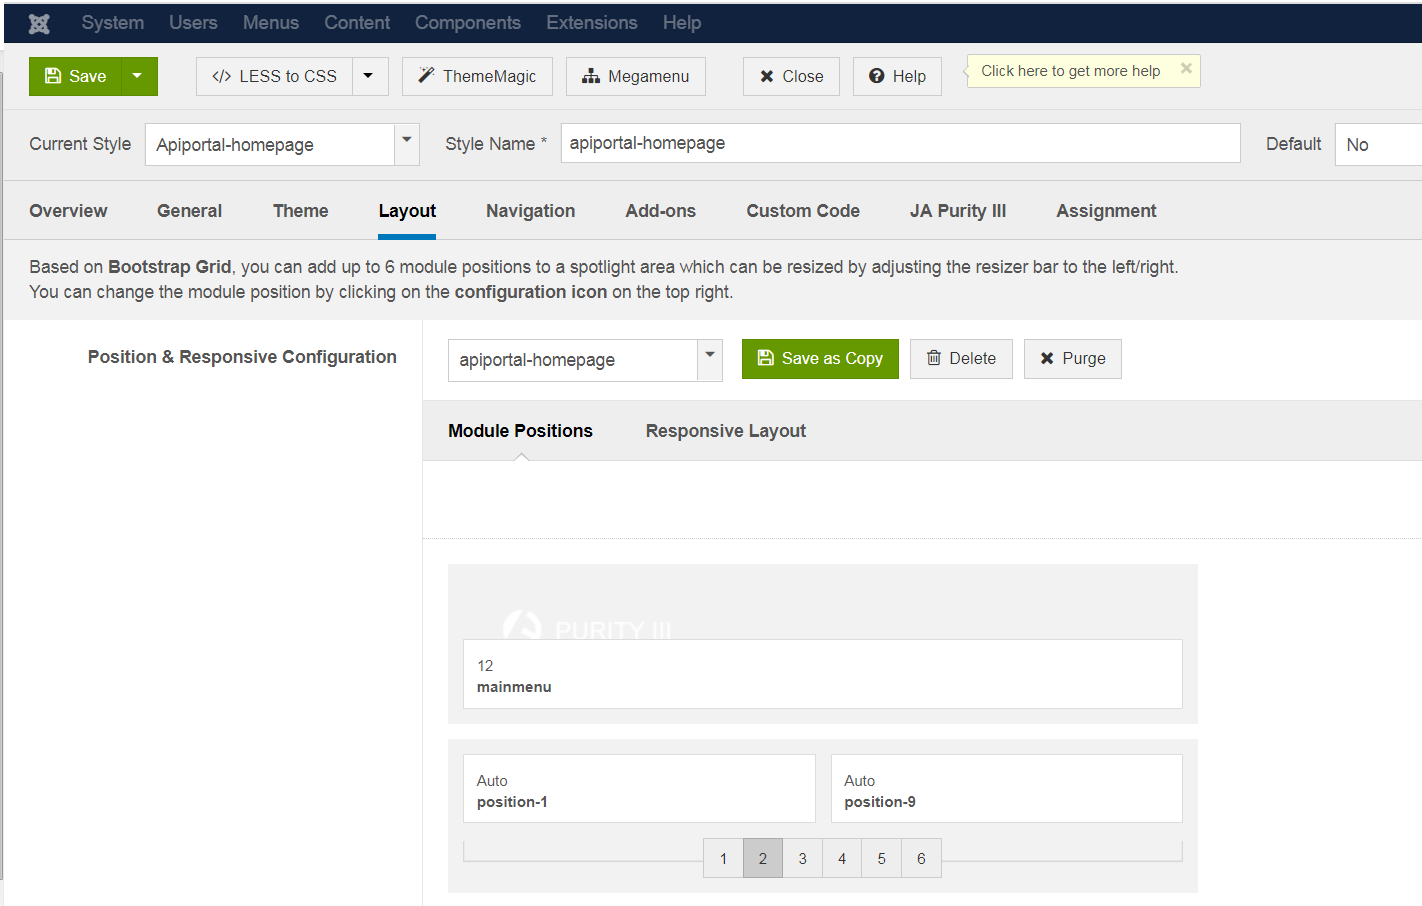
Assign your template as default for the Home page
Create a new style and assign it to the Home page.
- Select the checkbox next to an existent customized style and press Duplicate.
- Click to open the style.
- In Style Name, add a name related to homepage.
- Click the Layout tab, and select apiportal-homepage for Position & Responsive Configuration.
- Click the Assignment tab, and select only Home.
- Click Save, then click Close.
Configure terms and conditions text
To modify the API Portal Terms and Conditions content, edit the following file:
/opt/axway/apiportal/htdoc/components/com_apiportal/views/terms/tmpl/default.php
Enable the T4 template
API Portal version November 2022 ships with the T4 template. However, if you are upgrading from previous versions to the November 22 release of API Portal and wish to adopt this template, there are some manual steps you must take to configure menu items, and apply your customizations and styling to the new T4 template.
Follow the steps below to configure menu items in the T4 template:
-
In JAI, click System > Site Templates Styles under the Templates section, and in the Default column, select T4 - Default.
-
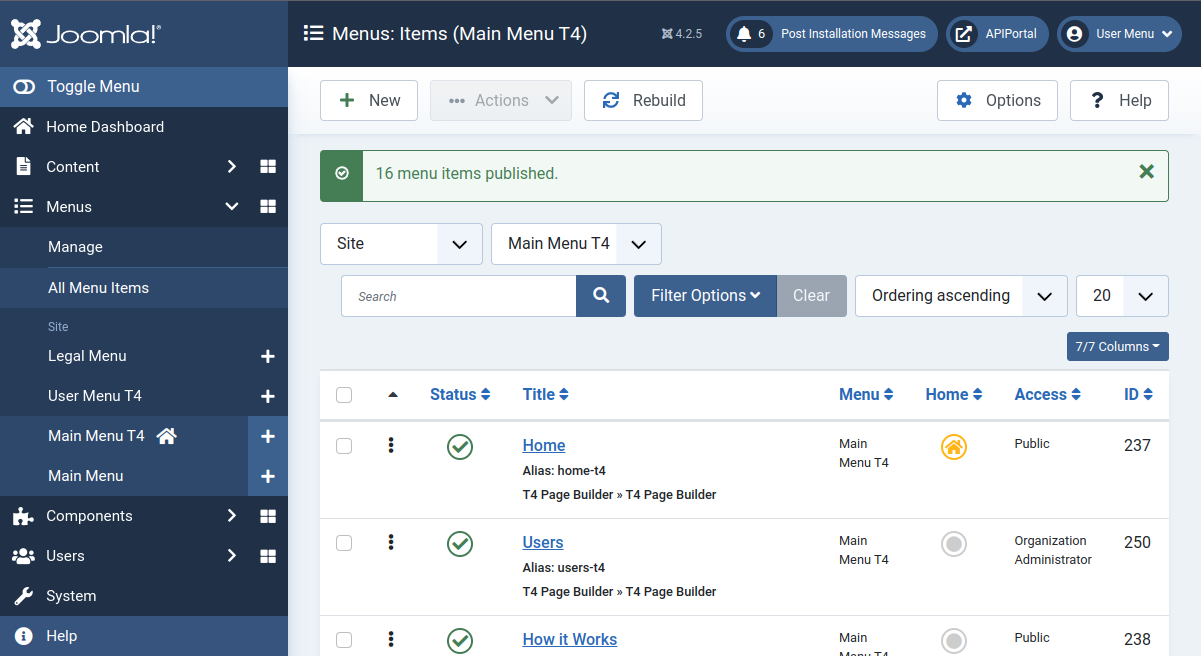
Click Menus > Main Menu T4 and assign the home page by clicking Home icon under the Home column, then select the checkboxes for all menu items and click … Actions > Publish.
-
Click Menus > Manage > Main Menu and change the menu name from mainmenu to, for example, mainmenu-t3.
-
Click Menus > Main Menu and select the checkboxes for all menu items, then click … Actions > Unpublish.
-
Click Menus > Manage > Main Menu T4 and change the menu name from mainmenu-t4 to mainmenu.
-
Click Menus > Manage > User Menu T4 and change the menu name from user-menu-t4 to user-menu.
-
Click Menus > User Menu T4, select the checkboxes for all menu items and click … Actions > Publish.
-
(Optional) To preserve URLs format, click all menu items under both Menus > User Menu T4 and Menus > Main Menu T4 and remove -t4 prefix from aliases.
Watch this video to learn more about enabling T4 Template after upgrade: