Additional customizations
12 minute read
Add reCaptcha to sign up
You can customize your sign up functionality by enabling reCaptcha
reCaptcha is a free service you can add to the API Portal sign up page to prevent spam and abuse. The reCaptcha plugin is available in Joomla!.
Register a new site
You must have a Google user name and password to add reCaptcha. For more details, see reCaptcha documentation.
- Go to the reCaptcha admin page.
- Enter a label for your site (such as
API Portal), enter the API Portal domain (herelocalhost.localdomain) in the Domains field, and select Register. - Select the domain, and review how to add the reCaptcha:
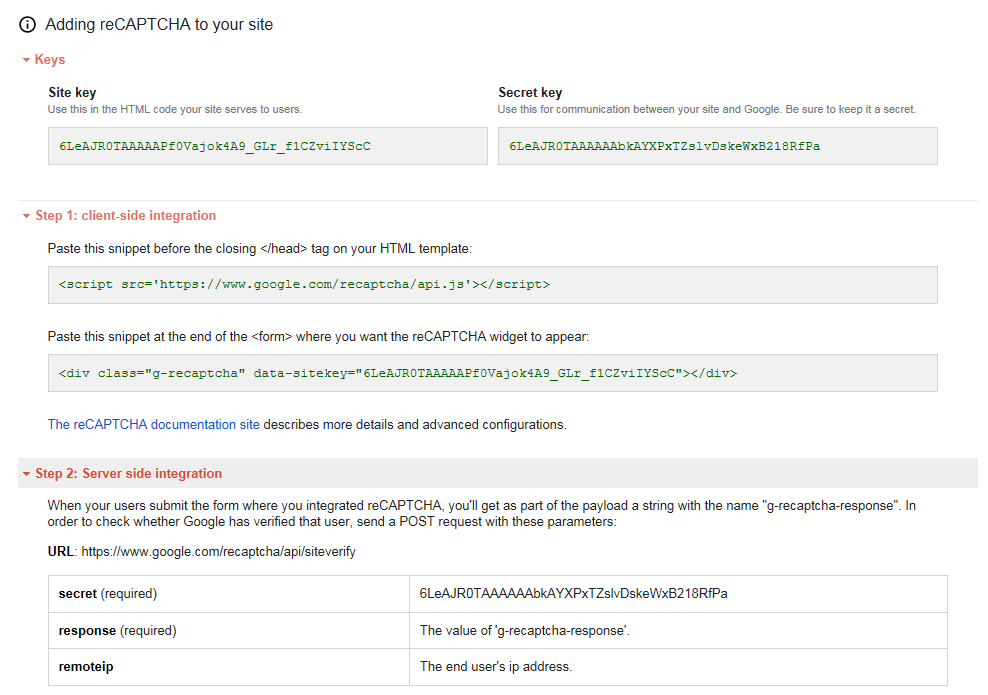
Add reCaptcha plugin
- Log in to the Joomla! Administrator Interface (JAI) (
https://<API Portal_host>/administrator). - Select System > Plugins.
- Click Captcha - ReCaptcha.
- Enter the respective reCaptcha keys to the Site key and Secret key fields.
- Set the Status of the plugin to
Enabled, and click Save & Close. - Click System > Global Configuration > Users.
- On the User Options tab, set the Captcha field to Captcha - ReCaptcha, and click Save & Close.
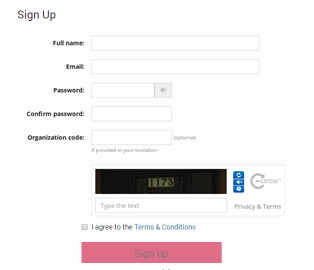
To verify the change, go to API Portal home page and click Sign In > Sign up. The reCaptcha functionality is displayed on the sign up page.
Configure API Portal with SMTP
You can configure API Portal with SMTP to enable sending user registration emails.
To send emails from API Portal (for example, for user registration or email validation), you must configure an SMTP server in API Manager. For more details, see Configure API Manager settings in Policy Studio.
Customize user registration emails
You can customize the emails that are sent to API Portal users on sign up. All API Portal user emails are sent from API Manager, so to customize emails see Customize API Manager generated email.
Customize API Portal user login
You can customize what API Portal page your API consumers see on first log in, and you can also enable ReCaptcha and user account locking on the login page.
Change the page displayed after first login in Purity III template
You can change the API Portal page users see when they first log in successfully to API Portal. The default behavior is:
- Display the Applications page if at least one application exists.
- Display the API Catalog page if no applications exist.
To change this behavior, follow these steps:
- In JAI, click Components > API Portal > Additional Settings.
- In the Redirect after login field, enter a menu link (for example,
/index.php?option=com_apiportal&view=home) or a menu alias (for example,/home) to redirect the user to after successful login. - Click Save.
Change the page displayed after first login in T4 template
You can change the API Portal page users see when they first log in successfully to API Portal. By default you are redirected to the Applications catalog page.
To change this behavior, follow these steps:
- In JAI, click Content > Site Modules.
- Open API Portal Login Form module.
- From Redirect after login and Link to page fields you can change the redirect on successful login.
- Click Save.
Note
In case of SSO login, the redirect URL is determined by the Redirect after login field, which is located at Components > API Portal > Additional Settings.Change the page displayed after unauthorized request
You can change the API Portal page that the users are redirected to after unauthorized request. By default they are redirected to the sign-in page.
To change this, follow these steps:
- In JAI, click Components > API Portal > Additional Settings.
- In the Redirect on unauthorized request field, enter a menu link (for example,
/index.php?option=com_apiportal&view=home) or a menu alias (for example,/home). - Click Save.
Enable ReCaptcha and user account locking
You can customize API Portal user login to display a ReCaptcha and lock the user account after a number of failed login attempts:
- In JAI, click Components > API Portal > Login Protection.
- Click Yes to enable login protection for API Portal.
- Enter a value for the number of failed login attempts before a ReCaptcha is displayed.
- Enter a value for the number of failed login attempts before the user account is locked.
- Enter a value in seconds for how long the user account is locked.
- Click Yes to enable locking by IP address. When this setting is enabled login attempts are blocked from the same IP address for the lock time specified even if correct user credentials are entered.
You can enable user account locking and IP address locking independently or in combination. For example, if you enable user account locking and IP address locking for 5 minutes after 2 failed login attempts,
UserAwill be locked for 5 minutes after entering 2 incorrect passwords, and any other user (for example,UserB) will also be unable to log in for 5 minutes from the same IP address, even if they provide correct user credentials. - Click Save.
Reset locked user accounts
Click Clear Locked Accounts to reset all locked user accounts, so that the users can log in again.
Add a customized message to the login page
You can add a customized message to the API Portal login page. You can use this message, for example, to inform your users that logging in to your API Portal constitutes consent to abide by your company’s security policies and standards. This message is displayed in the format of a banner.
To enable this feature follow these steps:
- In JAI, click System > Site Modules.
- Click New to create a new module.
- From the list of module types click Custom.
- Enter a title for the message.
- Use the text editor to enter the text for the message.
- Select Purity_iii > login-message-consent from the Position list.
- Click Save & Close.
- Go to the API Portal Sign In page, refresh the page, and verify that the banner is shown.
Enforce password policies
To ensure compliance with security polices, you can enforce password policies by asking your API Portal users to change their password at first login, as well as after an expired interval. These settings are available in API Manager, and they are enabled by default. For more information, see Customize password validation.
To disable the Enable password expiry and Days before passwords expire settings, follow these steps:
- In API Manager, click Settings > API Manager settings.
- Disable Enable password expiry and Days before passwords expire fields.
Note
If you disable Enable password expiry, which forces users to change password at first login, and a new user logs in after that, then this user will not be asked to change password if you decide to enable this setting again.Customize page title and summary in Purity III template
You can customize the title and summary text for the following API Portal pages: Users, APIs, Applications, Monitoring, Help Center, and Pricing.
- In JAI, click Menus > Main Menu.
- Open the desired page menu item and click the Page Display tab.
- In Masthead Title, enter the new page title. If you leave this empty, the default title is used.
- In Masthead Slogan, enter the new summary. If you leave this empty, the default text is used.
- Click Save & Close.
Customize application settings
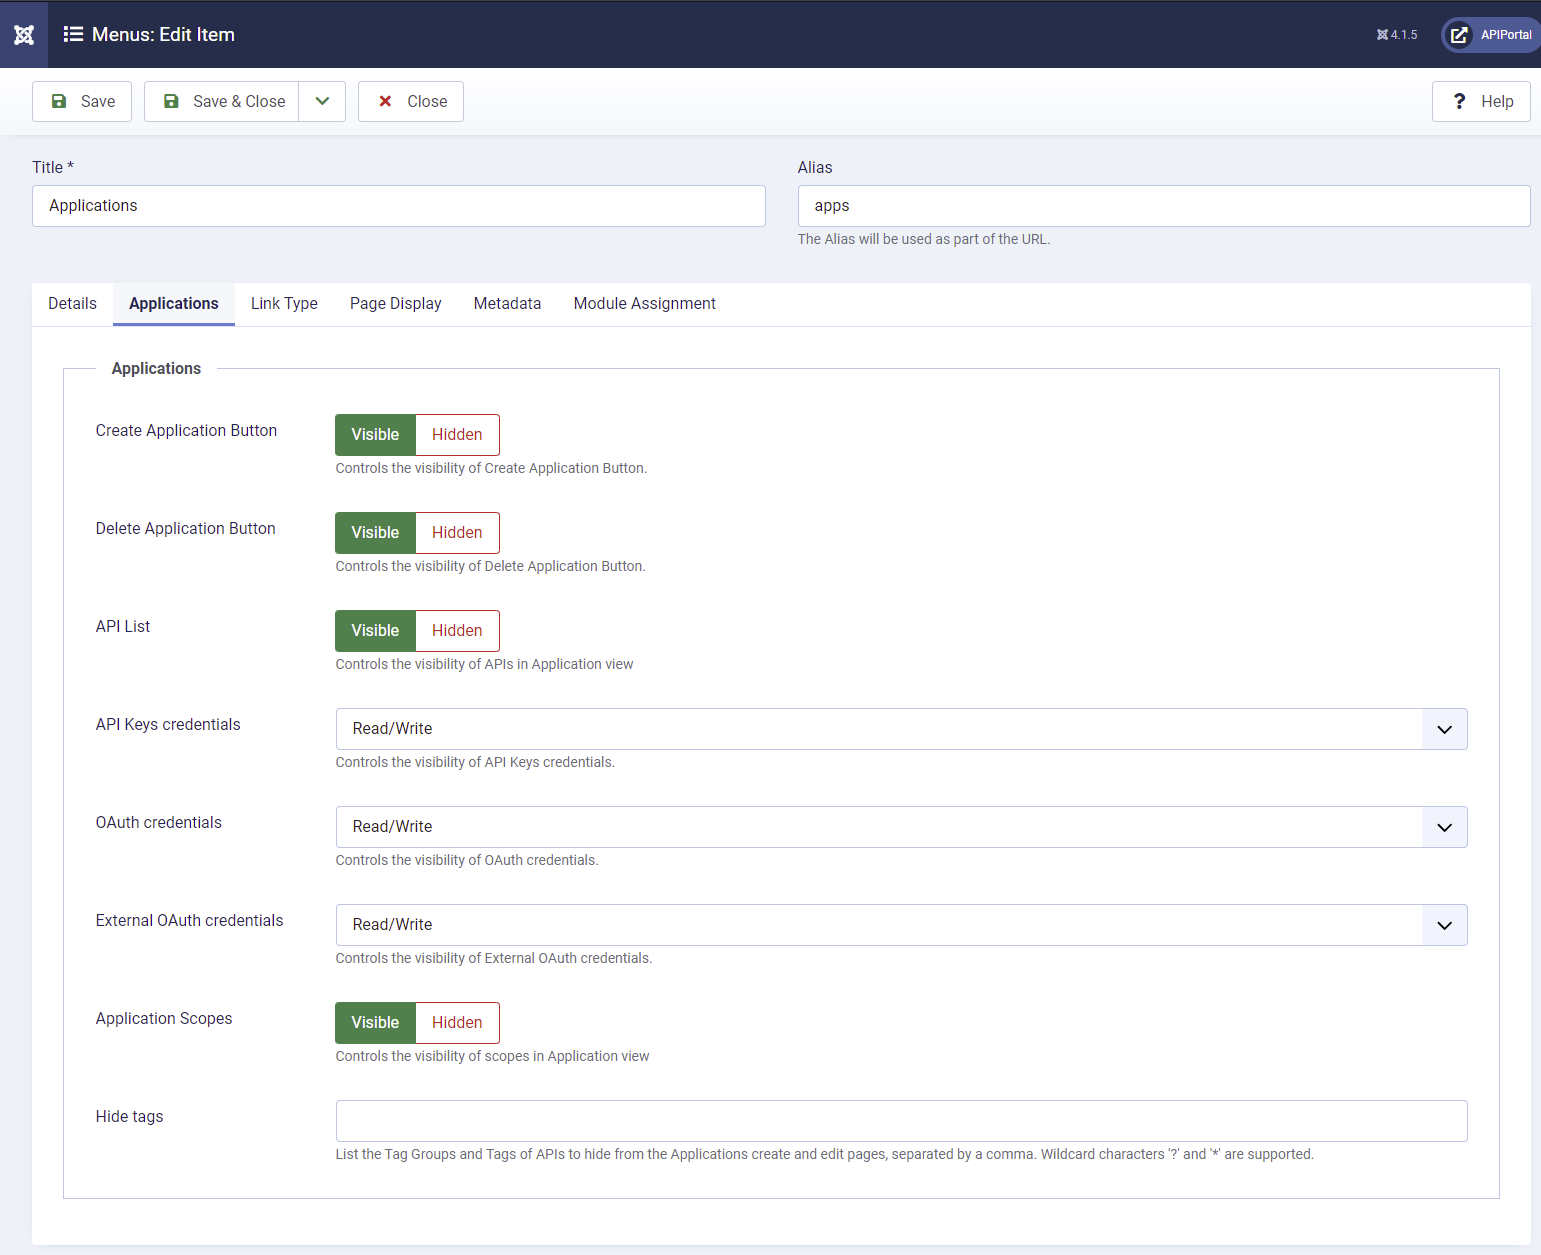
You can customize what your API consumers can see in the Applications view of API Portal, and you can customize what rights they have on applications and credentials:
- Show or hide the button that enables users to create new applications. The default is shown.
- Show or hide the button that enables users to delete applications. The default is shown.
- Show or hide the list of APIs for applications. The default is shown.
- Enable users read/write or read only permissions on credentials, or hide credentials completely. The default is read/write.
- Show or hide application scopes. The default is shown.
Customize application settings in Purity III template
To change the settings:
- In JAI, click Menus > Main Menu.
- Click Applications.
- Click the Applications tab.
- Change the settings as required and click Save & Close.
Customize application settings in T4 template
There are three modules In T4 template from which you can configure the Applications pages:
- Applications Catalog: you can adjust the configuration that will be applied to Applications Catalog page.
- Application View: this module provides all options available for the Application view page.
- Application Form: this module provides all options available for the Create application and edit application pages.
To change the settings of the page:
- Log in to the Joomla! Administrator Interface (JAI) (
https://<API Portal_host>/administrator). - Click Content > Site Modules.
- Select the module that you want to change.
- Change the settings as required, then click Save & Close.
Customize monitoring
To enable your API consumers to view monitoring information for their APIs and application in API Portal, you must ensure that you have enabled monitoring in the connected API Manager. For details, see Monitor APIs and applications in API Manager.
If monitoring is disabled in the connected API Manager, all monitoring information, including the following UI elements, are hidden in API Portal:
- The Monitoring menu option.
- The View Metrics links in the API Catalog and Applications pages.
- The Usage tabs in the API and View Application pages.
In the case of multiple API Managers connected to API Portal:
- The Monitoring menu option is visible if at least one of the connected API Managers has monitoring enabled.
- The Monitoring menu option is hidden if all of the connected API Managers have monitoring disabled.
- The View Metrics links in the API Catalog and Applications pages are hidden for items where the corresponding API Manager has monitoring disabled, and visible otherwise.
- The Usage tabs in the View Application and API pages are hidden for items where the corresponding API Manager has monitoring disabled, and visible otherwise.
Note
In the API Portal home page the Manage and analyze banner is visible regardless of whether monitoring is enabled or disabled in the connected API Manager. If monitoring is disabled, the Monitoring page will be empty.Add a customized privacy policy
The privacy policy feature enables you to define and manage privacy policies that users must accept when signing up to your API Portal.
When you install API Portal, a default privacy policy article is automatically created as a placeholder in Joomla!. You can use this default policy to verify how it will appear to your API consumers.
API Portal also creates a privacy policy system group and a privacy policy category to enable the privacy policy feature.
Caution
You must not edit or delete the default privacy policy article, group, or category.Create a new privacy policy
You must create your customized privacy policy before enabling it in API Portal:
- In JAI, click Content > Articles > New
- Enter a meaningful name for your policy, and the text of the privacy policy.
- Select
Privacy Policyfrom the Category list. - Click Save & Close.
To meet GDPR compliance regulations, JAI does not allow you to edit a privacy policy. To update a policy you must create a new article on the privacy policy category.
Enable your new privacy policy
Enable a policy article. This displays a dialog box asking new users to read and agree with the policy on sign up.
- In JAI, click Components > API Portal > Additional settings and select the desired policy from the list in the Privacy Policy field.
- Click Save.
Privacy policy agreement for existing users
After you enable the privacy policy feature, API Portal will display a dialog asking existing users to read and agree with the policy on their next login. If they decline it they will be redirected to the login page to try again. If they accept it, they will not be asked to accept it again on subsequent logins.
If you create and enable a new policy, for example, because the policy of your company has changed, the users will be asked to read and agree with the new policy on next login.
API Manager custom properties support
API Portal offers an interface to the custom properties defined in API Manager. For more details on how to add and manage custom properties in API Manager, see Customize API Manager data.
API Portal supports custom properties for the following entities:
- Application: You can view and edit the values of the custom properties defined for applications.
- User: You can view and edit the values of the custom properties defined for users.
- API: You can only view the values of the custom properties defined for APIs.
API Portal does not support custom properties defined for organizations.
Absolute session timeout
User sessions that remain active for extended periods of time are exposed to attacks, and they provide big opportunities for a malicious actor to exploit a compromised session. You can set an absolute session timeout (hard limit) on user sessions, even when the user is, or appears to be, actively using the application, to mitigated the attacks.
- In JAI, click Components > API Portal > Additional settings and choose the maximum amount of time that a session can stay open (in hours) in the Absolute session timeout. The default is 24 hours.
- Click Save.
Since the session is destroyed after the specified period of time, the potential footprint of the session is eliminated, which helps to minimize attacks.
Chat support
You can configure your API Portal to show an Intercom chat support. After you enable this module, by default, all users will be able to see the Chat, even users not logged to the portal.
To start using Intercom Chat:
- In JAI, click System > Site Modules.
- Search for Intercom
- Enter your
Application Idtaken from Intercom. - To enable the chat only for logged users, select
NofromShow chat for non-logged in users.
After you configure this module, the Intercom chat icon is displayed on all pages of your API Portal.
Show notifications for applications that are waiting for approval
When the auto-approve setting is disabled, users can’t use their newly-created applications until they are approved by an Organization administrator (Org admin).
To remind the Org admin that there are applications waiting for approval, API Portal displays a notification with a link to the list of pending approval applications every time that the Org admin logs in to API Portal.
To disable this notification:
- In JAI, click Components > API Portal > Additional settings.
- Choose No for the Show notifications for applications that are pending approval field.
- Click Save.