Upgrade from API Gateway 7.5.x or 7.6.x
20 minute read
In API Gateway 7.5.1 and later versions, the Apache Cassandra database is fully separated from the API Gateway. This means that the data contained in Apache Cassandra does not need to be exported and imported along with the other configuration data when upgrading.
In an upgrade from API Gateway 7.5.1 and later versions:
- Your existing Apache Cassandra deployment can remain in place for use with API Gateway 7.7. There is no need to install a new Apache Cassandra deployment.
- No data changes are necessary in the Apache Cassandra database, which means it can remain running throughout the upgrade, serving any upgraded API Gateways when they come online.
Caution
- During an upgrade, including zero downtime upgrade (ZDU), quotas are reset, meaning that your quotas might be too lenient for a period after the upgrade.
- During a ZDU the old quota count and new quota count are in use at the same time.
- Quota could be reduced during ZDU to protect individual instances from being overloaded.
Overview of upgrade steps on a single-node environment
Note
Read through this documentation in its entirety before beginning the upgrade process to anticipate each of the steps involved.The upgrade of a single-node environment, in general, involves performing the following steps:
- Install API Gateway 7.7 in a new directory.
- Apply the latest available update for the new API Gateway 7.7.
- Export the data from the old installation and upgrade it.
- Apply the upgraded data to the new installation.
- Verify the upgrade.
Before you upgrade
This section provides a checklist of the tasks that you must perform on your old API Gateway installation, and on your new API Gateway 7.7 installation, before you upgrade.
Note
API Gateway 7.7 supports Apache Cassandra version 2.2.12. If you are upgrading from API Gateway 7.5.x (which supported Apache Cassandra 2.2.5 and 2.2.8) it is recommended that you upgrade Apache Cassandra to version 2.2.12 before you upgrade to API Gateway 7.7. For more information on upgrading Apache Cassandra, see Upgrade Apache Cassandra.Checklist for the old API Gateway installation
Perform the following in your old API Gateway installation.
Task 1 - Back up the old API Gateway installation
Back up the old API Gateway installation on each node. At a minimum:
- Back up the
apigatewaydirectory. - Back up any databases used by API Gateway. This includes external databases used for OAuth or KPS, and your metrics database if this has been configured (for example, for monitoring in API Gateway Analytics or API Manager).
Note
You do not need to stop any processes to back up theapigateway directory.
Task 2 - Check that old API Gateway groups are consistent
Upgrade is not supported for inconsistent groups. Before you upgrade, ensure that all API Gateway groups in the old installation are consistent, meaning that all API Gateways in a group have the same configuration deployed.
To check that all API Gateway groups are consistent:
- Create a new group that has more than one API Gateway. (You can use Policy Studio or API Gateway Manager to deploy configurations to API Gateway groups.)
- Deploy a new configuration to just one of the API Gateways in the new group.
- Check if the change is consistent with the other API Gateways.
Task 3 - Do not change the old API Gateway installation
Do not make any changes to the old API Gateway installation after the upgrade process has begun. For example, if you have run any sysupgrade commands, do not perform any of the following on the old installation:
- Do not make any topology changes (for example, add new API Gateway instances)
- Do not deploy any configuration
- Do not update the API Gateway admin user store
- Do not update API Manager configuration (for example, add new APIs, organizations, or applications)
See also What happens if you change the old API Gateway installation after running export?
Task 4 - Check that ext/lib customizations in the old installation are compatible
If you have customizations (for example, third-party JAR files) in the ext/lib
directory of your old API Gateway installation, the sysupgrade command copies any third-party JARs to the new installation. However, you must verify that all third-party JARs are compatible with API Gateway 7.7.
Before you upgrade, you should confirm that any third-party JARs are not already present in the new installation under directory apigateway/system/lib. You should also test any custom JARs to ensure that they work correctly in API Gateway 7.7.
Task 5 - Upgrade API Gateway Analytics version 7.4.0 or later
If you are using API Gateway Analytics version 7.4.0 or later, you can upgrade API Gateway Analytics before you run the sysupgrade command. For more information, see Upgrade API Gateway Analytics.
If you are using a metrics database with API Manager and not API Gateway Analytics, see Upgrade your metrics database for API Manager.
Task 6 - Identify components and configuration requiring manual upgrade steps
Not all components and configuration from earlier API Gateway versions can be upgraded automatically with the sysupgrade command. In this case, you must upgrade these items manually.
Check your old installation and identify if you are using any of the following:
- Redaction files – You must copy the
redaction.xmlfile from your old installalation to the new gateway, then include it from theservice.xmlfile as described in Enable redaction for an API Gateway and validate your configuration. - Customizations to OAuth sample .md files – For more information on how to set up OAuth, see Configure OAuth.
- API firewalling – You must set up API firewalling again using the configuration from the old installation. For more information, see API Firewalling.
- QuickStart tutorial – For more information on migrating the QuickStart tutorial, see Migrate the QuickStart tutorial.
- API Gateway services – If you are running API Gateway processes as services on Linux, you must upgrade these manually. See Upgrade services.
- Java file changes - If you have customized Java files like
cacertsorjava.security, you must apply these changes again, in the new installation. Do not simply copy these files to the new installation as they might have other changes, like newer copies of CA certificates. Instead, you must redo your customization on the new copies of these files in the new installation. - JVM settings changes - Any custom properties from
/apigateway/system/conf/jvm.xmlis lost. You must move all customized JVM properties you wish to preserve to one of the separate include files as described in System property changes and KB 167287. Settings, which are correctly separated, are preserved during upgrade, and the system JVM file is overwritten.
All Node Manager customizations are lost on upgrade, and they must be redone from scratch in the new installation. Examples of such customizations include:
- RBAC and integration with OpenLDAP or Active Directory.
- HA setup for Admin Node Managers.
- Customizations to security headers on API Gateway Manager (8090).
- Changes to the Admin Node Manager certificate via managedomain
Checklist for the new API Gateway 7.7 installation
Perform the following in your new API Gateway 7.7 installation.
Task 1 - Apply the latest update
Apply the latest available update for your new installation. To see the system property changes made between the old installation and the latest update, see System property changes. Updates are available from Axway Support.
To see the system property changes made between the old installation and the latest update, see system property changes.
Task 2 - Do not start any Node Managers or API Gateways in the new installation
Do not create or start any Node Managers, groups, or API Gateways in the new installation. These are started automatically by the sysupgrade process.
Task 3 - Open the new Apache Cassandra client port in the firewall
API Gateway version 7.7 includes the Datastax Cassandra client, which uses a default port of 9042 to communicate with Cassandra over the native protocol. Earlier API Gateway versions included the Hector Cassandra client, which used a default port of 9160 to communicate with Cassandra over the Apache Thrift protocol.
When upgrading from 7.5.1 or later to API Gateway 7.7 all Cassandra hosts are updated to use port 9042 for client communication. You must open the port 9042 on your firewall to enable API Gateway to communicate with Apache Cassandra.
Alternatively, to continue to use the same port as you used in your old installation, you can perform some manual steps after the upgrade completes. For more information, see Configure a different Apache Cassandra client port.
Task 4 - Move third-party JDBC JARs to the new installation
If your old API Gateway installation uses external third-party databases for OAuth and KPS, you must copy the JDBC JAR files to the following location in your new 7.7 installation:
/apigateway/upgrade/lib
For example, if your new installation is at /opt/Axway/7.7, copy the JDBC drivers to /opt/Axway/7.7/apigateway/upgrade/lib.
This enables the sysupgrade apply step to upgrade the databases.
Upgrade steps - Single-node upgrade example
This section provides an example of a single-node domain upgrade from API Gateway version 7.5.1 to API Gateway 7.7.
Tip
You can use the steps in this example as a guide when upgrading a single-node domain from API Gateway 7.5.x or 7.6.x to 7.7. However, you must remember to modify the steps appropriately for your version and topology.Sample single-node upgrade topology
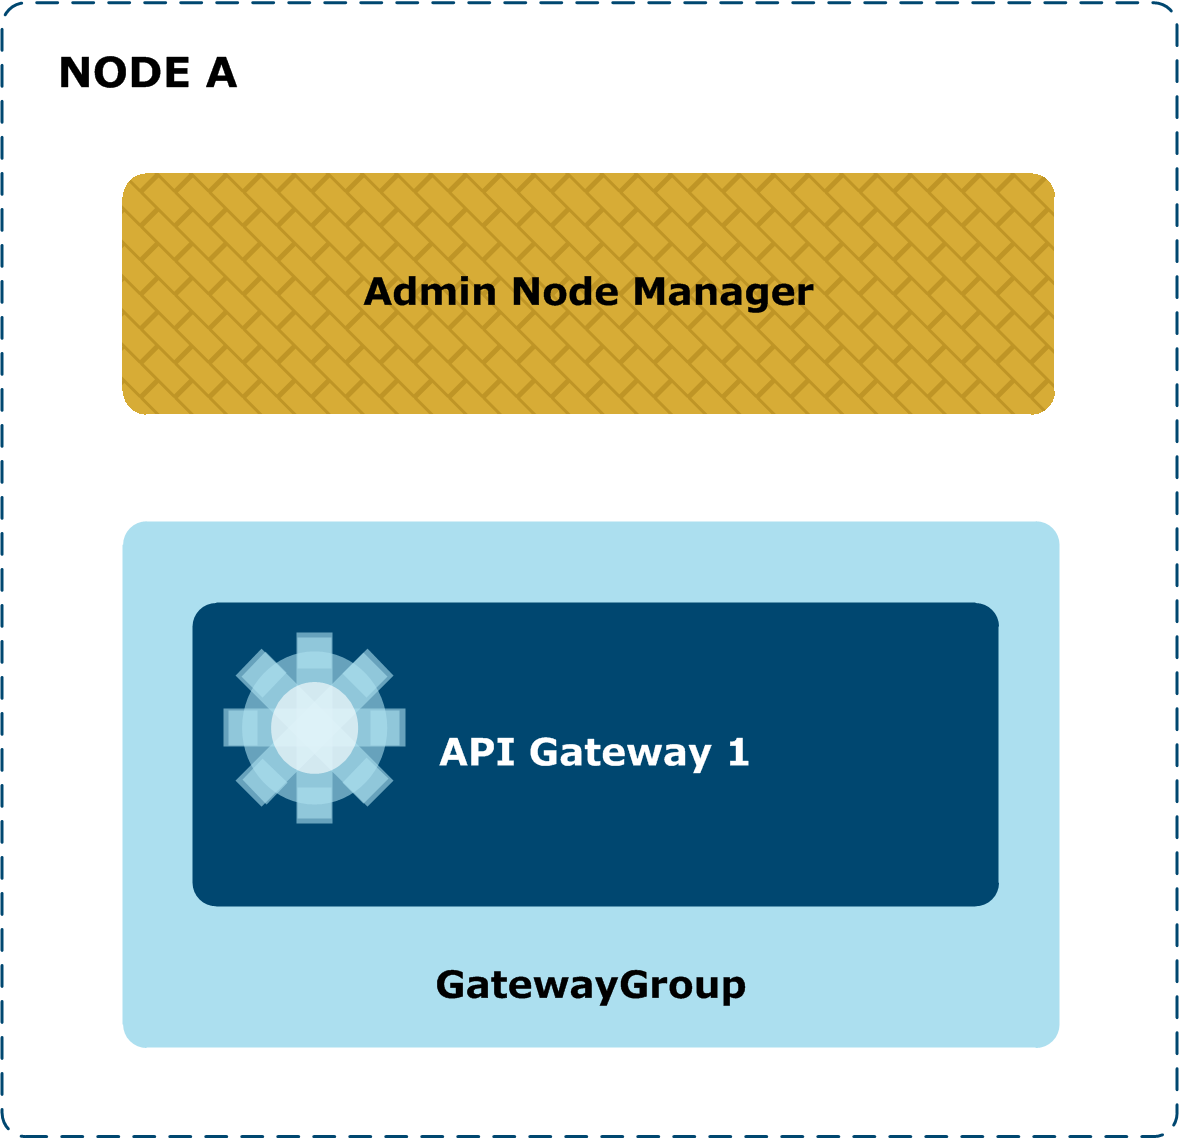
In this example, API Gateway has a single-node topology that includes one Admin Node Manager and one API Gateway instance. There is a single API Gateway group.
The sample topology is as follows:
Before you upgrade - Check the old installation
Perform the checks on your old API Gateway 7.5.1 installation, as detailed in Checklist for the old API Gateway installation.
Step 1 - Install API Gateway 7.7
- Select the Custom option in the installer as follows:
- Admin Node Manager - Select this component.
- API Gateway Server - Select this component.
- Policy Studio – Select this only if you want to run Policy Studio on the local machine.
- API Manager – Select this only if you are upgrading API Manager.
- QuickStart tutorial - Do not select this component. The QuickStart tutorial creates and starts processes in the new installation.
sysupgraderequires that no processes are running in the new installation. - Cassandra - Do not select this component. The external Cassandra configuration is retained when upgrading from 7.5.x or 7.6.x.
- When prompted for an installation directory, enter a new directory (for example,
/opt/Axway-7.7). A warning message displays if you try to install 7.7 in the same directory as the old installation. - When prompted to set an administrator user name and password, enter the same Admin Node Manager credentials that you use for the old API Gateway installation.
Step 2 - Update and check the new installation
When the installation is complete, perform the new installation checks detailed in Checklist for the new API Gateway 7.7 installation.
Step 3 - Export the data from the old installation and upgrade it
Caution
Before runningexport, you must ensure that the old API Gateway processes are running, including all Admin Node Managers, Node Managers, and API Gateway instances. These processes must be running in the old installation to export the API Gateway configuration data.
The following example shows how to run the export and upgrade commands:
cd /opt/Axway-7.7/apigateway/upgrade/bin
./sysupgrade export --old_install_dir /opt/Axway-7.5.1/apigateway/
./sysupgrade upgrade
If there are any errors or warnings, you are prompted to examine the sysupgrade log files. For more details on errors and warnings that can occur during upgrade and recommended actions, see sysupgrade error reference. You can also use Policy Studio to resolve issues with the configuration. For more details, see Resolve upgrade issues in Policy Studio.
You must resolve any errors before proceeding. You can rerun export and upgrade multiple times until all issues are resolved.
Step 4 - Apply the upgraded data to the new installation
Caution
Before runningapply, you must stop the API Gateway processes in the old installation and ensure that Cassandra is already running.
The following example shows how to run the apply command:
cd /opt/Axway-7.7/apigateway/upgrade/bin
./sysupgrade apply
This upgrades the external OAuth and KPS databases (if necessary), creates a new system that matches the old topology, and imports the upgraded data.
When all steps have completed successfully, the new API Gateway version 7.7 processes should be running.
Step 5 - Verify the upgrade
To verify that the upgrade has been successful:
- Connect to API Gateway Manager (for example, on
https://HOST:8090/), and view the API Gateway group topology, administrator users, and Key Property Stores. - Start Policy Studio, and create a new project based on the running API Gateway. You can view the upgraded configuration (for example, policies, settings, and so on).
- If you were using OAuth client applications in your old installation, start the Client Application Registry web interface, and view the client applications.
Step 6 - Update cipher scheme
To make use of a more secure cipher scheme, you must re-encrypt your KPS data using the kpsadmin command. For more information see, Update cipher scheme.
Upgrade steps - Multi-node upgrade example
This topic provides an example of a multi-node domain upgrade from API Gateway version 7.5.x or 7.6.x (in this case, 7.5.1) to API Gateway 7.7.
Tip
You can use the steps in this example as a guide when upgrading a multi-node domain from API Gateway 7.5.x or 7.6.x to 7.7. However, you must remember to modify the steps appropriately for your version and topology.The following diagram shows an example flow for a multi-node upgrade.
Sample multi-node upgrade topology
The sample multi-node upgrade topology is as follows:
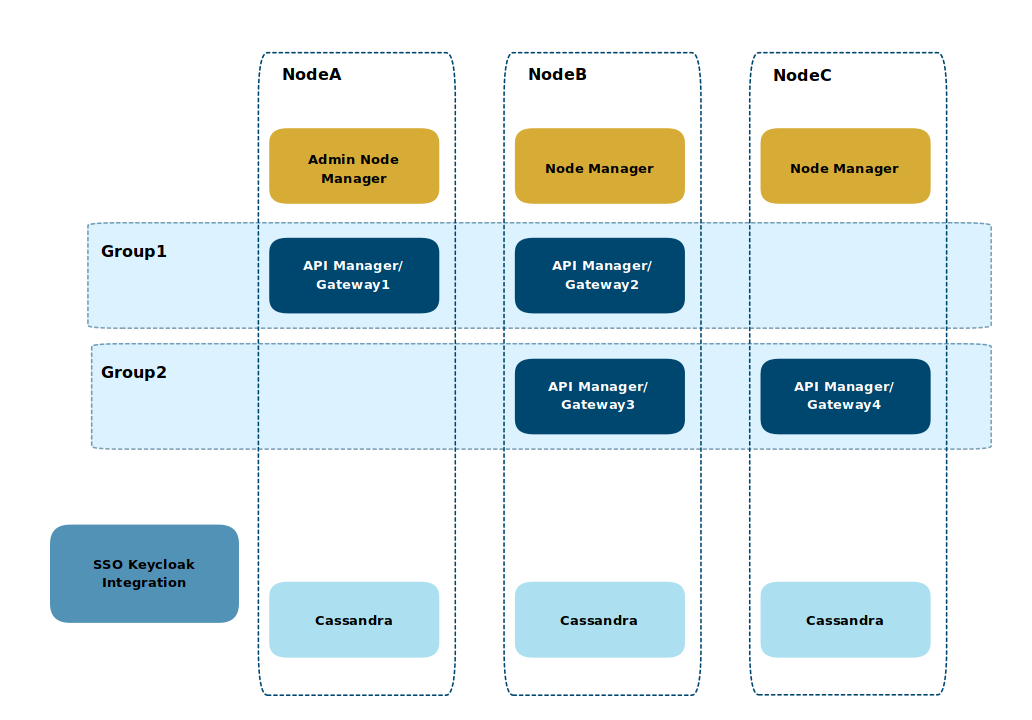
In this example, API Gateway has a three-node topology that includes:
- One Admin Node Manager on NodeA.
- Two Node Managers, one on NodeB and one on NodeC.
- A single API Gateway instance.
- Cassandra running on each node.
There are two API Gateway groups:
Group1has an API Gateway instance running on NodeA and NodeB.Group2has an API Gateway instance running on NodeB and NodeC.
The nodes involved are:
- API Gateway NodeA: This node runs an Admin Node Manager, and a single API Gateway (
Gateway1) onGroup1. - API Gateway NodeB: This node runs a Node Manager, an API Gateway (
Gateway2) onGroup1, and an API Gateway (Gateway3) onGroup2. - API Gateway NodeC: This node runs a Node Manager, and a single API Gateway (
Gateway4) on groupGroup2.
The sample topology uses an Apache Cassandra database cluster for high availability (HA):
Cassandra1running on NodeA (seed node).Cassandra2running on NodeB.Cassandra3running on NodeC.
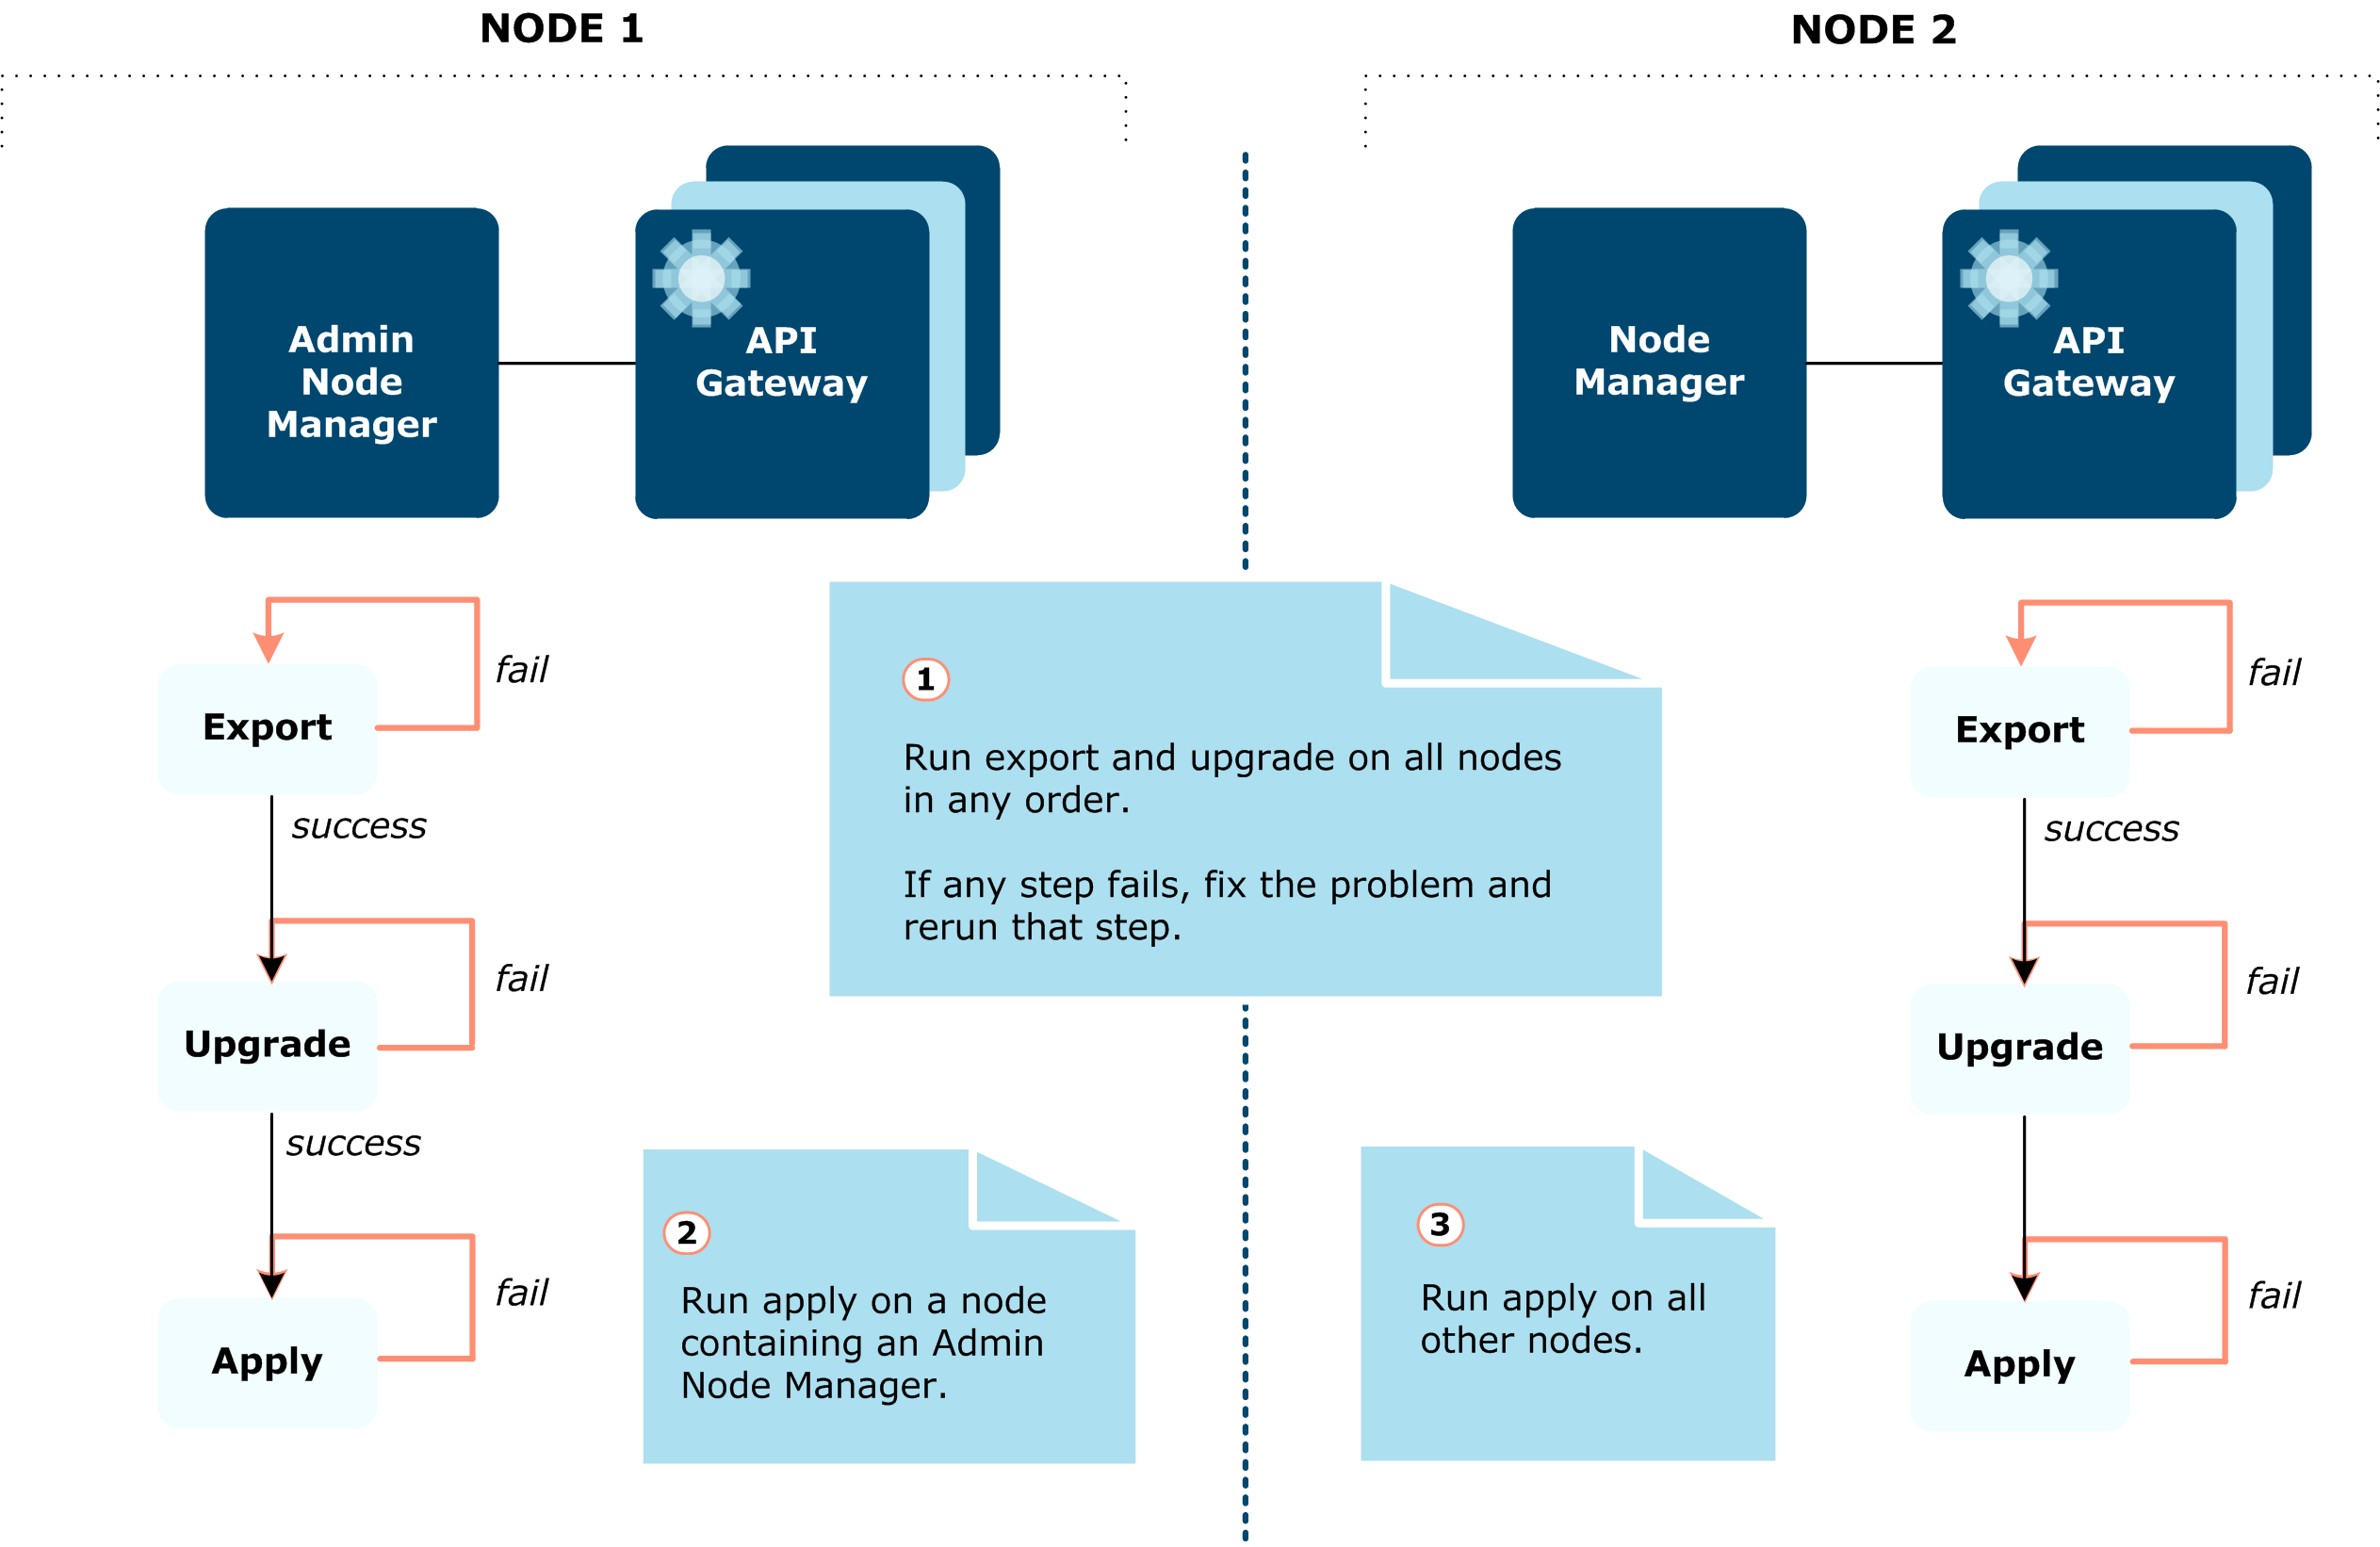
Overview of upgrade steps on a multi-node environment
Note
Read through this documentation in its entirety before beginning the upgrade process to anticipate each of the steps involved.The upgrade of a multi-node-node environment, in general, involves performing the following steps:
- Install API Gateway 7.7 on each node.
- Update and check the new installation on each node.
- Export the data from the old installation and upgrade it on each node.
- Apply the upgraded data to the new installation on the first Admin Node Manager.
- Apply the upgraded data to the new installation on the other nodes.
- Verify the multi-node upgrade.
Check the old installation on each node before you upgrade
Perform the checks on your old API Gateway 7.5.1 installation, as detailed in Before you upgrade.
Step 1 - Install API Gateway 7.7 on each node
Install API Gateway 7.7 on each node in the multi-node topology where your old API Gateway domain is running.
- Select the Custom option in the installer as follows:
- Admin Node Manager – Select this on NodeA, NodeB, and NodeC for the sample topology.
- API Gateway Server – Select this on NodeA, NodeB, and NodeC for the sample topology.
- Policy Studio – Select this on the nodes on which you will run Policy Studio.
- API Manager – Select this on NodeA, NodeB, and NodeC for the sample topology.
- QuickStart tutorial - Do not select this component. The QuickStart tutorial creates and starts processes in the new installation.
sysupgraderequires that no processes are running in the new installation. - Cassandra - Do not select this component. The external Cassandra configuration is retained when upgrading from 7.5.x or 7.6.x.
- When prompted for an installation directory, enter a new directory (for example,
/opt/Axway-7.7). A warning message displays if you try to install 7.7 in the same directory as the old installation. - When prompted to set an administrator user name and password, enter the same Admin Node Manager credentials that you use for the old API Gateway installation.
Step 2 - Update and check the new installation on each node
When the installation is complete, perform the new installation checks detailed in Checklist for the new API Gateway 7.7 installation.
Step 3 - Export the data from the old installation and upgrade it on each node
Run the export and upgrade commands on each node (NodeA, NodeB, and NodeC). You can run and rerun these commands on NodeA, NodeB, and NodeC in any node order.
Note
The sample topology has one Admin Node Manager (running on NodeA) and two Node Managers (running on NodeB and NodeC). You must specify the Admin Node Manager for the export command using the --anm_host option, and this Admin Node Manager must also be the first node you upgrade.
The value of --anm_host must be an exact match of the host name in the topology (in this example, --anm_host NodeA) and you must specify the same name for --anm_host option on the other nodes (--anm_host NodeA in NodeB and NodeC).
In a topology with multiple Admin Node Managers, we recommend that you specify the first Admin Node Manager (see Which is the first Admin Node Manager?).
All processes must be running on all nodes in the old installation to export the API Gateway configuration data. Therefore, ensure that the Admin Node Manager (NodeA), Node Managers (NodeB and NodC), and API Gateway instances (NodeA, NodeB and NodC) are running.
The following export and upgrade commands must be executed exactly as they are, on each node (NodeA, NodeB and NodeC):
cd /opt/Axway-7.7/apigateway/upgrade/bin
./sysupgrade export --old_install_dir /opt/Axway-7.5.1/apigateway/ --anm_host NodeA
./sysupgrade upgrade --cass_host NodeA
The sample topology uses Apache Cassandra to store API Manager data, so you must add the host name or IP address of the new external Cassandra database cluster to the upgrade command. If you are not using Apache Cassandra, run the upgrade command with the --no_cassandra option.
If there are any errors or warnings, you are prompted to examine the sysupgrade log files. For more details on errors and warnings that can occur during upgrade and recommended actions, see sysupgrade error reference. You can also use Policy Studio to resolve issues with the configuration. For more details, see Resolve upgrade issues in Policy Studio.
Any errors must be resolved before proceeding. You can rerun export and upgrade multiple times until all issues are resolved.
Step 4 - Apply the upgraded data to the new installation on the first Admin Node Manager
Before running apply on the Admin Node Manager node (NodeA), stop the API Gateway processes in the old installation on NodeA, NodeB, and NodeC, and ensure that Cassandra is already running.
The following example shows how to run the apply command on NodeA:
cd /opt/Axway-7.7/apigateway/upgrade/bin
./sysupgrade apply --anm_host NodeA
The 7.7 Admin Node Manager and API Gateway are now running on NodeA, and you can launch the API Manager web console at https://NodeA:8090.
Step 5 - Apply the upgraded data to the new installation on the other nodes
Run apply on the other nodes in turn (NodeB and then NodeC).
The following example shows how to run the apply command on each of the other nodes:
cd /opt/Axway-7.7/apigateway/upgrade/bin
./sysupgrade apply --anm_host NodeA
sysupgrade is now complete on all nodes. All the API Gateway 7.7 processes are running on all nodes in the topology.
Step 6 - Verify the multi-node upgrade
For the sample topology you can also perform the following checks to verify the API Manager upgrade:
- Connect to the API Manager web console (for example, on
https://NodeA:8075/). - Log in as an administrator user and view the organizations, application developers, and applications.
- Log in as a non-administrator user and view the applications.
Step 7 - Update cipher scheme
To make use of a more secure cipher scheme, you must re-encrypt your KPS data using the kpsadmin command. For more information see, Update cipher scheme.
Note
Thekpsadmin command with the reencrypt option only needs to be run on one node.
After you upgrade
This section includes post-upgrade steps that you might need to perform after running sysupgrade to upgrade from API Gateway 7.5.x or 7.6.x to 7.7.
Configure a different Apache Cassandra client port
If you upgraded from API Gateway 7.5.1 or later to version 7.7 all Cassandra hosts are updated to use port 9042 for client communication. To use a different port (for example, to use the same port as you used in your old installation), follow these steps:
- For each Cassandra host, update the setting
native_transport_portin theCASSANDRA_HOME/conf/cassandra.yamlfile. Set the value to the port number to use for client communication. - Update the details for each Cassandra host in Policy Studio. Select Server Settings > Cassandra > Hosts, and update the port for each host.
Note
If you change the configuration to use the same port as you used in your old installation, you cannot leave any API Gateways in your old installation running during theapply step, as the port uses a different Cassandra protocol.
Upgrade API Gateway projects
Each API Gateway group has a configuration that is typically deployed as a .fed file. When you upgrade from an earlier version of API Gateway, configuration for all API Gateway groups is automatically upgraded during sysupgrade process. However, you might have configuration files that were originally created in Policy Studio in a development environment that also need to be upgraded. You can upgrade the configuration in your development environment in one of the following ways:
- In Policy Studio:
- Choose the From an API Gateway instance option to create a new project from the configuration in an already upgraded API Gateway.
- Choose the From existing configuration option to create a new project from an old configuration. The configuration is upgraded to version 7.7 automatically.
- If you upgraded from version 7.5.1 or later and you have several projects to upgrade (these projects might be independent of one another, or could include shared projects and their dependencies), you can use the
projupgradetool. This tool upgrades several projects at once. For more information, see Upgrade an API Gateway project.
Upgrade services
If you were running the API Gateway and Node Manager processes as services in your old installation, you must update the service scripts manually after the upgrade completes.
Complete the following steps after running sysupgrade apply:
- Switch user to
rootto enable you to modify files in/etc/init.d. Typically, Axway services file names start withvshell-. - Edit the Node Manager script and update the
VDISTDIRvariable to point to theapigatewayfolder of the new installation. For example, on a machine called XUbuntu02, edit the file/etc/init.d/vshell-Node-Manager-on-XUbuntu02.- Update the
VDISTDIRvariable (for example, changeVDISTDIR="/opt/Axway-7.2.2/apigatewaytoVDISTDIR="/opt/Axway-7.7/apigateway).
- Update the
- Edit each of the relevant API Gateway scripts, and update the
VDISTDIRand theVINSTDIRvariables to point to theapigatewayfolder of the new installation. For example, on a machine called XUbuntu02 with one API Gateway calledGateway1that is a member of a group calledDefault Group, edit the file/etc/init.d/vshell-Default-Group-Gateway1.- Update the
VDISTDIRvariable (for example, changeVDISTDIR="/opt/Axway-7.2.2/apigatewaytoVDISTDIR="/opt/Axway-7.7/apigateway). - Update the
VINSTDIRvariable (for example, changeVINSTDIR="/opt/Axway-7.2.2/apigateway/groups/group-2/instance-1toVINSTDIR="/opt/Axway-7.7/apigateway/groups/group-2/instance-1).
- Update the
- Save the changes to the files and restart the machine. When the machine restarts the new services are started.
Alternatively, your Linux administrator can remove the old services using the preferred Linux utility and delete the old init.d service files, and you can use managedomain to recreate the services after running sysupgrade.
Migrate the QuickStart tutorial
sysupgrade does not migrate the Quickstart tutorial from your old installation. To migrate it, copy the /apigateway/webapps/quickstart directory from your old installation (for example, /opt/Axway/7.4.1/apigateway/webapps/quickstart) to the same location in the new 7.7 installation (for example, /opt/Axway/7.7/apigateway/webapps/quickstart).
Migrate single sign-on configuration files
sysupgrade does not migrate SSO configuration files from your old installation. If you have configured single sign-on for API Manager or API Portal, you must migrate it manually. Copy the configuration files located in the apigateway/groups/group-x/instance-x/conf directory in your old installation (for example, /opt/Axway/7.5.3/apigateway/groups/group-2/instance-1/conf) to the same location in your new 7.7 installation (for example, /opt/Axway/7.7/apigateway/groups/group-2/instance-1/conf).
The configuration files are:
service-provider.xml- Configuration file for API Manager SSOservice-provider-apiportal.xml- Configuration file for API Portal SSOsso.jks- Keystore for SSOtrustStore.jks- Truststore for SSO related HTTPS communications
You must repeat this for each instance configured with SSO.
Support services
The Axway Global Support team provides worldwide 24 x 7 support for customers with active support agreements.
Email mailto:support@axway.com or visit Axway Support at https://support.axway.com.
See Get help with API Gateway for the information that you should be prepared to provide when you contact Axway Support.
Where to go next
For more information on system configuration and a release change log, see Reference.