Configure API Manager single sign-on
11 minute read
This topic details the steps you must follow to configure API Manager SSO. It also lists the prerequisites for configuring SSO, describes the configuration files used to configure SSO, and provides some usage guidelines.
Watch this video to see how to configure single sign-on based on the Keycloak example.
Prerequisites
Before you can start to configure API Manager SSO:
- You must have a third-party IdP installed and running.
Configuration files
The following configuration files are used for API Manager SSO.
A keystore (for example sso.jks)
This file is the keystore generated by an administrator, and it is referenced in service-provider.xml.
- Contains the key that the SSO agent uses to sign requests. The exported public key must be stored by the IdP.
- Located in your API Gateway instance folder (for example,
INSTALL_DIR/apigateway/groups/group-2/instance-1/conf). - For more information, see Step 1 – Configure the IdP.
service-provider.xml
Defines the Service Provider (SP), the SAML Identity Provider (IdP), and the mappings that can be made by the SAML IdP. In this case the SP is API Manager.
- Located in your API Gateway instance folder (for example,
INSTALL_DIR/apigateway/groups/group-2/instance-1/conf). - For more information, see Step 2 – Create the service-provider.xml file.
idp.xml (optional)
- Required only if you are specifying the IdP by file.
- Located in your API Gateway instance folder (for example,
INSTALL_DIR/apigateway/groups/group-2/instance-1/conf). - For more information, see Specify the IdP by file.
jvm.xml (optional)
- Used to configure the SSO cookie domain name and required only in a load-balanced environment.
- Located in the folder
INSTALL_DIR/apigateway/conf.
An optional trustore (for example trustStore.jks)
This file is an optional truststore that contains the required IdP server certificates, and it is referenced in service-provider.xml.
- When specifying the IdP by URL this truststore is used to validate the IdP server certificate to download the required Metadata-Information, see Specify the IdP by URL.
- Located in your API Gateway instance folder (for example,
INSTALL_DIR/apigateway/groups/group-2/instance-1/conf). - Add the server certificates into this trustore.
Sample files
You can use the sample files included in your API Gateway installation at:
INSTALL_DIR/apigateway/samples/sso
Tip
Copy the sample files to your API Gateway instance folder (for example,INSTALL_DIR/apigateway/groups/group-2/instance-1/conf) and edit them as appropriate.
The following sample files are included:
ShibbolethIDPfolder:- Sample Shibboleth configuration files to help you configure Shibboleth as an IdP. These configuration files are part of the Shibboleth installation and can be found in the respective Shibboleth installation folders. For more information on Shibboleth, see the Shibboleth documentation.
- Sample
service-provider.xmlwhere the IdP is specified by file usingidp.xml. - Sample
idp.xml.
keycloakfolder:- Sample
service-provider.xmlfile that uses a URL to specify the IdP. - Sample
service-provider-apiportal.xmlfor configuring API Portal SSO. For more details, see Configure API Portal single sign-on.
- Sample
Usage guidelines
When configuring API Manager SSO, follow these guidelines.
Host names
Always use fully qualified domain names (FQDNs) for the host name. Avoid using IP addresses or localhost in the configuration.
User role mapping and API Manager organizations
You must manually configure the mapping of user roles between the IdP and API Manager in the file service-provider.xml. For more information, see Mapping syntax.
An SSO user is mapped to one of three SSO roles:
AdministratorOperatorUser
The SSO role to API Manager role mapping is as follows:
| SSO role | API Manager role | Notes |
|---|---|---|
Administrator |
API administrator (for example, apiadmin) |
The API administrator does not belong to a specific organization |
Operator |
Organization administrator | The organization administrator belongs to a specific organization |
User |
API consumer | The API consumer belongs to a specific organization |
Note
If the IdP does not return any role, a user is assigned the default role ofUser (API consumer) in API Manager.
The service-provider.xml mapping effectively maps a user to an organization. To authenticate a user successfully using SSO:
- If the user’s role is
UserorOperator, the user must belong to a specific organization (at most one organization) and that organization must already exist in API Manager. An API Manager administrator user can add the organizations in advance. For more information on adding organizations, see Manage organizations. - If the user’s role is
Administrator, that user does not need to belong to a specific organization.
For more information on API Manager roles, see API Manager access control.
SSO users and SSO login
The following restrictions apply to SSO users and SSO login:
-
SSO authenticated users cannot change their own passwords.
-
To log in using SSO, users cannot use the standard login URL (
https://FQDN:PORT). Instead, users must use the following SSO login URL:https://FQDN:PORT/api/portal/v1.4/sso/login/ -
FQDNis the FQDN of the machine where API Gateway is running, andPORTis the API Manager listening port (for example,https://gateway.example.com:8075/api/portal/v1.4/sso/login/). -
If a user has already authenticated using SSO (for example, by previously logging in to Decision Insight), they must still use the SSO login URL for API Manager. If they are already authenticated, they are automatically redirected to the API Manager home page at
https://FQDN:PORT/homeand presented with a view appropriate to their API Manager role.
Step 1 – Configure the IdP
API Manager uses a certificate to sign SAML requests. The IdP requires the public key to verify the validity and provenance of the SAML requests from API Manager. To configure the IdP, you must import the public key to the IdP.
In this step you will create a keystore, export the public key of the keystore you created, and import it to your IdP.
First, use the Java keytool utility to set up a keystore containing a key pair:
-
Change directory to your API Gateway instance folder (for example,
INSTALL_DIR/apigateway/groups/group-2/instance-1/conf). -
Execute
keytoolto create a keystore. For example, the following command generates a keystore with the aliasssokeyin the filesso.jksvalid for 365 days (1 year):keytool -genkey -alias ssokey -keyalg RSA -keystore sso.jks -keysize 2048 -validity 365
Tip
The valuesssokey and sso.jks are used in the sample files included in the API Gateway installation. You can use different values when generating the keystore, but you must update the sample files with the new values.
Next, export the public key of the keystore you created. For example, use one of the following commands to export it using Java keytool.
This example exports it to publickey.txt:
keytool -list -rfc -keystore sso.jks -alias ssokey > publickey.txt
This example exports it to publickey.cer:
keytool -export -keystore sso.jks -alias ssokey -file publickey.cer
Finally, import the public key to your IdP. Consult the documentation for your IdP for details.
Step 2 – Create the service-provider.xml file
In this step you will create a service-provider.xml file based on a sample file, and update it with the correct values for your keystore, your IdP, and the appropriate mappings for your IdP:
-
Copy either of the
service-provider.xmlsample files included in theINSTALL_DIR/apigateway/samples/ssofolder of your API Gateway installation to your API Gateway instance folder (for example,INSTALL_DIR/apigateway/groups/group-2/instance-1/conf). The sample file in theShibbolethIDPfolder specifies the IdP by file, and the sample in thekeycloakfolder specifies the IdP by URL. -
In the
ServiceProvidersection, update thekeystore,keystorePassphrase, andkeyAliasfields with the correct values for your keystore.<ServiceProvider ... keystore="conf/KEYSTORE_FILE" keystorePassphrase="KEYSTORE_PASSPHRASE" keyAlias="KEY_ALIAS" ... </ServiceProvider> -
For example, if you generated a keystore called
sso.jkswith a passphraseabc123and an alias calledssokey, the settings inservice-provider.xmlwould be as follows:<ServiceProvider ... keystore="conf/sso.jks" keystorePassphrase="abc123" keyAlias="ssokey" ... </ServiceProvider> -
In the
SamlIdentityProvidersection, update themetadataUrlfield as detailed in Specify the IdP by file or Specify the IdP by URL. -
In the
SAMLIdentityProvidersection, update theMappingssection with the appropriate mapping of IdP attributes to API Manager attributes. For more information on the mapping syntax, see Mapping syntax. -
Update any other fields as required. For more information on the elements in the
service-provider.xmlconfiguration file, see service-provider.xml configuration file reference.
Specify the IdP by file
To specify the IdP by file, follow these steps:
-
Copy the
idp.xmlsample file included in theINSTALL_DIR/apigateway/samples/sso/ShibbolethIDPfolder of your API Gateway installation to your API Gateway instance folder (for example,INSTALL_DIR/apigateway/groups/group-2/instance-1/conf). -
In the
idp.xmlfile:- Replace the place holder
CHANGE THIS : Replace this text with your IDP_CERTIFICATEwith the certificate of your IdP that is used for signing SAML tokens. - Replace all instances of the placeholders
<IDP_FQDN>:<IDP_SOAP_PORT>and<IDP_FQDN>:<IDP_HTTP_PORT>with the fully qualified domain name and port of your IdP.
- Replace the place holder
-
Set the
metadataUrlfield of theSamlIdentityProvidersection of theservice-provider.xmlfile to the value./idp.xml. For example:<SamlIdentityProvider entityId="https://axwayidp.localdomain/idp/shibboleth" metadataUrl="./idp.xml" ... </SamlIdentityProvider>
Specify the IdP by URL
To specify the IdP by URL, set the metadataURL field to the metadata URL of the IdP in the SamlIdentityProvider section of the service-provider.xml file. For example:
   <SamlIdentityProvider
      entityId="https://YourkeycloakIDPServerFQDN:8443/auth/realms/Axway"
      metadataUrl="https://YourkeycloakIDPServerFQDN:8443/auth/realms/Axway/protocol/saml/descriptor"
      ...
   </SamlIdentityProvider>
When specifying an IdP by URL, you might need to set up a truststore JKS file:
sso.jks– Contains the key used by the SSO agent to sign requests. This key needs to go to the IdP.truststore.jks– This is a separate truststore that is used for HTTPS communication between the SSO agent and the IdP while retrieving metadata online.
Tip
You can use the same keystore for all of the operations.Step 3 – Configure SSO in Policy Studio
Perform the following steps in Policy Studio:
- Open the configuration of your API Manager-enabled API Gateway instance. For example, select File > New Project from an API Gateway instance.
- Navigate to Environment Configuration > Listeners > API Gateway > API Portal > Paths in the Policy Studio tree.
- Click Add > Static File Provider.
- Set Relative Path to
/sso-login-failed. - Ensure that the settings for this relative path match those for the
/login-failedrelative path, the only difference being the path name. - Set File to
$VDISTDIR/webapps/apiportal/login.html. - Enter the following values to the additional headers table, and click OK:
Content-Security-Policy:frame-ancestors 'none'X-Frame-Options:DENY
- Update the servlet to
API Portal v1.4 ('v1.4').- Edit the property
jersey.config.server.provider.classnames. In the Value field add the class namecom.vordel.common.apiserver.filter.SSOBindingFeatureto the existing comma-separated list of class names. - Add a new property. In the Name field enter the name
CsrfProtectionFilterFactory.refererWhitelistand in the Value field enter the URL of the IdP (for example,https://sample_idp_host:8443).
- Edit the property
- Deploy the configuration to the API Manager-enabled API Gateway instance.
Step 4 – Configure SAML endpoint URLs in the IdP
You must configure the SAML endpoints of API Manager in your IdP. Consult the documentation for your IdP for details. The following examples are for Keycloak IdP.
| Keycloak field name | API Manager endpoint URL |
|---|---|
| Assertion Consumer Service POST Binding URL | https://<your_API Manager_host_FQDN>:8075/api/portal/v1.4/sso/login/post |
| Assertion Consumer Service Redirect Binding URL | Leave this field blank |
| Logout Service POST Binding URL | https://<your_API Manager_host_FQDN>:8075/api/portal/v1.4/sso/logout/post |
| Logout Service Redirect Binding URL | https://<your_API Manager_host_FQDN>:8075/api/portal/v1.4/sso/logout/post |
- If you are also configuring SSO for API Portal, you must configure the endpoint URLs separately for both API Manager and API Portal. For more details, see Configure API Portal single sign-on.
- For API Manager endpoint URLs, use the version of the API as specified previously in the servlet properties.
Step 5 – Configure the SSO cookie domain name (optional)
This implementation of SSO uses a cookie, which is created on the API Gateway server and sent to the client’s browser. The cookie includes the domain name, which is set to the API Gateway host name by default. For example, if the host name is apigateway.wks.us.axway.int, the domain name in the cookie contains the substring apigateway.wks.us.axway.int.
If API Gateway is hidden behind a load balancer, you might need to change the cookie domain name as the client’s browser is not aware of the internal API Gateway host name and therefore might not accept this cookie.
To change the default domain name to a sample domain name such as axway.int:
-
Create a file called
jvm.xmlin the folderINSTALL_DIR/apigateway/conf(if it does not already exist). -
Add the following setting:
<ConfigurationFragment>
  <VMArg name="-Dcom.axway.sso.domain.name=axway.int" />
</ConfigurationFragment>
Note
Do not prefix the domain name with a period (for example, do not use the value.axway.int).
Step 6 – Configure the orgs2Role header using a policy (optional)
You can use the orgs2Role attribute to assign user membership to multiple API Manager organizations, or you can configure an API Gateway policy.
The policy is invoked at runtime after the SAML response from the identity provider is verified by the service provider (in this case, API Manager). The API Manager runtime will only accept the output of the policy if it is successful and it has the orgs2Role value set in the HTTP headers. To set the header, you can use existing API Gateway filters, for example Add HTTP Header Filter, or you can set the header programmatically.
The following message attributes are available to aid with the decision making process of setting the orgs2Roleheader:
user.emailuser.telephone.numberuser.departmentuser.descriptionuser.userfullnameorgs2Roleauthentication.subject.roleauthentication.subject.idauthentication.organization.name
To configure a policy, perform the following steps in Policy Studio:
- Open the configuration of your API Manager-enabled API Gateway instance. For example, select File > New Project from an API Gateway instance.
- Navigate to Server Settings > API Manager > Identity Provider in the Policy Studio tree.
- Choose the policy you want to invoke in the Single sign on policy (optional) field.
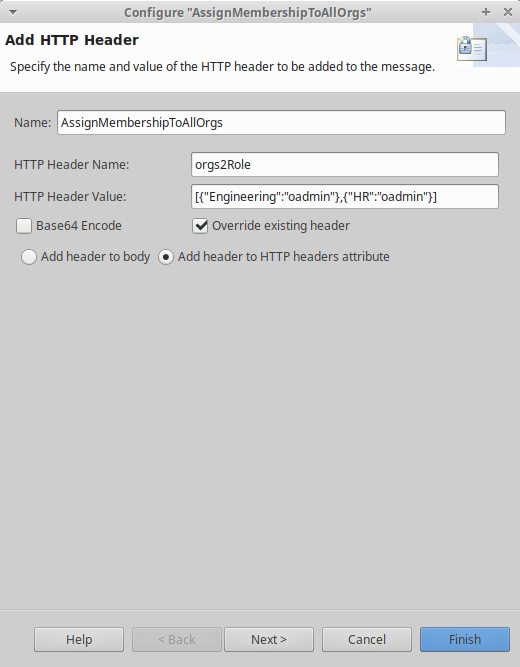
Example policy
-
Use a switch filter to make a decision based on a message attribute.
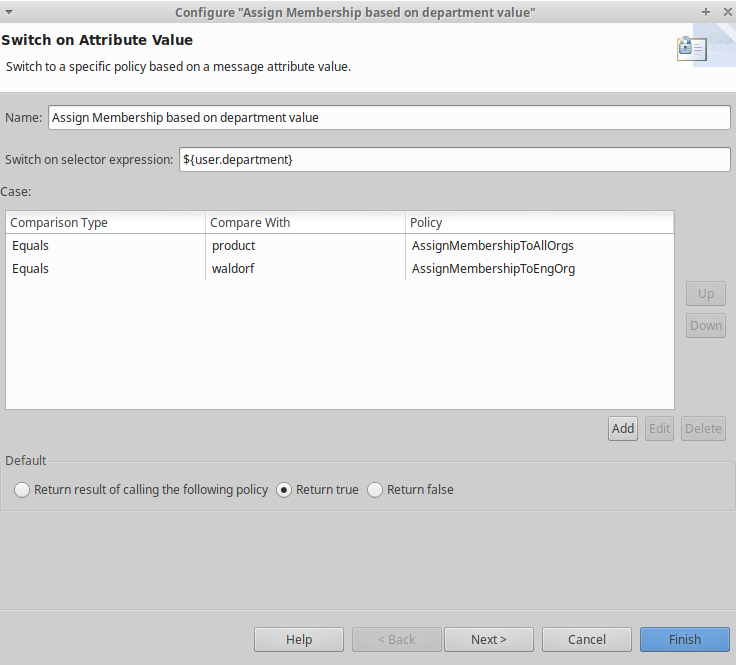
-
Assign membership via the Add HTTP Header filter.
Note
Using this policy will take precedence over any existing value you might have for theorgs2Role attribute in the identify provider configuration or the service-provider.xml file.
Step 7 – Restart API Gateway
Finally, you must restart the Node Manager and the API Gateway instance to enable the changes in service-provider.xml and jvm.xml files to be applied. After the restart, your users will be able to log in to API Manager using SSO.