Promote managed APIs between environments
11 minute read
When APIs have been registered in API Manager, you can promote them directly between environments using the API Manager export and import mechanism. This exports registered APIs in JSON format, which you can then import into API Manager as required.
Alternatively, you can use one of these approaches:
- Use the
apimanager-promotescript to automatically promote APIs between environments with zero downtime for DevOps. - Use a promotion policy that you have configured in Policy Studio to automate promotion between environments.
- When APIs have been developed using Policy Studio, you can also promote them between environments using the API Gateway mechanism for promotion and deployment of standard API Gateway configuration.
Tip
Another alternative is to use theapim-cli tool to follow an APIs as code approach. Store your API definition (Swagger or WSDL) plus a meta data configuration file in your version control system, and a CI/CD pipeline replicates it into API Manager in the state you want. For details, go to apim-cli tool on GitHub.
Promote registered APIs with zero downtime using a script
The apimanager-promote script enables you to:
- Promote APIs and client applications registered in API Manager to another environment with zero downtime. For example, this ensures that you will not lose service due to any APIs that are unpublished.
- Perform automatic bulk import of APIs and applications previously exported using the API Manager REST API or web console.
- Ensure that pre-configured credentials continue to work between environments.
- Export a subset of APIs and applications and re-import with customized settings in a properties file.
- Handle updates of any conflicting APIs, applications, or application credentials without causing downtime for any published APIs.
How to use the apimanager-promote script
When using the apimanager-promote script, the high-level steps are as follows:
-
Export the APIs and applications that you wish to promote from API Manager (as a
.datfile in JSON format). For example, select the front-end APIs that you wish to export, and click Manage selected > Export API collection.Alternatively, you can export using the API Manager REST API. For more details, see API Manager REST APIs.
-
Create your
promotion.propertiesfile to specify how your APIs and applications are promoted. See Generate your promotion.properties file. -
Place your exported API and application files (
.dat) and your generatedpromotion.propertiesfile in the same directory.You must ensure that the respective files names are
api-*.dat,application-*.dat, andpromotion.properties, and change the file names if necessary. -
Run the
apimanager-promotescript to import the APIs into the target API Manager environment. This script is available in the following directory:INSTALL_DIR/apigateway/posix/bin
Run the apimanager-promote command
You must specify the target environment that you wish to promote into, your API administrator credentials, along with your source API data files and promotion properties file. For example:
apimanager-promote --target https://apimanager.company.com:8075 --username my_admin --passfile users/apiadmins/my_admin-pass <path/to/my_api_data>
The path/to/my_api_data directory must include the exported .dat file for the source APIs (and optional applications if exported) and your promotion.properties file.
Specify apimanager-promote command options
You can specify the following command options:
| Command option | Description |
|---|---|
-? --help |
Print help message and exit. |
-f , --passfile <arg> |
Specify an API administrator password file. |
-p , --password <arg> |
Specify an API administrator password. |
-t , --target <arg> |
Specify the target API Manager environment URL. |
--template |
Print out the promotion.properties template file to help specify the required data. |
-u,--username <arg> |
Specify the API administrator user name. |
Generate your promotion.properties file
You must create a promotion.properties file to specify options for the APIs and applications to be promoted. For example, this enables you to specify how to manage any conflicts and an optional virtual host for the target environment.
You can use the apimanager-promote --template command to generate a default properties file, which you can then customize as needed. For example:
>apimanager-promote --template

# promotion.properties (generated 09/05/17 15:55)

organization.apipromotion.import=API Development
organization.target=Community
api.conflict.upgrade=false
application.conflict.upgrade=false
application.apikey.upgrade=false
application.oauthclient.upgrade=false
application.oauthresource.upgrade=false
api.publish.virtualhost=
api.unpublished.remove=false
Note
You must ensure that the target organizations specified in thepromotion.properties file already exist in that instance before running the apimanager-promote command.
The promotion properties are described as follows:
| Property | Description |
|---|---|
organization.apipromotion.import |
Specify the target development organization that all the APIs are imported into (for example, the default API Development organization). |
organization.target |
Specify the target consumer organization that all the client applications are imported into. This organization is also given access to all the imported APIs (for example, the Community organization). |
api.conflict.upgrade |
Specify whether to promote an existing API if there is a conflict in the development organization (true or false). |
application.conflict.upgrade |
Specify whether to promote an existing application if there is a conflict in the consumer organization (true or false). |
application.apikey.upgrade |
Specify whether to promote an existing API key if there is a conflict in the consumer organization (true or false). |
application.oauthclient.upgrade |
Specify whether to promote an existing OAuth client application if there is a conflict in the consumer organization (true or false). |
application.oauthresource.upgrade |
Specify whether to promote an existing OAuth resource if there is a conflict in the consumer organization (true or false). |
api.publish.virtualhost |
Specify an optional virtual host name and port on which the promoted APIs are available. The host name should be DNS resolvable. |
api.unpublished.remove |
Specify whether to remove an old unpubished API from the development organization (true or false). This only applies when an upgrade occurs. For example, if there is a conflict and api.conflict.upgrade is set to true, this results in two APIs (existing and upgraded). The api.unpublished.remove option specifies whether to keep or delete the existing API that has been unpublished. |
application.apis.remove.all |
Specifies whether, on API conflict, all current API access granted to applications should be removed (true or false). When enabled, requires that api.conflict.upgrade is set to true also. |
organization.apis.remove.all |
Specifies whether, on API conflict, all current API access granted to organizations should be removed (true or false). When enabled, requires that api.conflict.upgrade is set to true also. |
After running the apimanager-promote command, press F5 to reload the API Manager web console in the target environment.
Promote registered APIs using a promotion policy
APIs and applications registered using API Manager can be exported from one API Manager environment and imported into another API Manager environment using a file-based package (.dat file in JSON format). For example, this enables APIs to be promoted from a sandbox API group where client applications are developed and tested to the production API group. You can use a custom promotion policy that has already been developed in Policy Studio to automate this process in API Manager.
Note
If you use a custom promotion policy, you must also promote this policy as part of the standard API Gateway configuration. For more details, see Promote APIs developed in Policy Studio.Create the promotion policy in Policy Studio
You must first create your custom promotion policy in Policy Studio to import APIs into a target environment. For example, the following promotion policy is based on the proxies/import method provided in the API Manager REST API:
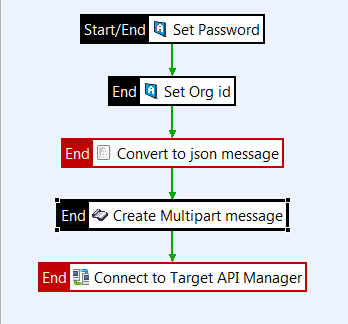
This policy imports a previously exported API as follows:
- If the API was exported using a password, the file is encrypted, and a password must be set to decrypt.
- The target API Manager environment is specified by setting the target organization ID.
- The import creates a virtualized API and all the back-end API definitions necessary for the front-end API in JSON format.
- This approach is similar to the
proxies/importFromUrlmethod except that it supports traditional form-based file upload to the target environment usingmultipart/form-data.
Tip
You can also use the Set Attribute filter in your promotion policy to configure theerrorMessage message attribute with a meaningful error message. For example, when used in conjunction with a False filter, this message can then be displayed in API Manager if the API promotion policy fails.
Enable the promotion policy in Policy Studio
To enable your custom promotion policy in Policy Studio, select Server Settings > API Manager > API Promotion in the Policy Studio tree.
Enable the promotion policy in API Manager
When you have configured and deployed a promotion policy in Policy Studio, you must also then enable the policy in API Manager. You can do this by selecting Settings > API Manager settings > API REGISTRATION > API promotion via policy. A Promote API option is then added to the Frontend API management menu when you log in again.
For details of onboarding a client application from sandbox APIs to production APIs, see Deploy sandbox and production APIs.
Promote APIs developed in Policy Studio
APIs created with the REST API development wizard in Policy Studio are part of the standard API Gateway configuration. This means that you can promote APIs between environments using the API Gateway mechanism for promotion and deployment of API Gateway configuration (using .fed, .pol, and .env packages). For example, you can use this mechanism to promote APIs from a testing environment to a production environment and to handle differences between each environment.
For more details on the API Gateway mechanism for promoting configuration between environments, see the API Gateway DevOps Deployment Guide.
For details of onboarding a client application from sandbox APIs to production APIs, see Deploy sandbox and production APIs.
Deploy sandbox and production APIs
In a production environment, enterprises should create and deploy the following separate API Gateway groups:
- Sandbox API group - the APIs that API consumers use against test back-end systems before going live (for example, a test credit card payment system)
- Production API group - the production APIs that front the production back-end systems (for example, a live credit card payment system)
This section shows an example production environment topology with Sandbox and Production API groups, and shows examples of promoting and onboarding Sandbox APIs to Production APIs.
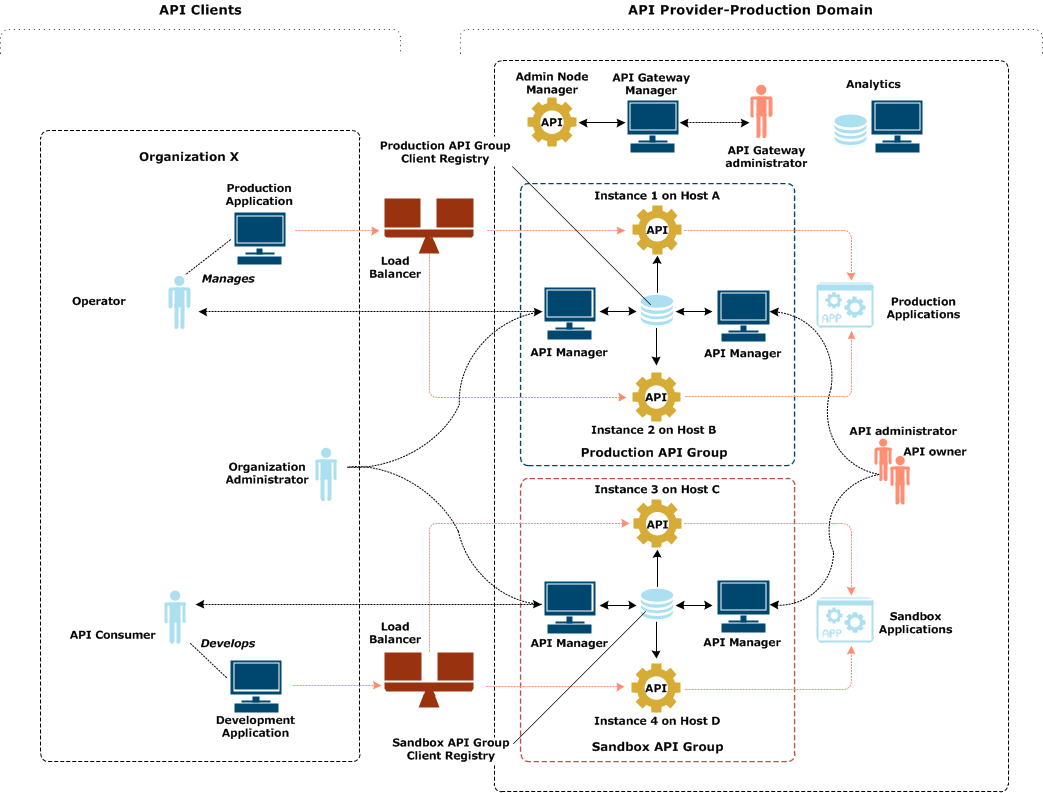
Production environment topology
The following diagram shows the environment topology in a typical production domain. This environment topology includes two separate API Gateway groups, each of which includes two API Gateway instances with API Manager deployed on each, and its own Client Registry and API Manager. This enables the message traffic for the Sandbox API and the Production API to be kept separate.
For example, in named organization X, when an API consumer builds a client application, they log into API Manager in the Sandbox API group. The development application sends requests to the API Gateway instances in the Sandbox API group. Similarly, when an operator manages the production application, they log in to API Manager in the Production API group. The production application sends requests to the API Gateway instances in Production API group. In this way, the Sandbox test traffic can be isolated from the live Production traffic.
The Sandbox API group can support both the Community organization and named organizations, including self-registration. API consumers are registered to create applications, and applications are registered for testing prior to onboarding to the Production APIs. However, the Production API group should support named organizations only, and not the Community, with registration restricted to the API administrator and organization administrator.
Promote configuration to sandbox and production APIs
The following diagram shows the process of promoting API Gateway policy-based configuration from the downstream environment (for example, development or testing) to both the Sandbox API and Production API groups in the production environment.
Both the Sandbox API and Production API groups are virtualizing the same APIs and therefore must use the same policy package (.pol). During configuration promotion, the policy package from the downstream environment (for example, testing) is copied and deployed to both API groups.
However, both API groups use different environment specific configuration (for example, to connect to different back-end systems, which require different connection information). Therefore each API group has a specific environment package (.env) that is deployed to the API group along with the common policy package.
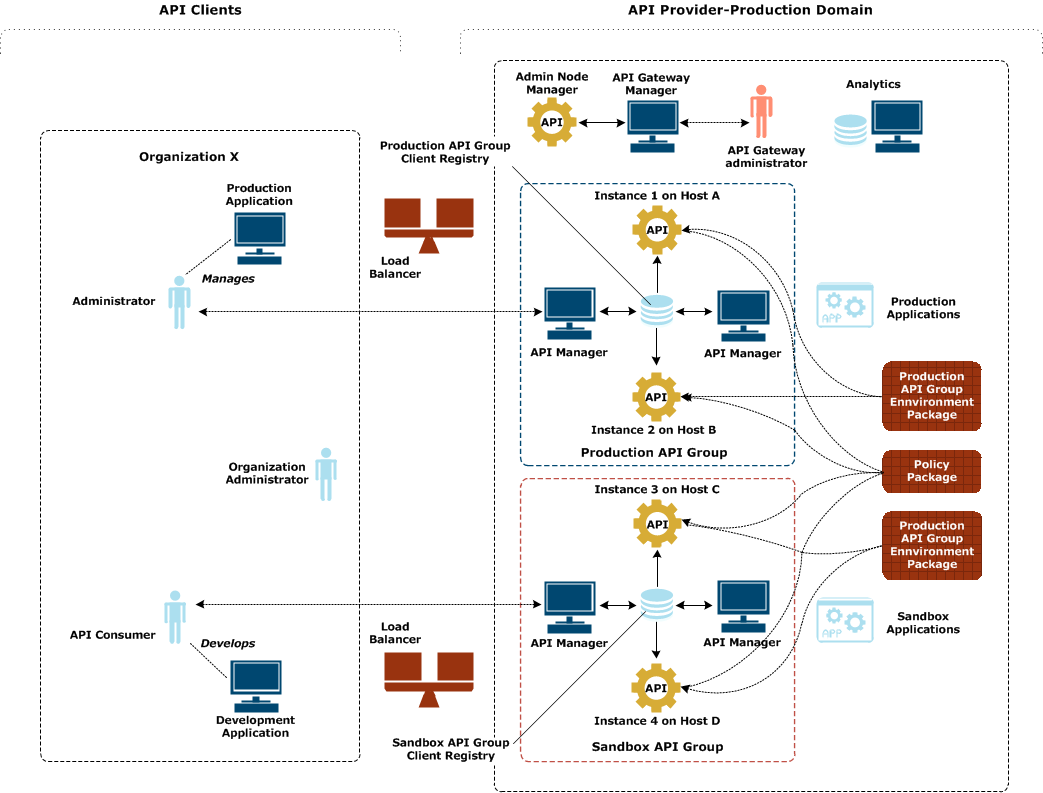
If your deployment does not use API Gateway policy-based configuration, you can promote APIs from a downstream environment using the API Manager export and import mechanism.
Onboard to production APIs
The following diagram shows the process of onboarding a client application from the Sandbox API group to the Production API group. For the API Provider, production onboarding involves registering the API Client in the Production API group, and copying or importing client application information from the Client Registry in the Sandbox API group. For the API Client, the client application is deployed into the API Client production environment, and is configured to invoke the Productions APIs.
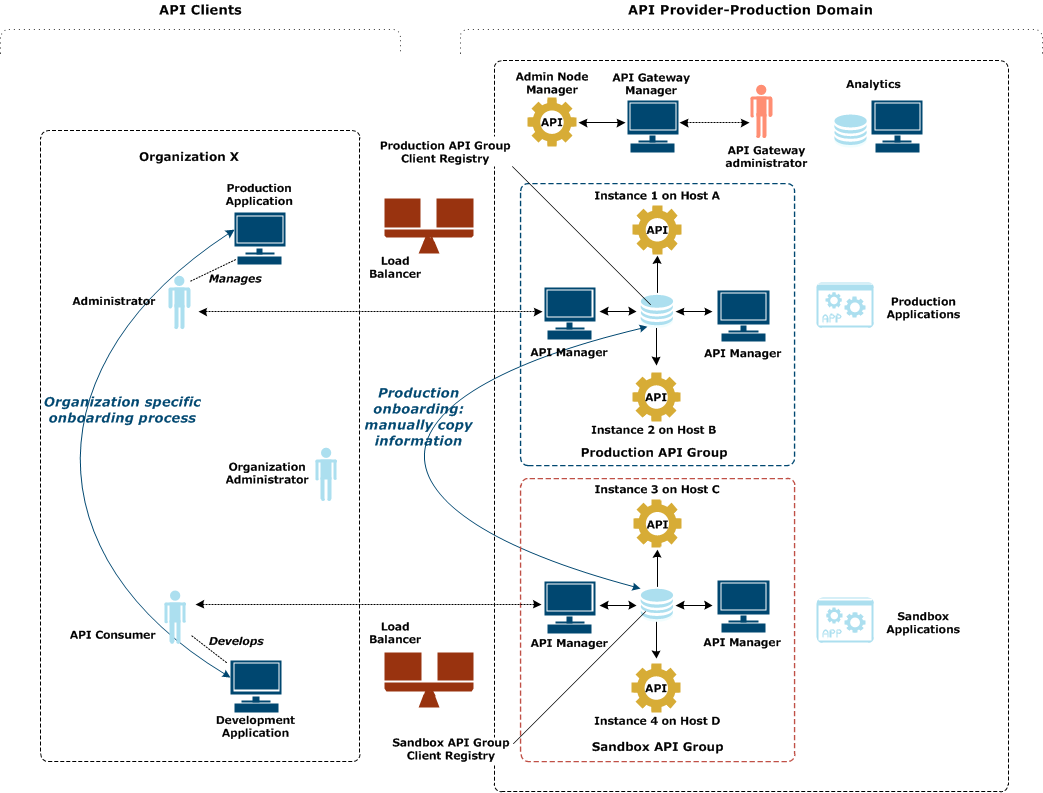
Note
Production onboarding involves more than the technical task of onboarding information between API groups. Internal business processes, which are out of the scope of this document, also need to be considered. These include commercial or legal issues that need to be resolved when setting up a formal business partnership between an API Provider and API Client. For example, will the client be charged for API use, and what quotas are required to service the demand from the end users of client applications.Configure high availability
Each API Gateway instance connects to an external Apache Cassandra for default persistent data storage. This Cassandra database is used by features such as API Manager, API keys, and OAuth.
If you configure multiple API Gateways in a group, you should configure high availability in the Apache Cassandra database. For more details, see Administer Apache Cassandra.