Configure cloud application connectors
27 minute read
API Manager enables you to connect to and manage cloud-based applications, such as the following:
- Salesforce.com provides cloud-based customer relationship management (CRM) solutions
- ServiceNow provides cloud-based service management solutions (for example, IT, human resources, facilities, field service, and so on)
- Axway API Builder enables you to easily connect your mobile apps to any data source.
Configure a connector for Salesforce APIs
API Manager enables you to import and manage cloud application APIs such as Salesforce.com. The policy developer can configure client authentication profiles for use with the Salesforce.com API connector in Policy Studio.
When the policy developer has connected to the Salesforce.com cloud API provider, the API administrator can then import and manage Salesforce.com application APIs in the API Manager web console.
Salesforce.com API use cases
Salesforce.com provides cloud-based customer relationship management (CRM) solutions. Salesforce.com provides the following types of API:
- Standard Object API: Used to manipulate business objects in the system.
- Bulk API: Provides a REST interface for importing and exporting a set of data.
For example, the API administrator can use the Standard Object API to expose SalesForce.com opportunities to sales teams on their desktop and mobile devices. Salespeople can also create new opportunities while on-site with customers.
The API administrator can use the Bulk API to extract a daily set of opportunities from SalesForce.com and store them in an archive.
Configure an API connector for Salesforce.com
The policy developer can configure an API connector in Policy Studio. To configure a connector, perform the following steps:
-
Select Server Settings > API Manager > API Connectors in the Policy Studio tree on the left.
-
Click Add to add a new connector.
-
Configure the following settings to suit your environment:
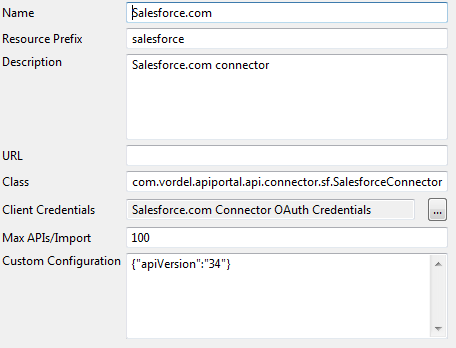
- Name:
The name of the API connector:
Salesforce.com. - Resource Prefix:
The resource prefix used for the API connector:
salesforce. - Description: A short description of the API connector.
- URL: Leave this field blank for Salesforce.com (applies to SeviceNow only).
- Class:
The Java class for the API connector:
com.vordel.apiportal.api.connector.sf.SalesforceConnector - Client Credentials: Salesforce.com APIs require OAuth-based authentication. For more details, see Configure OAuth client credentials for Salesforce.com. You can also right-click the parent Salesforce node to edit the OAuth provider settings (for example, provider URLs and token stores). For more details, see Configure OAuth provider settings for Salesforce.com.
- Max APIs/Import:
Enter the maximum number of APIs that can be imported from the Salesforce.com cloud provider into a single API in API Manager. A very large number makes it harder for an API owner to manage. The Salesforce.com connector defaults to
100APIs per import. For more details, see Import Salesforce.com APIs in API Manager - Custom Configuration:
Enter custom configuration details if any. For example, the supported versions for Salesforce.com are
{"apiVersion":"33"}or{"apiVersion":"34"}.
- Name:
The name of the API connector:
-
Click OK.
The following example shows the API connector configuration for the Salesforce.com connector in Policy Studio:
Configure OAuth client credentials for Salesforce.com
Under Environment Configuration > External Connections > Client Credentials > OAuth2 > Salesforce, the default Salesforce.com Connector OAuth Credentials client profile includes basic settings, which you can customize for your environment.
The following shows an example when you click Edit on the OAuth2 Credentials tab, and select Advanced:
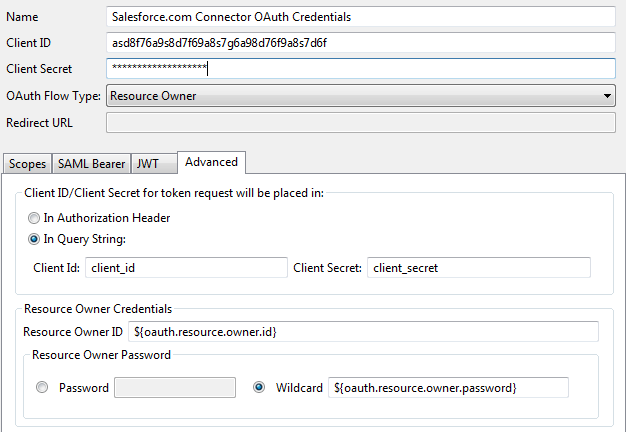
API Manager behaves as an OAuth client to Salesforce.com APIs, so you must configure valid client application credentials.
To configure client credentials for Salesforce.com, perform the following steps.
-
Your Salesforce.com administrator must first create a Connected app to represent API Manager in your Salesforce.com account.
-
When the Connected app is set up, Salesforce.com provides a Consumer Key and Consumer Secret for the app, which are used to configure the Saleforce.com connector in Policy Studio.
Note
When accessing data using its APIs, Salesforce.com asks its users to use their account password concatenated with a security token that is randomly generated and emailed to users. You must ensure that the security token is added to the end of the password to log in. -
Update the Client Id and Client Secret fields with the Consumer Key and Consumer Secret values that you obtained from the Connected app.
-
Select an OAuth Flow Type of Resource Owner. API Manager does not support the Authz Code flow when accessing Salesforce.com APIs. Other flows are not supported by Salesforce.com.
-
On the Advanced tab, the Resource Owner Credentials settings are important. The default Salesforce.com OAuth profile is configured to use selectors for the Resource Owner ID and Password (
${oauth.resource.owner.id}and${oauth.resource.owner.password}). These settings cause the Salesforce.com connector in API Manager to prompt the user for their Salesforce.com credentials before importing APIs.Alternatively, you can configure the OAuth profile with a system account. In this case, the Resource Owner ID should have a literal value, and the Resource Owner Password should be set to Password, along with the corresponding password value.
Configure OAuth provider settings for Salesforce.com
Under Environment Configuration > External Connections > Client Credentials > OAuth2 > Salesforce, the default OAuth2 Provider Settings tab includes basic settings, which you can customize for your environment. The following shows an example on the OAuth2 Provider Settings tab:
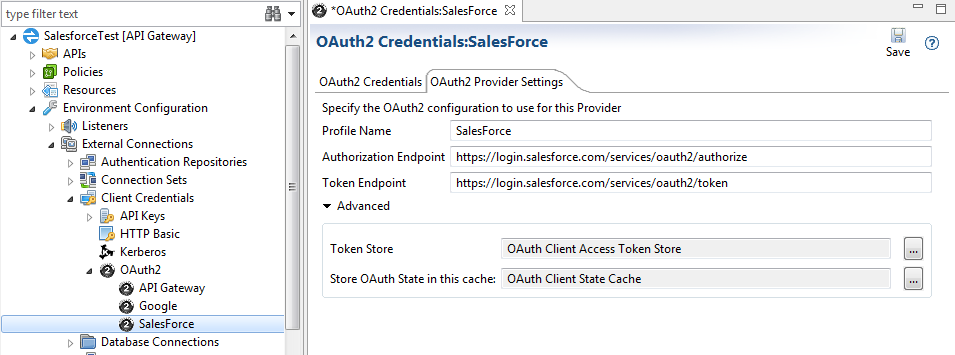
The OAuth provider settings are as follows:
- Profile Name: Enter a profile name for the OAuth provider settings. Defaults to
SalesForce. - Authorization Endpoint: Enter the Salesforce.com URL for the OAuth authorization endpoint. Defaults to
https://login.salesforce.com/services/oauth2/authorize. - Token Endpoint: Enter the Salesforce.com URL for the OAuth token endpoint. Defaults to
https://login.salesforce.com/services/oauth2/token.
Click Advanced to configure the following:
- Token Store: Click browse to select the API Gateway OAuth token store. Defaults to
OAuth Client Access Token Store. - Store OAuth State in this cache: Click browse to select the cache in which API Gateway stores the OAuth client state. Defaults to
OAuth Client State Cache.
Click Save when finished editing these settings.
Import Salesforce.com APIs in API Manager
When the policy developer has configured the API connector and the associated client authentication credentials in Policy Studio, the API administrator can import the Salesforce.com cloud API in the API Manager web console. When importing APIs, the import dialog displays the list of available Salesforce.com APIs. For example, these include the standard object, Query, Query All, Search, and Bulk APIs. You can filter this list to display the required APIs.
You can then select multiple different APIs to be part of an API definition imported in API Manager, and governed as a single back-end API. You can virtualize and manage the resulting back-end API just like any other API in API Manager.
Note
You can import the Salesforce.com Bulk API alone only, and not in combination with other APIs.To import a Salesforce.com API in API Manager, perform the following steps:
-
Select API Registration > Backend API.
-
Click New API, and select Import from Salesforce.com.
-
If the OAuth profile for Salesforce.com is configured with a wildcard resource owner password, you are prompted to enter valid Salesforce.com login credentials. Remember to add the Salesforce security token to the end of the password to log in.
Alternatively, if the OAuth profile for Salesforce.com is configured with a valid system account, the Salesforce.com connector automatically attempts to connect to Salesforce.com.
-
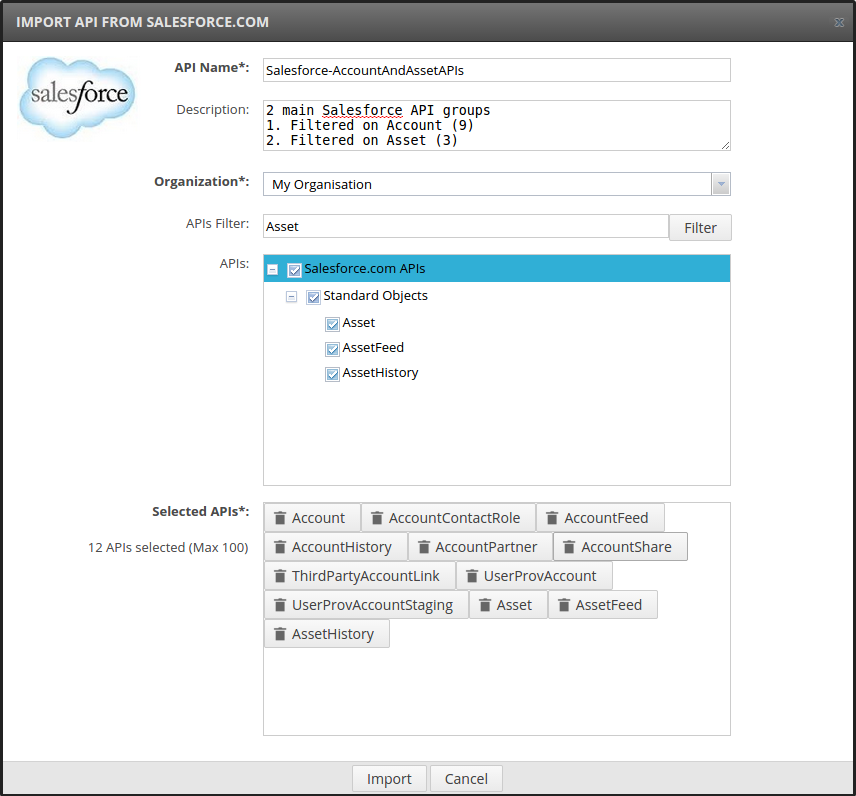
Complete the following details in the import dialog:
- API Name: Enter a name for the back-end API to display in API Manager.
- Description: Enter a short description for the back-end API.
- Organization: Select the organization name from the list.
- APIs Filter: Enter a filter string, and click Filter to display the results in the APIs tree.
- APIs: Select the Salesforce.com object API that you require in the tree. You can continue to filter and select multiple APIs.
- Selected APIs: View the APIs selected for import, and click to remove any that do not apply.
- The following example shows a completed import dialog:
-
When you have selected all the APIs you require, click Import at the bottom. The imported APIs are displayed as a single back-end API in API Manager. For example:
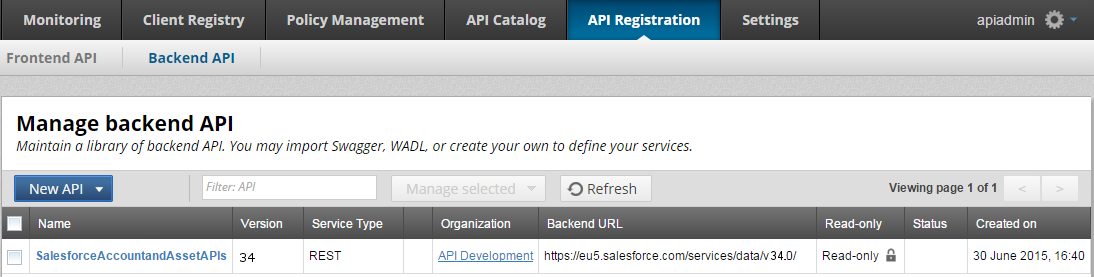
Manage Salesforce.com APIs in API Manager
When you import a cloud API and register it as a back-end API, you can virtualize and manage it as a front-end API, just like any other API in API Manager. For example, this includes selecting different authentication mechanisms and testing API methods.
Virtualize Salesforce.com APIs
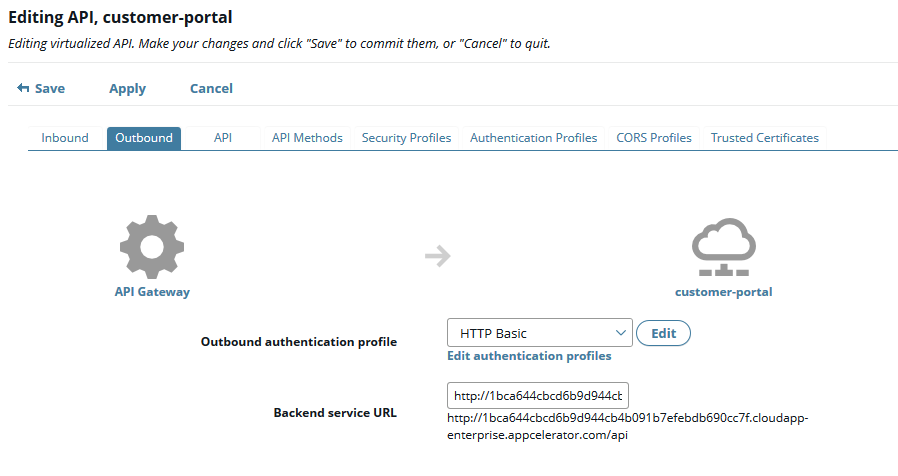
When you have imported a set of Salesforce.com objects in API Manager as a back-end API, you can virtualize it as a front-end API and secure it in different ways. In the most common scenario, API Manager acts as an OAuth client to Salesforce.com APIs. To achieve this, you must configure the virtualized front-end API in API Manager to use OAuth as the outbound authentication profile.
Configure the OAuth credentials in Policy Studio
To use OAuth for authentication with Salesforce.com, you must first configure an OAuth credential profile in Policy Studio. You can use the same OAuth credential profile used for the Salesforce.com connector at runtime, or you can configure a new profile.
Note
The OAuth credential profile must use the Resource Owner flow and send the Client Id and Client Secret in the Query String setting.After deciding which OAuth profile will be used in API Manager for authenticating against Salesforce.com at runtime, you must add the profile to the list of OAuth Outbound Credentials in Policy Studio. Perform the following steps:
- In the Policy Studio tree, select Server Settings > API Manager > OAuth Outbound Credentials.
- Click Add to add the profile (for example, the default Salesforce.com Connector OAuth Credentials).
- Click Apply Changes at the bottom right.
- Click Deploy in the toolbar.
For example:
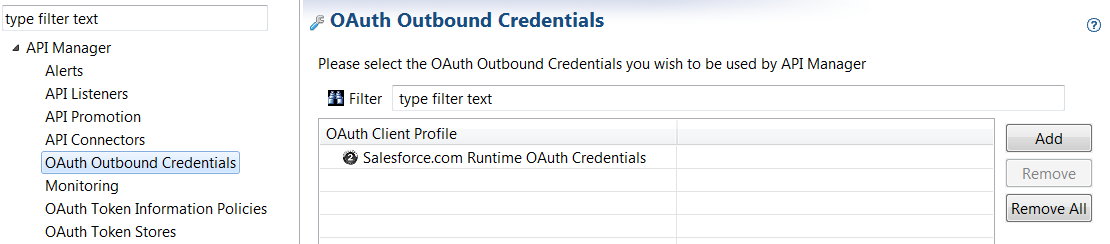
When the profile has been added, it is available for use in API Manager.
Using a system account:
If the Resource Owner Credentials configured in the OAuth profile are set to literal values (username and password), at runtime API Manager uses these credentials to negotiate an OAuth token with Salesforce.com.
The front-end API exposed to consumers can use any application or end user authentication or authorization mechanism. The Salesforce.com access rights defined by the system account are shared equally by all consumers.
Using end user credentials:
If the Resource Owner Credentials configured in the OAuth profile are set to wildcard selector values (such as ${oauth.resource.owner.id} and ${oauth.resource.owner.password}), at runtime API Manager resolves these selectors, and dynamically determines the user credentials to negotiate an OAuth token with Salesforce.com.
The front-end API exposed to consumers can use any application or end user authentication or authorization mechanism, as long as the configured selectors can be resolved to valid credentials. The Salesforce.com access rights defined by the credentials resolved at runtime are used.
Create the front-end API in API Manager
When you have configured the OAuth credentials in Policy Studio, you can virtualize the back-end Salesforce.com API as a front-end API in API Manager. Perform the following steps:
-
Select API Registration > Frontend API.
-
Click New API, and select New API from backend API.
-
Select the existing Salesforce back-end API in the dialog.
-
Enter a Resource Path (for example,
/salesforce). -
On the Inbound tab, select a security device for authentication from the Inbound security setting.
Note
If the Resource Owner Credentials in the OAuth for Salesforce.com are configured as selectors (for example,${oauth.resource.owner.id}and${oauth.resource.owner.password}), these must be resolved by API Manager before calling Salesforce.com. The logic for resolving selectors depends on each use case, but an Invoke Policy security device is recommended. This enables you to use a custom policy to analyze incoming requests, and decide which resource owner credentials to use with Salesforce.com. The simplest case involves the client application sending the end user credentials in the request, and a policy mapping those credentials to the configured selectors. -
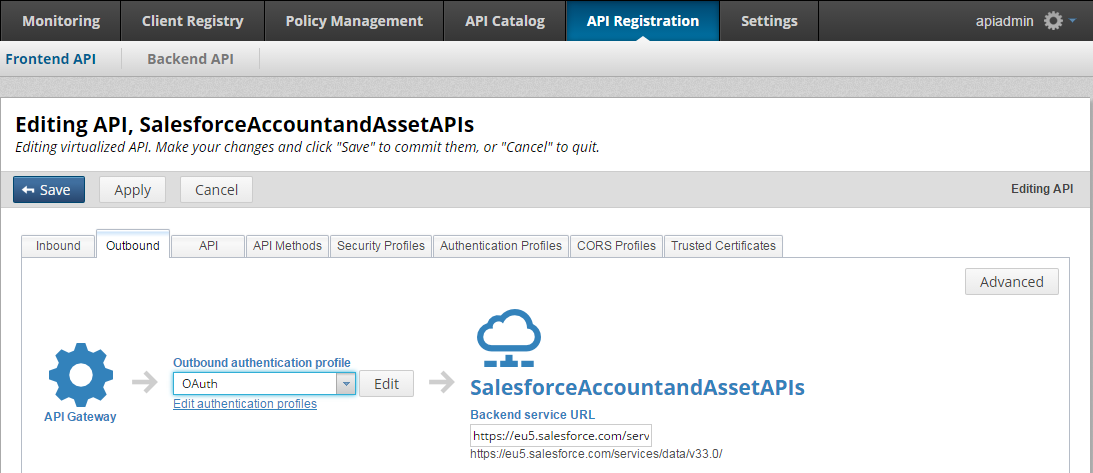
On the Outbound tab, select the OAuth security device from the Outbound authentication profile setting. Salesforce.com users and resources are bound to instances (such as
na1,ap1,eu1). Upon successful OAuth authentication, Salesforce.com indicates the instance to be used in the API endpoint (for example,eu5.salesforce.com). When OAuth is selected as the Outbound authentication profile, the back-end API URL is dynamically assigned based on the Salesforce.com indication. This ensures that API manager routes to the Salesforce.com instance according to the end user authentication credentials. -
Select the OAuth credentials that you configured in Policy Studio as the OAuth Provider Profile (for example, the default Salesforce.com Connector OAuth Credentials).
-
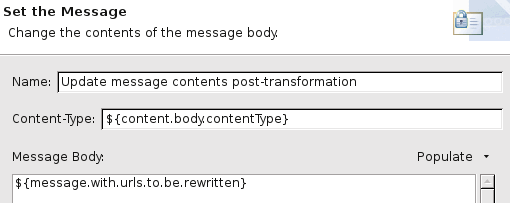
The response contents of Salesforce.com APIs can include relative links to other associated resources. Because the virtualized API in API Manager might present a different relative path to the consuming client application, URL rewriting might be necessary. A sample URL rewriting policy is available in Policy Studio under Sample Policies > API Management URL Rewriting. Click Advanced, and add this as a Response policy to leverage URL rewriting.
-
Click Save or Apply.
-
On the API Methods tab, you can select a method, and click Try method to test it.
The following example shows a virtualized front-end Salesforce API with OAuth selected for outbound authentication:
For more details on virtualizing APIs, see Virtualize REST APIs in API Manager.
For more details on Salesforce.com APIs, see https://developer.salesforce.com/
Configure a connector for ServiceNow APIs
API Manager enables you to import and manage cloud application APIs such as ServiceNow. The policy developer can configure client authentication profiles for use with the ServiceNow API connector in Policy Studio.
When the policy developer has connected to the ServiceNow cloud API provider, the API administrator can then import and manage ServiceNow application APIs in the API Manager web console.
ServiceNow API use cases
ServiceNow provides cloud-based service management solutions (for example, IT, human resources, facilities, field service, and so on). ServiceNow provides the following types of API:
- Table API: Used to manipulate business objects in the system.
- Aggregate API: Used to compute statistics on business objects.
- Import Set API: Provides a REST interface for importing and exporting set of data.
For example, the API administrator can use the Table API to expose ServiceNow incidents to support and service teams on their desktop and mobile devices. Each team member can collaborate and exchange information on the same incident using different tools in real time.
The API administrator can use the Aggregate API to expose a set of statistics on customer incidents on a web dashboard. The support team manager and the customer account manager use the dashboard to manage the status of customer issues.
The API administrator can use the Import Set API to extract a daily set of incidents from ServiceNow and store them in an archive.
Configure an API connector for ServiceNow
The policy developer can configure an API connector in Policy Studio. To configure a connector, perform the following steps:
-
Select Server Settings > API Manager > API Connectors in the Policy Studio tree on the left.
-
Click Add to add a new connector.
-
Configure the following settings to suit your environment:
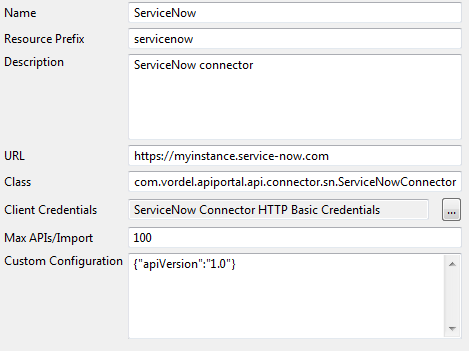
- Name:
The name of the API connector:
ServiceNow. - Resource Prefix:
The resource prefix used for the API connector:
servicenow. - Description:
A short description of the API connector:
ServiceNow connector. - URL:
Enter the URL for the ServiceNow API connector. This setting is required for ServiceNow:
https://myinstance.service-now.com - Class:
The Java class for the API connector:
com.vordel.apiportal.api.connector.sn.ServiceNowConnector - Client Credentials: ServiceNow APIs use HTTP basic authentication. Click the browse button to select the client credential required for ServiceNow. For more details, see Configure HTTP basic credentials for ServiceNow.
- Max APIs/Import:
Enter the maximum number of APIs that can be imported from the ServiceNow cloud API provider into a single API in API Manager. A very large number makes it harder for an API owner to manage. The ServiceNow connector defaults to
100APIs per import. For more details, see Import ServiceNow APIs in API Manager - Custom Configuration:
Enter custom configuration details:
{"apiVersion":"1.0"}.
- Name:
The name of the API connector:
-
Click OK.
The following example shows the default API connector configuration for the ServiceNow connector in Policy Studio:
Configure HTTP basic credentials for ServiceNow
To configure client credentials for ServiceNow, perform the following steps:
-
Register an account with ServiceNow to obtain your ServiceNow credentials.
-
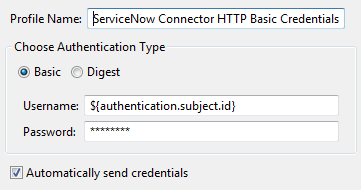
In the Policy Studio tree, select Environment Configuration > External Connections > Client Credentials > HTTP Basic, and click Add on the bottom right.
-
Enter a Profile Name (for example,
ServiceNow Credentials). -
Ensure Choose Authentication Type is set to Basic. Connecting to ServiceNow with Digest authentication is not supported.
-
Enter your ServiceNow account credentials in the Username and Password fields.
Alternatively, you can enter an API Gateway selector (
${authentication.subject.id}) in the Username field. This setting causes the ServiceNow connector in API Manager to prompt you for your ServiceNow credentials before importing APIs.
The following shows a completed example:
Import ServiceNow APIs in API Manager
When the policy developer has configured the API connector and the associated client authentication credentials in Policy Studio, the API administrator can import the ServiceNow cloud API in the API Manager web console. When importing APIs, the import dialog displays the list of available ServiceNow Table, Aggregate and Import Set APIs. You can filter this list to display the required APIs.
You can then select multiple different APIs to be part of an API definition imported in API Manager, and governed as a single back-end API. You can virtualize and manage the resulting back-end API just like any other API in API Manager.
Note
Due to the large number of APIs available from ServiceNow, importing all of them is not possible with the default API Gateway configuration, and might take over an hour. It is recommended that you import only the APIs that will be used.To import a ServiceNow API in API Manager, perform the following steps:
-
Select API Registration > Backend API.
-
Click New API, and select Import from ServiceNow.
-
If the client credentials profile for ServiceNow is configured with a wildcard resource owner password, you are prompted to enter valid ServiceNow login credentials.
Alternatively, if the credentials profile for ServiceNow is configured with a valid system account, the ServiceNow connector automatically attempts to connect to ServiceNow.
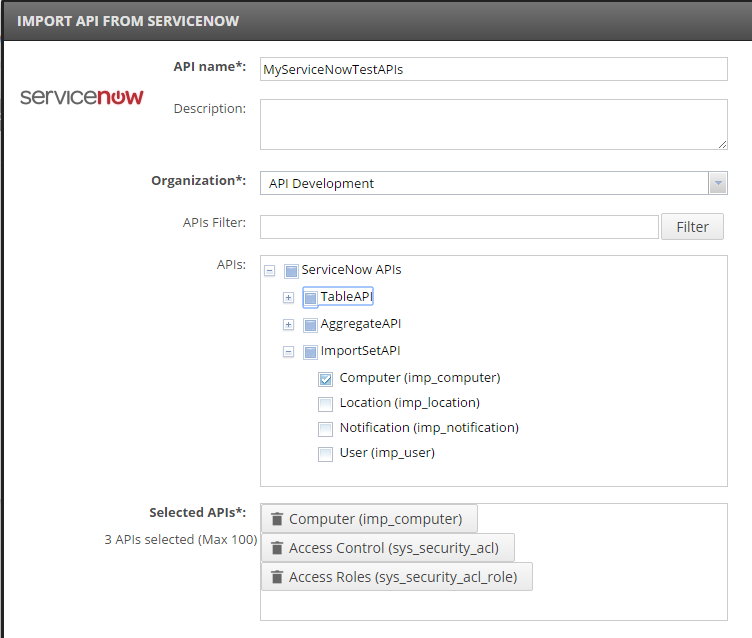
-
Complete the following details in the import dialog:
- API Name: Enter a name for the back-end API to display in API Manager.
- Description: Enter a short description for the back-end API.
- Organization: Select the organization name from the list.
- APIs Filter: Enter a filter string, and click Filter to display the results in the APIs tree.
- APIs: Select the ServiceNow object API that you require in the tree. You can continue to filter and select multiple APIs.
- Selected APIs: View the APIs selected for import, and click to remove any that do not apply.
The following example shows a completed import dialog:
-
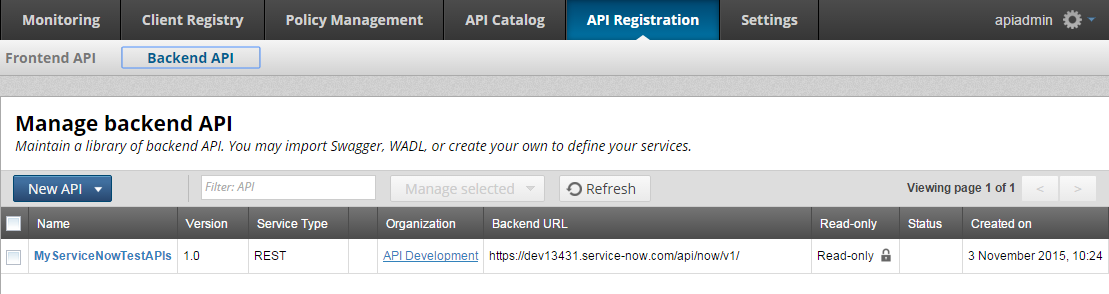
When you have selected all the APIs you require, click Import at the bottom. The imported APIs are displayed as a single back-end API in API Manager.
Manage ServiceNow APIs in API Manager
When you import a cloud API and register it as a back-end API, you can virtualize and manage it as a front-end API, just like any other API in API Manager. For example, this includes selecting different authentication mechanisms and testing API methods.
Virtualize ServiceNow APIs
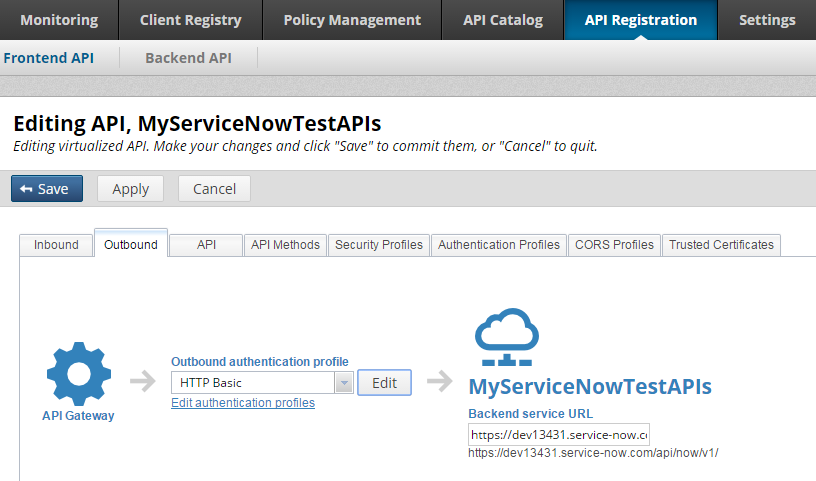
When you have imported a set of ServiceNow objects into API Manager as a back-end API, you can then virtualize it as a front-end API and secure it in different ways. In one of the most common scenarios, API Manager acts as an HTTP basic authentication client to ServiceNow APIs. To achieve this, you should configure the virtualized front-end API in API Manager to use HTTP basic as the outbound authentication profile.
Using a system account:
If the HTTP basic credentials are set to literal values (username and password), at runtime API Manager uses these credentials to authenticate with ServiceNow.
The front-end API exposed to consumers can use any application or end user authentication or authorization mechanism. The ServiceNow access rights defined by the system account are shared equally by all consumers.
Using end user credentials:
If the HTTP basic credentials are set to a wildcard selector value (such as ${authentication.subject.id}), at runtime API Manager resolves the selector, and dynamically determines the user credentials to authenticate with ServiceNow. This is the default.
The front-end API exposed to consumers can use any application or end user authentication or authorization mechanism, as long as the configured selectors can be resolved to valid credentials. The ServiceNow access rights defined by the credentials resolved at runtime are used.
Create the front-end API for ServiceNow in API Manager
When you have configured the HTTP basic credentials in Policy Studio, you can virtualize the back-end ServiceNow API as a front-end API in API Manager. Perform the following steps:
-
Select API Registration > Frontend API.
-
Click New API, and select New API from backend API.
-
Select the existing ServiceNow back-end API in the dialog.
-
Enter a Resource Path (for example
/servicenow). -
On the Inbound tab, select a security device for authentication from the Inbound security setting.
Note
If the HTTP basic credentials are set to a wildcard selector value (for example,${authentication.subject.id}), this must be resolved by API Manager before calling ServiceNow. -
On the Outbound tab, select a security device from the Outbound authentication profile setting. For example, HTTP basic is a commonly used outbound authentication profile in this scenario.
-
The response contents of ServiceNow APIs can include relative links to other associated resources. Because the virtualized API in API Manager might present a different relative path to the consuming client application, URL rewriting might be necessary. A sample URL rewriting policy is available in Policy Studio under Sample Policies > API Management URL Rewriting. Click Advanced, and add this as a Response policy to leverage URL rewriting.
-
Click Save or Apply.
-
On the API Methods tab, you can select a method, and click Try method to test it.
The following example shows a virtualized front-end ServiceNow API with HTTP basic selected for outbound authentication:
For more details on virtualizing APIs, see Virtualize REST APIs in API Manager.
For more details on ServiceNow APIs, see http://wiki.servicenow.com.
Submit XML requests to ServiceNow using API Gateway
Currently, you cannot submit XML requests to ServiceNow through API Gateway out-of-the-box. This is because ServiceNow returns an error if there is whitespace at the end of an XML request.
To workaround this issue, you can use either of the following approaches:
- Set the
Content-Typeof the XML request to the following:
Content-Type: charset=”UTF-8”; application/xml
-
Create a custom request policy to remove all whitespace at the end of a request. For example:
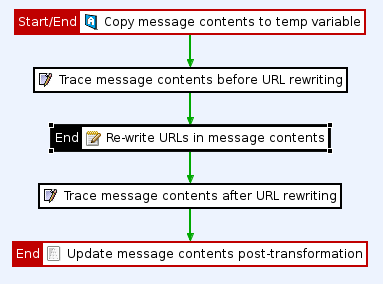
Custom policy to remove whitespace at end of request
The custom request policy to remove all whitespace at the end of a request is described as follows:
-
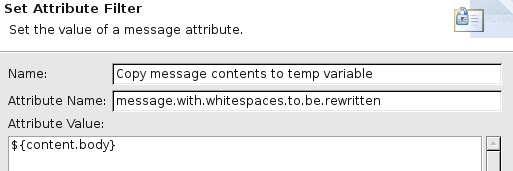
A Set Attribute filter copies the contents of the request to a temporary variable:
-
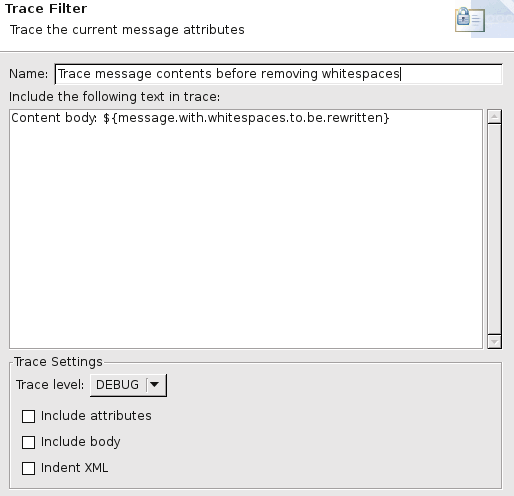
A Trace filter is used for tracking purposes:
-
A String Replace filter removes the whitespace at the end of the request body (using the
\s*$regular expression):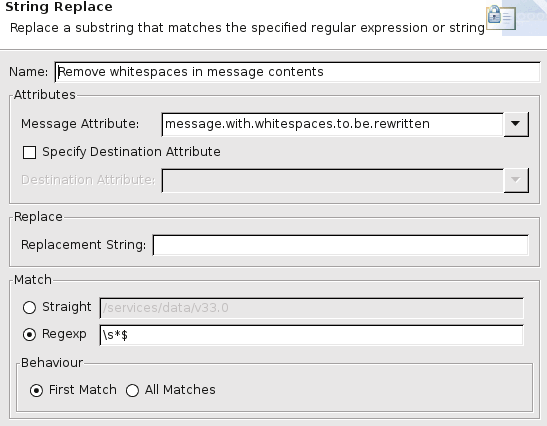
-
Another Trace filter is used for tracking purposes.
-
A Set Message filter sets the contents of the temporary variable (in which the replacement took place) as a request body:
Configure a connector for Axway API Runtime Services
API Manager enables you to import and manage cloud-based application APIs developed using Axway API Builder. Policy developers can configure client authentication profiles for use with the API Builder connector in Policy Studio. When the policy developer has connected to an API Builder cloud API provider, the API administrator can then import and manage API Builder application APIs in the API Manager web console.
API Builder use cases
API Builder enables you to create APIs as Node.js applications that run in different cloud environments. These include the API Runtime Services virtual private cloud (VPC) or on-premise cloud environments and the Appcelerator Public Cloud environment.
You can create an API Builder project and add endpoints to define how client applications access your application API. API Builder generates a Swagger definition for the application API, which you can import into API Manager using the API Builder connector.
API Builder also provides prebuilt connectors for third-party cloud applications and services (for example, MS SQL, MySQL, or MongoDB). You can also create custom connectors for any data source, reuse third-party connectors in your application APIs, and optimize payload size and data format for integration with mobile apps.
Configure an API connector for API Runtime Services
Policy developers can configure an API connector in Policy Studio as follows:
-
Select Server Settings > API Manager > API Connectors in the Policy Studio tree on the left.
-
Click Add to add a new connector for API Builder.
-
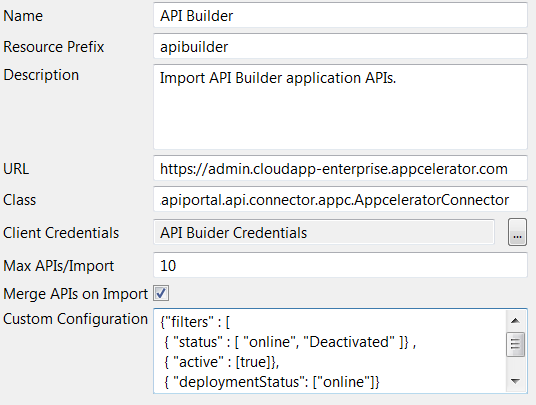
Configure the following settings to suit your environment:
-
Name: Enter the name of the API connector (for example,
API Builder). This name will be displayed in API Manager in the menu option when importing application APIs. -
Resource Prefix: Enter the resource prefix required for the API Builder connector:
apibuilder. -
Description: Enter the following description:
Import API Builder application APIs. This description will be displayed in the API Manager dialog when importing application APIs. -
URL: Enter the URL required for your API Builder application API environment. For example, if your API Builder applications are hosted in the API Runtime Services virtual private cloud (VPC) or on-premise cloud environment, contact your system administrator to obtain the required URL.
Alternatively, if your API Builder application APIs are hosted publicly, the Appcelerator Public Cloud environment is available the following URL:
https://admin.cloudapp-enterprise.appcelerator.com -
Class: Enter the Java class required for the API Builder connector:
com.vordel.apiportal.api.connector.appc.AppceleratorConnector -
Client Credentials: You must provide a user name and password to connect to API Builder. Click the browse button to configure the client credential required for API Builder. To configure new credentials, right-click the Client Credentials > HTTP Basic node, and select Add HTTP Basic Credentials. For more details, see Configure credentials for API Runtime Services.
-
Max APIs/Import: Enter the maximum number of application APIs that can be imported from the API Builder cloud API provider into API Manager. A very large number makes it harder for an application API owner to manage. The API Builder connector defaults to
10application APIs per import. For more details, see Import API Builder application APIs in API Manager. -
Merge APIs on import: You must deselect this setting for API Builder application APIs. Each API Builder application API will be imported into API Manager as a separate back-end API.
-
Custom Configuration: Not all API Builder application APIs can be imported into API Manager by default. Enter the following custom configuration to filter the list of application APIs displayed in API Manager to show only active API Builder application APIs:
{"filters" : [
    { "status" : [ "online", "Deactivated" ]} ,
    { "active" : [true]},
    { "deploymentStatus": ["online"]}
    ]
    }
This specifies filter attributes in JSON format to filter the list of available application APIs displayed in API Manager. This field can be blank or contain a JSON
filtersobject that includes an array of objects.
-
-
Click OK.
The following example shows the completed configuration for the API Builder cloud application connector in Policy Studio:
Configure credentials for API Runtime Services
To configure client credentials for API Builder, perform the following steps:
-
Register an account for API Builder to obtain your API Builder credentials. For more details, see http://www.appcelerator.com/.
-
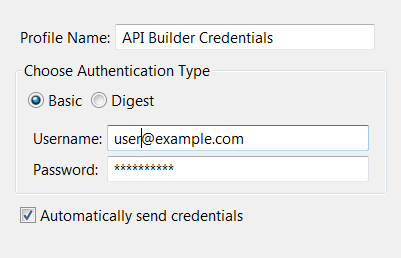
In the Policy Studio tree, select Environment Configuration > External Connections > Client Credentials > HTTP Basic, and click Add on the bottom right.
-
Enter a Profile Name (for example,
API Builder Credentials). -
Ensure Choose Authentication Type is set to Basic.
-
Enter your API Builder account credentials in the Username and Password fields.
Alternatively, you can enter an API Gateway selector (
${authentication.subject.id}) in the Username field. This setting causes the API Builder connector in API Manager to prompt you for your API Builder credentials before importing application APIs.
The following shows an example HTTP basic authentication profile:
Import API Builder application APIs in API Manager
When the policy developer has configured the API connector and the associated client authentication credentials in Policy Studio, the API administrator can import the API Builder application API in the API Manager web console. When importing APIs, the import dialog displays the list of available API Builder application APIs. You can filter this list to display the required application APIs.
You can then select multiple application APIs to import into API Manager. You can virtualize and manage the resulting back-end APIs just like any other APIs in API Manager.
For example, to import an API Builder API, perform the following steps in API Manager:
-
Select API Registration > Backend API.
-
Click New API, and select Import from API Builder.
-
If the client credentials profile for API Builder is configured with a selector for the username, you are prompted to enter valid API Builder login credentials.
Alternatively, if the credentials profile for API Builder is configured with a valid system account, the API Builder connector automatically attempts to connect to API Builder.
-
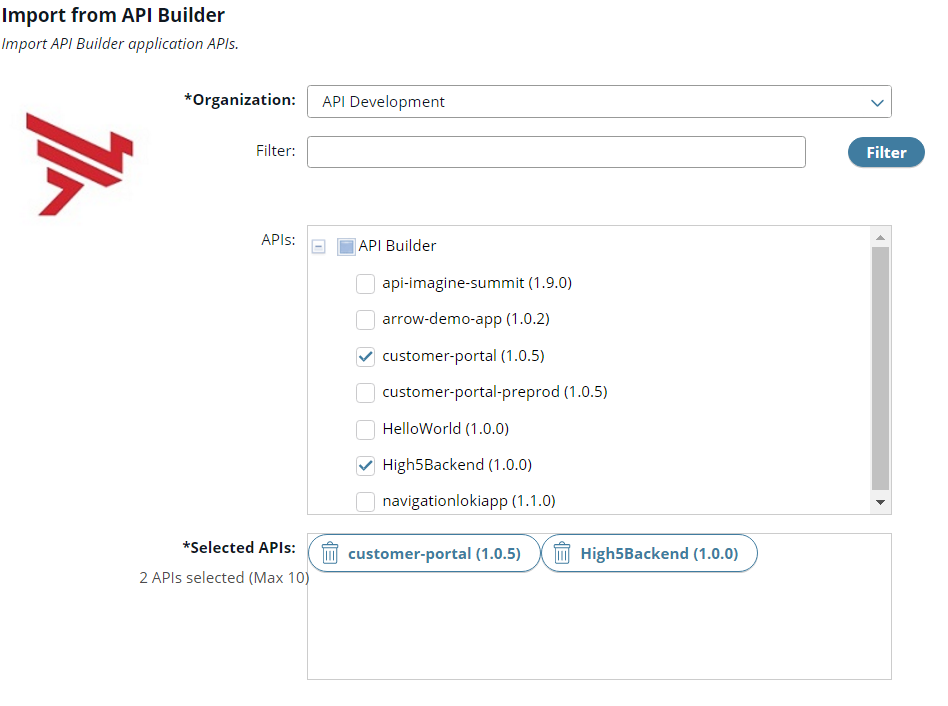
Complete the following details in the import dialog:
- Organization: Select the organization name from the list.
- Filter: Enter a filter string, and click Filter to display the results in the APIs tree.
- APIs: Select the API Builder application API that you require in the tree. You can continue to filter and select multiple APIs.
- Selected APIs: View the application APIs selected for import, and click to remove any that do not apply.
The following example shows a completed import dialog:
-
When you have selected all the application APIs you require, click Import at the bottom. Each imported application API is displayed as a separate back-end API in API Manager:
Manage API Builder application APIs in API Manager
When you import a cloud-based application API and register it as a back-end API, you can virtualize and manage it as a front-end API, just like any other API in API Manager. For example, this includes selecting different authentication mechanisms and testing API methods.
Virtualize API Builder application APIs
When you have imported API Builder application APIs into API Manager as back-end APIs, you can then virtualize them as a front-end APIs and secure them in different ways. In a common scenario, API Manager acts as an HTTP basic authentication client to API Builder APIs. To achieve this, you should configure the virtualized front-end API in API Manager to use HTTP basic as the outbound authentication profile.
Using a system account:
If the HTTP basic credentials are set to literal values (user name and password), at runtime API Manager uses these credentials to authenticate with API Builder.
The front-end API exposed to consumers can use any application or end user authentication or authorization mechanism. The API Builder access rights defined by the system account are shared equally by all consumers.
Using end user credentials:
If the HTTP basic credentials are set to a selector value (for example, ${authentication.subject.id}), at runtime API Manager resolves the selector, and dynamically determines the user credentials to authenticate with API Builder.
The front-end API exposed to consumers can use any application or end user authentication or authorization mechanism, as long as the configured selectors can be resolved to valid credentials. The API Builder access rights defined by the credentials resolved at runtime are used.
Create the front-end API Builder API in API Manager
When you have configured the HTTP basic credentials in Policy Studio, you can virtualize the back-end API as a front-end API in API Manager. Perform the following steps:
-
Select API Registration > Frontend API.
-
Click New API, and select New API from backend API.
-
Select the existing API Builder back-end API in the dialog.
-
Enter a Resource Path (for example
/api_builder). -
On the Inbound tab, select a security device for authentication from the Inbound security setting.
Note
If the HTTP basic credentials are set to a selector value (for example,${authentication.subject.id}), this must be resolved by API Manager before calling API Builder. -
On the Outbound tab, select a security device from the Outbound authentication profile setting. For example, HTTP basic is a commonly used outbound authentication profile in this scenario.
-
The response contents of API Builder APIs can include relative links to other associated resources. Because the virtualized API in API Manager might present a different relative path to the consuming client application, URL rewriting might be necessary. A sample URL rewriting policy is available in Policy Studio under Sample Policies > API Management URL Rewriting. Click Advanced, and add this as a Response policy to use URL rewriting.
-
Click Save or Apply.
-
On the API Methods tab, you can select a method, and click Try method to test it.
The following example shows a virtualized front-end API imported from API Builder with HTTP basic selected for outbound authentication:
For more details on virtualizing APIs, see Virtualize REST APIs in API Manager.
For more details on API Builder, see API Builder documentation.
Configure a connector to route through a HTTP proxy
You need to configure an API Manager connector (for example, for Salesforce.com) to route through an outbound HTTP proxy because your company requires all access to external applications to be routed through a proxy.
Configure the API Manager connector and the imported cloud application APIs to route through a proxy.
-
Create a file called
jvm.xmlin the folderINSTALL_DIR/apigateway/conf(if it does not already exist). -
Add the following setting:
<ConfigurationFragment> <SystemProperty name=”apiconnector.http.proxyHost” value=YOUR_PROXY_HOST /> <SystemProperty name=”apiconnector.http.proxyPort” value=YOUR_PROXY_PORT /> </ConfigurationFragment> -
Restart the API Manager-enabled API Gateway instance to enable the changes in
jvm.xmlto be applied. -
Import the cloud application APIs (for example, Salesforce APIs) in API Manager.
-
In Policy Studio, select Environment Configuration > External Connections > Proxy Servers and create a new proxy server with the host and port details of your outbound HTTP proxy.
-
Create a custom routing policy. Copy one of the templates under Policies > Generated Policies > REST APIs > Templates and rename the copy to Routing via Proxy.
-
Edit the Connect to URL filter contained in the custom routing policy. Select Settings and under the Proxy section, select the proxy server you created earlier.
-
Select Server Settings > API Manager > Routing Policies and add the custom routing policy.
-
Deploy the new configuration to the API Manager-enabled API Gateway instance.
-
In API Manager, change the default method routing to Routing via Proxy for the APIs that were generated using the connectors.