Register REST APIs in API Manager
11 minute read
API owners can use the API Manager web interface to register back-end REST APIs. You can manually create a new back-end API or import a definition for an existing API (for example, in Swagger, OAS3, or WSDL format). Using API Manager to register REST APIs means that you can register APIs in a browser, in multiple formats, without any service outage.
When a back-end API is registered, you can then virtualize it as a publicly exposed front-end API. Registered and virtualized APIs are governed by the API Gateway using configured policies. API owners and API administrators can use API Manager to manage registered APIs, and API consumers can use API Manager or API Portal to consume virtualized APIs in their applications.
Note
You must first register a back-end REST API before you can virtualize a front-end REST API. For more details, see Virtualize REST APIs in API Manager.Back-end and front-end APIs
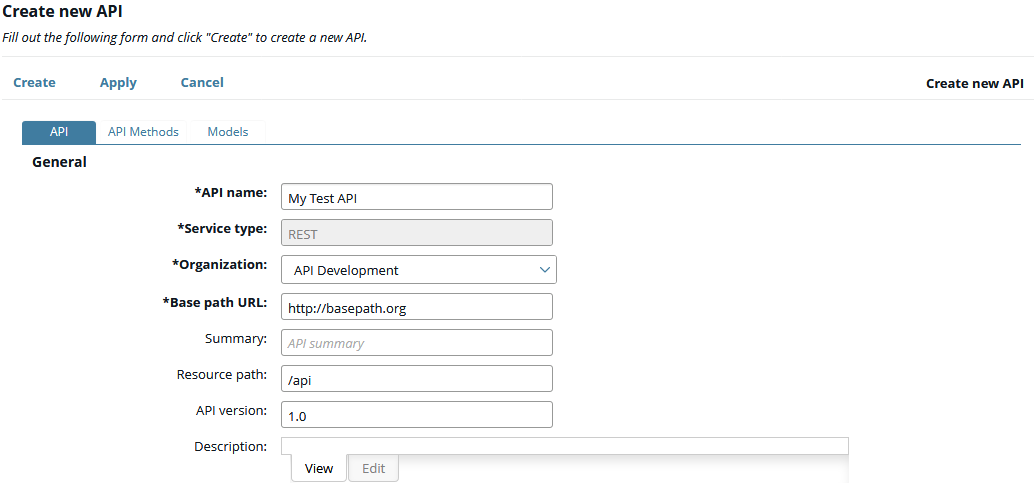
In API Manager, the back-end API defines the contract with the remote server, which services the API that is virtualized on the API Gateway. The back-end API can be exposed by an application server on the network or in the Cloud, for example, Twitter. You can register a new back-end REST API manually, or you can import a definition for an existing REST API, which is in Swagger or WSDL formats. The following image shows a manually registered back-end API:
The front-end API is the virtualized publicly exposed REST API that is hosted in API Gateway, and which is invoked by client applications (for example, iPhone or Android apps). The following image shows a back-end API virtualized as a front-end API:
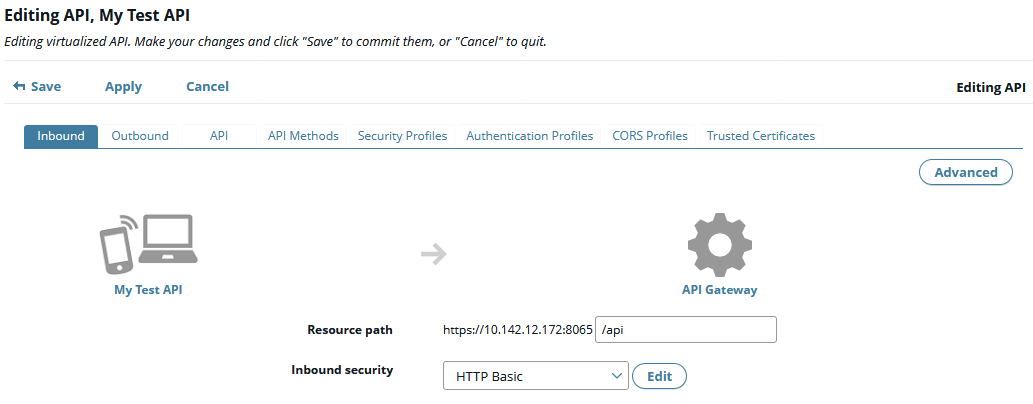
By default, the front-end API works in the same way as the back-end API, proxying the API “as is”. However, you can edit the front-end API to present an enriched, public-facing API to client applications. For example, you can change the URL path, change and map parameters, or improve the documentation.
In addition, this separation of front-end API and back-end API definitions allows the back-end API to change over time. This means that you can control how changes are exposed to client applications, thus minimizing or eliminating the potential impact on these applications.
Enable an organization for API development
Before you begin registering REST APIs for an organization, you must first enable an organization for API registration and development. The API Manager welcome dialog prompts you to automatically create an API Development organization, which is enabled for API development by default.
To create the default API Development organization:
- Click the Client Registry > Organizations view in API Manager.
- Click the name of the organization to enable (for example, Acme Inc).
- Set the API Development option to On.
You can now register back-end APIs and virtualize front-end APIs for this organization.
Import an existing back-end REST API
To automatically register an existing back-end REST API:
-
Click the API Registration > Backend API view in API Manager.
-
Click New API and select one of the following:
- Import Swagger API: Import an API in Swagger/OAS format.
- Import WADL API: Import an API in Web Application Description Language (WADL) format. Note that API Manager only supports
the
http://wadl.dev.java.net/2009/02XML namespace for WADL elements.
-
On the Import API dialog, complete the following:
- Source: Select the source type from the list.
- File or URL: Click the browse button to select the definition file, or enter the URL.
- API Name: A user-friendly name for the API (for example,
Test API). - Organization: Select the organization from the list (for example, Acme Inc).
- Authentication: For URL-based APIs only, enter a User name and Password if required.
After the REST API is imported, it is displayed as read-only in API Manager. The following image shows two imported APIs based on WADL and Swagger definitions:
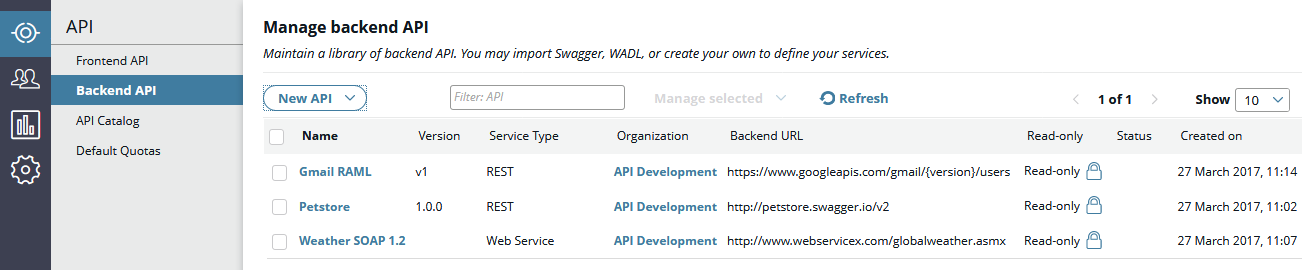
You can click an API from the list to view its general details, methods, and schema model.
Note
Do not use spaces or the URL encoded%20 in the base path URL.
Note
SmartBear Swagger parser third-party libraries are used to import OAS definitions. Certificate checking is used in the parser when resolving remote references (import from URL), therefore the following flags may need to be added to jvm.xml file to resolve external references:
<VMArg name="-Dio.swagger.parser.util.RemoteUrl.trustAll=true"/>
<VMArg name="-Dio.swagger.v3.parser.util.RemoteUrl.trustAll=true"/>
For more information, see SSL Certificate error while trying to import swagger definition and Dealing with self-signed SSL certificates.
Import an existing web service back-end API
To import an existing web service-based back-end API, perform the following steps:
-
Click the API Registration > Backend API view in API Manager.
-
Click New API > Import WSDL API.
-
On the Import Web Service dialog, complete the following:
- URL: Enter the URL for the web service. For example,
http://wsf.cdyne.com/WeatherWS/Weather.asmx?WSDL. - API Name: A user-friendly name for the API (for example,
Weather API). - Organization: Select the organization from the list (for example, Acme Inc).
- Authentication: For URL-based APIs only, enter a User name and Password if required.
- URL: Enter the URL for the web service. For example,
-
Click Import to import the API into the catalog.
Limitations of web services support
API Manager does not support the following features:
- WSDL import from file: You can only import a web service from a URL. You must use Policy Studio if you want to import from a file.
- WS-Policy/WS-Security: If this is required, you must register the web service using Policy Studio.
- Schema validation: If schemas are available, you can validate using custom request/response policies. Otherwise, you should register using Policy Studio.
- Binding/operation selection: You cannot select specific bindings/operations for import. If this is required, you must use Policy Studio.
- Cloning: You cannot clone an API registered from a web service.
Tip
When your web service schemas are loaded in API Manager, they are protected by your chosen front-end API security device. Your client testing tool may be able to reach the WSDL, but not the schema imports without the appropriate key/credentials.For details on registering web services using Policy Studio, see Register and secure web services.
Import an existing cloud-based back-end API
Before importing a cloud API, you must first ensure that the API connector and OAuth profile for the cloud API have been configured. For example, see Configure a connector for Salesforce APIs.
To import a cloud-based back-end API for existing cloud-based APIs in API Manager:
- Select API Registration > Backend API.
- Click New API, and select Import from Salesforce.com or Import from ServiceNow.
- Enter your login credentials from your cloud API provider (for example, Salesforce.com) in the dialog (if prompted).
- Select the cloud APIs that you require in the dialog.
- Click Import to import the selected APIs as a single back-end API in API Manager.
Import an existing back-end API deployed on an API Gateway
To import an existing back-end REST or SOAP API that is already deployed on an API Gateway, perform the following steps when logged in as API administrator:
-
Click the API Registration > Backend API view in API Manager.
-
Click New API > Import API from Topology.
-
In the Import from Topology dialog, complete the following required settings:
- Host: Enter the Admin Node Manager host name (for example,
localhost). - Port: Enter the Admin Node Manager port number (for example,
8090). - Login Name: Enter your Admin Node Manager login name.
- Password: Enter your Admin Node Manager password.
- Group: Select the API Gateway group name (for example, AcmeGatewayGroup).
- Instance: Select the API Gateway instance name (for example, AcmeGateway).
- Service Type: Select REST API or SOAP service.
- Service: Select the API Gateway service name (for example, AcmePayment.
- API name: Enter the API name (for example, Acme Payment API).
- Organization: Select the organization (for example Acme Inc).
- Host: Enter the Admin Node Manager host name (for example,
-
Click Import to import the API into the catalog.
Manually register a new back-end REST API
To manually register a new back-end REST API in API Manager, perform the following steps:
-
Click the API Registration > Backend API view in API Manager.
-
Click New API > New.
-
In the API tab, complete the following general details:
-
API name: Enter a required name for the API (for example, Acme API).
-
Service type: Enter a service type for the API (for example, defaults to REST).
-
Organization: Select a required organization for the API (for example, Acme Inc).
-
Backend URL: Select a back-end URL (Available only for OAS3 APIs with multiple backends).
-
Base path URL: Enter a resource path. Defaults to
http://basepath.org.- Do not use spaces or the URL encoded
%20in the base path URL.
- Do not use spaces or the URL encoded
-
Summary: Enter an optional summary for the API to display in the API Catalog.
-
Resource path: Enter a resource path for the API. Defaults to
/api. -
API version: Enter an optional version number for the API. Defaults to
1.0. -
Description: Click the Edit tab, and enter an optional description for the API.
-
-
Click Create to register the API.
Create REST API methods
To add a REST API method to a newly registered API, perform the following steps:
-
On the API Methods tab, complete the following:
- Method Name: Enter a required name for the API method (for example,
GetProducts), and enter an optional Method summary. - Verb: Enter a required HTTP verb for the API method. Defaults to
GET. - Path: Enter the path for the method. Defaults to
/. - Description: Click the Edit tab, and enter an optional description for the API.
- Method Name: Enter a required name for the API method (for example,
-
To add a parameter exposed by the API method, click the add button in the PARAMETERS section, and complete the following:
- NAME: Enter a required name for the parameter (for example,
customer_name). - DESCRIPTION: Enter an optional description for the parameter.
- TYPE: Select the parameter type (for example,
query,path,form,body, orheader). Defaults toquery.The Swagger specification only allows a method to have onebodyparameter. - DATA TYPE: Select the parameter data type (for example,
string,int,boolean, and so on). Defaults tostring. - REQUIRED: Select whether the parameter is required. Defaults to
No. - ALLOW MULTIPLE: Select whether multiple parameters are allowed. Defaults to
No.
- NAME: Enter a required name for the parameter (for example,
-
To specify content types that can be consumed by the API method, click the plus (+) button in the Consumes content-type section, and enter the content type. For example,
application/xml,text/plain, and so on. Defaults toapplication/json. -
To specify content types that can be produced by the API method, click the plus (+) button in the Produces content-type section, and enter the content type. For example,
application/xml,text/plain, and so on. Defaults toapplication/json. -
To specify response codes that can be produced by the API method, click the plus (+) button in the Response codes section, and select the response codes (for example,
Create codes (201, 403, 500)). -
Click Add to add the new API method.
Create the REST API data model
For JSON-based REST APIs only, you can enter the JSON schema model for the API data on the Models tab. This tab is not displayed for web service APIs.
This model is optional and describes the data that is passed to the API as the request payload or returned from the API as the response payload. The data model is then displayed for application developers in the API Catalog, in API Manager or in API Portal.
Tip
You can add/edit the data model for a manually created REST API, but this is read-only for an imported REST API. In this case, the data model is part of the imported definition, and cannot be changed. However, if you need to update the model (for example, to fix a bug in the schema), you can do so by cloning the API as described in the next section.Manage back-end API lifecycle
When you have registered the back-end API, you can select it from the list of registered APIs, click Manage selected, and choose one of the following options:
-
Delete: Deletes the selected API(s) registered in the API Registration > Backend API view. You can delete APIs created as front-end APIs in the Frontend API view.
-
Clone API: Creates a copy of the selected REST API, which you can then edit as required. You cannot clone a back-end API imported from a WSDL-based web service.
After an API is cloned, if you subsequently delete the original back-end API, the Download original API definition option is no longer enabled (for the clone) because the original API definition no longer exists.
-
Export API: Exports a copy of the selected back-end API (in
.jsonformat). You can then import this into another API Manager environment as a back-end API. -
Download original API definition: For APIs imported from Swagger or WADL definitions, downloads a copy of the original REST API definition.
Tip
The API Admin can configure all back-end APIs to be editable by default using the Allow users to modify Backend APIs option in API Manager settingsNext steps
When you have registered a back-end REST API, the next step is to virtualize it as a publicly exposed front-end API. For more details, see Virtualize REST APIs in API Manager.