Customize API Catalog
8 minute read
Customize API Catalog settings
You can customize the following in the API Catalog view of API Portal:
-
Display APIs in a list or tile view.
-
Show or hide the button that enables users to download API definitions. Defaults to shown.
-
Show or hide the button that enables users to download client SDKs. Defaults to hidden.
-
Hide tags from API Catalog.
-
Show only APIs associated with specified tags. For more details on tags, see Group APIs with tags.
-
Hide APIs associated with specified tags. For more details on tags, see Group APIs with tags.
-
Show only APIs associated with specified statuses.
-
Show or hide the button that enables users to try out an API. You can show the button for all users, for authenticated users only, hide it for APIs with specific tags, or hide it completely. The default is shown for all users. For more details on Try-it button visibility see Customize Try-it button visibility.
-
Set a payload size (in KB). If the response is bigger than the configured value, the response is downloaded as file. Defaults to blank, which means that downloads are disabled.
-
Swagger UI layout of REST APIs. You can choose from:
- Multi-column: A Two-column view, in which methods are listed on the left side, and the details of a selected method are listed on the right side. This is the default option in API Portal.
- Single-column: The official layout shipped with the Swagger UI.
-
Show or hide code examples in endpoint details when using Amplify rendering tool. Defaults to shown.
-
Show or hide
externalDocsalong with its description. -
Choose colors for the different methods.
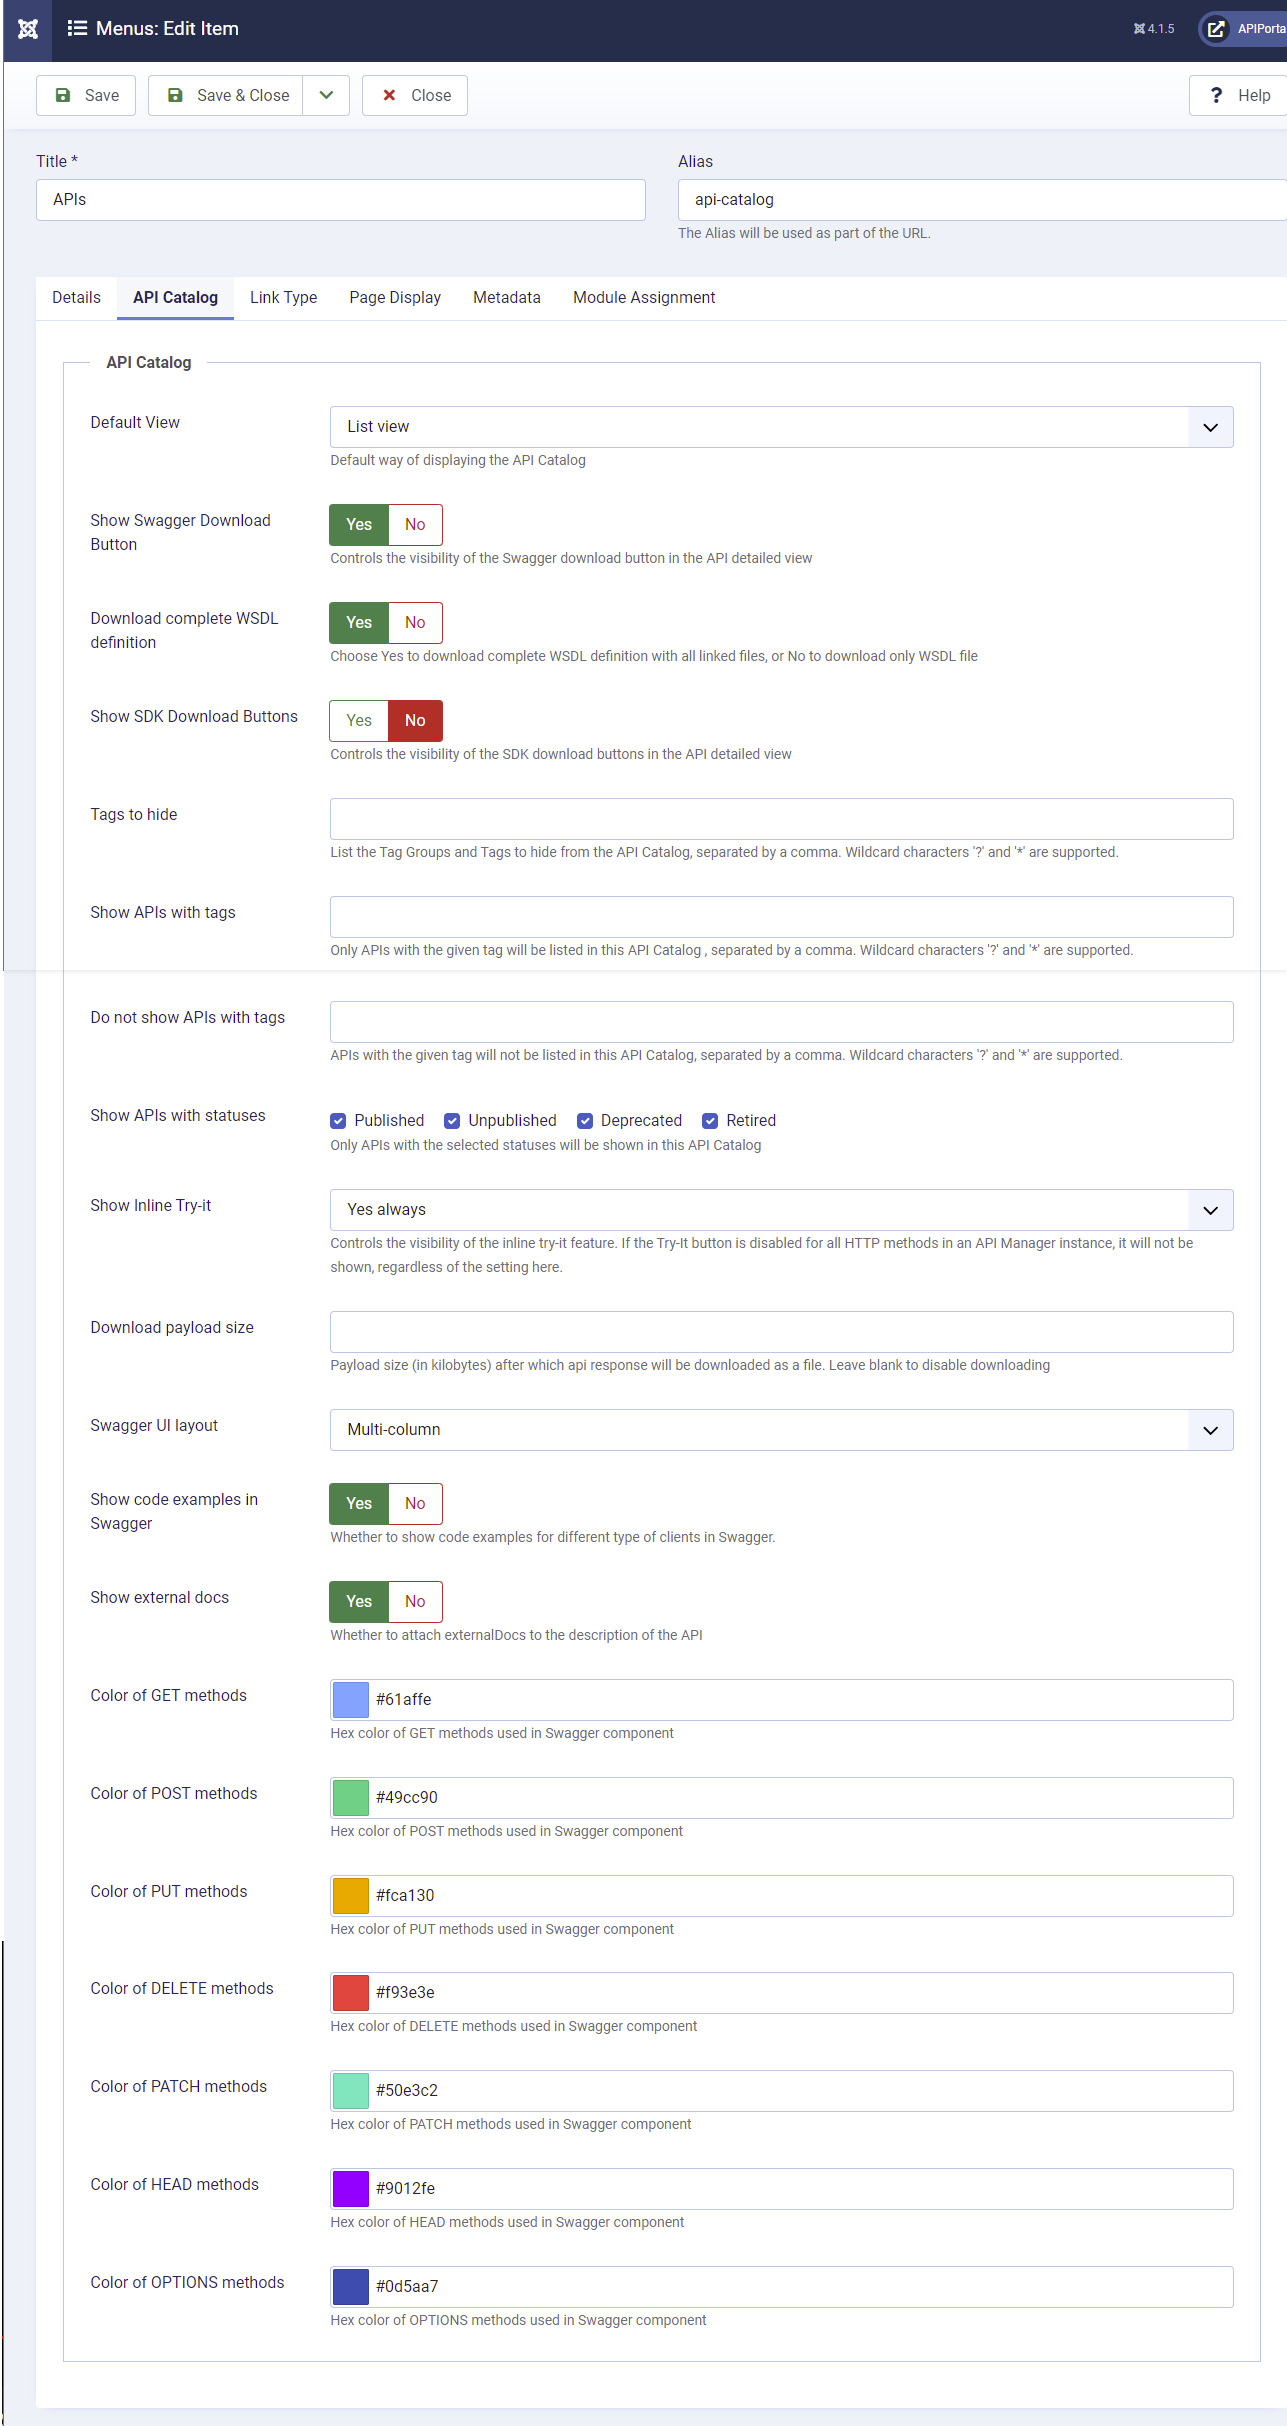
Change API Catalog settings in Purity III template
Follow these steps to change the API Catalog settings in Purity III template:
- Log in to the Joomla! Administrator Interface (JAI) (
https://<API Portal_host>/administrator). - Click Menus > Main Menu.
- Click APIs.
- Click the API Catalog tab.
- Change the settings as required, then click Save & Close.
Change API Catalog settings in T4 template
Use the Joomla module available from the T4 template to change the configuration for your API Catalog page.
- Log in to JAI (
https://<API Portal_host>/administrator). - Click Content > Site Modules.
- Click API Catalog List.
- Change the settings as required, then click Save & Close.
Change API details page settings in T4 template
The following are the three Joomla modules available for the API details page:
- API Portal Try It Meta Data: this module allows you to configure what information will be shown on the overview tab of the API Details page (description, status, host, tags, and so on). You can also restrict the access to API Details page for APIs by way of specific tags and statuses.
- API Portal Try It Swagger: this module allows you to configure settings for the methods tab of the API Details page (Swagger UI layout, whether to show Try-it button, colors of different API methods, and so on).
- API Portal Try It Application Subscriptions: this module allows you to configure settings for the applications tab of API Details page.
Follow these steps to change any of the settings:
- Log in to JAI (
https://<API Portal_host>/administrator). - Click Content > Site Modules.
- Select the module you want to change.
- Change the settings as required, then click Save & Close.
Customize source of API descriptions in Purity III
You can customize API Portal to show summaries, instead of descriptions, for APIs, to provide the App developer a quicker summary view of what the API is about instead of a long description. Using description can also have a performance impact, so it is best to use summary to improve the performance of the API Catalog view.
To change the settings:
- Log in to JAI (
https://<API Portal_host>/administrator). - Click Components > API Portal > Additional Settings.
- In the API Information Source field, select
DescriptionorSummary. - Click Save.
Customize source of API descriptions in T4 template
In the T4 template, to change the source of API descriptions, follow these steps:
- Log in to JAI (
https://<API Portal_host>/administrator). - Click Content > Site Modules.
- Click API Catalog List.
- Change the settings as required, then click Save & Close.
Customize page title and summary in Purity III
You can customize the API Catalog page title and summary text. For more information, see Additional customizations.
Customize page title and summary in T4 template
You can directly edit API Catalog page title and summary from T4 Page Builder. For more information, see Customizations with T4 Page Builder.
Group APIs with tags
You can add tags to APIs in API Manager and use them to split your API Catalog into smaller subsets. For example, you can create multiple themed API groups based on your developer communities.
For more details on adding tags to APIs, see the API Manager User Guide.
Create an API Catalog using Purity III
To create a dedicated API Catalog in Purity III for a subset of tagged APIs, follow these steps:
-
Log in to Joomla! Administrator Interface (JAI).
-
Click Menus > Main Menu > Add New Menu Item.
-
Enter a menu title for the new API Catalog.
-
In Menu Item Type, click Select > API Portal > API Catalog Page.
-
Set Access to the level you want, and ensure that Status is set to
Published. -
In Ordering, select where in the main menu the new API Catalog appears. The menu item is placed after the item you select in here.
- To access all your API Catalogs under the APIs menu item rather than additional menu items, set Parent Item to APIs.
-
On the API Catalog tab, in Show APIs with tags, enter the tags to include in this API Catalog.
-
On the API Catalog tab, in Do not show APIs with tags, enter the tags to exclude in this API Catalog.
-
On the Page Display tab, you can change the page title and summary text. For more details, see Customize page title and summary.
-
Click Save & Close.
Create an API Catalog using T4 template
To create a dedicated API Catalog in T4 template for a subset of tagged APIs, follow these steps:
- Log in to Joomla! Administrator Interface (JAI).
- Click Content > Site Modules.
- Select the following modules: API Catalog List, API Catalog Layout Switch, API Catalog Search Box, API Catalog Sorting, then click Duplicate from the Actions button.
- Open the duplicated API Catalog List module.
- In Show APIs with tags, enter the tags to include in this API Catalog.
- In Do not show APIs with tags, enter the tags to exclude in this API Catalog.
- Click Save & Close.
- Click Components > T4 Page Builder > All Pages and open API Catalog page.
- Enter title for the new API Catalog page and click on the Save as copy button.
- Click Edit from the Page Content tab. The page is opened in T4 Page Builder. In the structure of the page you will see four modules: API Catalog List, API Catalog Layout Switch, API Catalog Search Box, and API Catalog Sorting.
- Replace the modules from the previous page with the duplicated modules from step 3. To do so, click on each module and from the right -side toolbox that is shown, select the duplicated module from the Module drop-down.
- Click Save and Close.
- From Components > T4 Page Builder > All Pages click Add menu item button that is shown on the row of the newly created page from step 10.
- A dialog window is shown. Enter a Title for the new API Catalog.
- Select Main Menu from the Menu drop-down.
- For Template Style set T4 - Page Builder, or your copy of that template style if you have created one.
- Set Access to the level you wish, and ensure that Status is set to
Published. - In Ordering, select where in the main menu you want to display the new API Catalog. The menu item is placed after the item you select in here.
- Click Create New Menu.
Your themed API Catalog is now ready, and you can see it in your API Portal.
You can also choose to use some tags as an internal tool, and hide them from the API consumers. To hide tags, On the API Catalog tab, in Hide tags, enter the tags to hide.
Create tags with wildcards
You can add tags using the * and ? wildcards. This is helpful to list only development APIs in one API Catalog and production APIs in another. In this case you can filter them using wildcards as follows: *dev* will list APIs which contain dev somewhere in the tag, for example, financial_development and development tags. Or, to hide all tags which start with test and end with any other letter, for example, test or tests, you can do test?.
Customize the Try-it button visibility
You can customize the Try-it button for a specific API Catalog. For Purity III, follow these steps:
-
In JAI, click Menus > Main Menu > APIs.
-
Click the API Catalog tab.
-
Select one of the options from the Show Inline Try-it list to set the Try-it button visibility.
- Yes always - The Try-it button will always be displayed. This is the default option.
- Yes only for authenticated users - The Try-it button will be visible only for authenticated users.
- No for APIs with the following tags - The Try-it button will be hidden for APIs with specific tags. When this option is selected, a new field, Hide Inline Try-it for APIs with tags, is shown. In this field, you can choose for which tags the Try-it button will be hidden. You can enter multiple tags by separating them by coma. Wildcard symbols (
?and*) are allowed in this field. - Never - The Try-it button will always be hidden.
-
Click Save.
Note
If you are using T4 template, the option to change is located in the API Portal Try It Swagger module.Disable the Try-it button visibility
The Try-It button is enabled for all requests to an API by default. To enable or disable it on specific types of requests (GET, POST, PUT, and so on):
- In JAI, click Components > API Portal > API Manager.
- In Try-It Settings, enable or disable the Try-It button for each request type.
- Click Save.