Conversion filters
22 minute read
JSON to XML conversion filter
You can use the JSON to XML filter to convert a JavaScript Object Notation (JSON) document to an XML document.
For details on the mapping conventions used, go to https://github.com/beckchr/staxon/wiki/Mapping-Convention.
To configure the JSON to XML filter, specify the following fields:
Name: Enter a suitable name that reflects the role of the filter in the policy.
Virtual root element: If the incoming JSON document has multiple root elements, enter a virtual root element to be added to the output XML document. This is required because multiple root elements are not valid in XML. Otherwise, the XML parser fails.
Insert processing instructions into the output XML representing JSON array boundaries: Select this option to enable round-trip conversion back to JSON. This inserts the necessary processing instructions into the output XML. This option is not selected by default.
This option is recommended if you wish to convert back to the original JSON array structures. This information would be lost during the translation back to XML. For more details, see XML to JSON conversion filter.
Convert JSON object names to valid XML element names: Select this option to convert your JSON object names to XML element names. This option is not selected by default.
You should ensure that your JSON object names are also valid XML element names. If this is not possible, this option analyzes each object name and automatically performs the conversion. This has a performance overhead and is not recommended if you wish to convert back to the original JSON.
JSON to XML filter examples
This section shows examples of using JSON to XML filter options.
Multiple root elements
For example, the following incoming JSON message has multiple root elements:
{
  "firstName": "John",
  "lastName": "Smith",
  "age": 25,
  "address":
  {
    "streetAddress": "21 2nd Street",
    "city": "New York",
    "state": "NY",
    "postalCode": "10021"
  },
  "phoneNumber":
  [
    {
      "type": "home",
      "number": "212 555-1234"
    },
    {
      "type": "fax",
      "number": "646 555-4567"
    }
  ]
}
If you enter customer in the Virtual root element field, this results in the following output XML:
<?xml version="1.0" encoding="utf-8"?>
<customer>
    <firstName>John</firstName>
    <lastName>Smith</lastName>
    <age>25</age>
    <address>
    <streetAddress>21 2nd Street</streetAddress>
    <city>New York</city>
    <state>NY</state>
    <postalCode>10021</postalCode>
    </address>
    <phoneNumber>
    <type>home</type>
    <number>212 555-1234</number>
    </phoneNumber>
    <phoneNumber>
    <type>fax</type>
    <number>646 555-4567</number>
    </phoneNumber>
</customer>
Insert processing instructions into the output XML
For example, take the following incoming JSON message:
{
"customer" :
{
  "first-name" : "Jane",
  "last-name" : "Doe",
  "address" :
  {
    "street" : "123 A Street"
  },
  "phone-number" :
  [
    {
      "@type" : "work",
      "$" : "555-1111"
    },
    {
      "@type" : "cell",
      "$" : "555-2222"
    }
  ]
}
}
When the Insert processing instructions into the output XML representing JSON array boundaries option is selected, the output XML is as follows:
<?xml version="1.0" encoding="utf-8"?>
<customer>
    <first-name>Jane</first-name>
    <last-name>Doe</last-name>
    <address>
    <street>123 A Street</street>
    </address>
<?xml-multiple phone-number?>
    <phone-number type="work">555-1111</phone-number>
    <phone-number type="cell">555-2222</phone-number>
</customer>
JSON to XML filter exceptions
The JSON to XML filter aborts with a CircuitAbortException if:
- Content body of the payload is not in valid JSON format
- Convert JSON object names to valid XML element names option is selected, and there is a problem with the conversion process
XML to JSON conversion filter
You can use the XML to JSON filter to convert an XML document to a JavaScript Object Notation (JSON) document. For more information, see Mapping Convention.
To configure the XML to JSON filter, specify the following fields:
Name: Enter a suitable name to reflect the role of this filter in a policy.
Automatically insert JSON array boundaries: Select this option to attempt to automatically reconstruct JSON arrays from the incoming XML document. This option is selected by default.
Convert number/boolean/null elements to primitives: Select this option to convert number, boolean, or null elements in the incoming XML document to JSON primitive types. This option is selected by default.
When this option is selected, the filter converts an XML number element to a JSON primitive. Otherwise, an XML number element is converted to a JSON text node. For example:
Incoming XML:
<number>123.4</number>
JSON output with this option selected:
"number" :12.4
JSON output with this option not selected:
"number" :"12.4"
Similarly, XML boolean or null elements are converted to JSON primitives if this option is selected.
Convert namespace declarations: Select this option to convert namespace declarations in the incoming XML and add them to the resulting JSON. This option is not selected by default, and any namespace declarations are removed from the resulting JSON.
Use the following XPath to convert: Select an XPath expression to specify which elements of the incoming XML to convert. The options are:
- All elements inside SOAP body (SOAP 1.1 or SOAP 1.2)
- All elements inside SOAP body (SOAP 1.1)
- The entire message
Note
If the incoming XML document includes the<?xml multiple>
processing instruction, the JSON array is reconstructed regardless of this option setting. If the XML document does not contain <?xml multiple>, and this option is selected, the filter makes an attempt at guessing what should be part of the array by examining the element names.
XML to JSON filter exceptions
The XML to JSON filter aborts with a CircuitAbortException if the JSON parser has a problem parsing the stream converted from XML to JSON.
Add HTTP header filter
The API Gateway can add HTTP headers to a message as it passes through a policy. It can also set a Base64-encoded value for the header. For example, you can use the Add HTTP Header filter to add a message ID to an HTTP header. This message ID can then be forwarded to the destination web service, where messages can be indexed and tracked by their IDs. In this way, you can create a complete audit trail of the message from the time it is received by the API Gateway, until it is processed by the back-end system.
Each message being processed by the API Gateway is assigned a unique transaction ID, which is stored in the id message attribute. You can use the ${id} selector to represent the value of the unique message ID. At runtime, this selector is expanded to the value of the id message attribute.
To configure the Add HTTP Header filter, complete the following fields:
Name: Enter an appropriate name for the filter to display in a policy.
HTTP Header Name: Enter the name of the HTTP header to add to the message.
HTTP Header Value: Enter the value of the new HTTP header. You can also enter selectors to represent message attributes. At runtime, the API Gateway expands the selector to the current value of the corresponding message attribute. For example, the ${id} selector is replaced by the value of the current message ID. Message attribute selectors have the following syntax:
${message_attribute}
Override existing header: Select this setting to override the existing header value. This setting is selected by default.
Note
When overriding an existing header, the header can be an HTTP body-related header or a general HTTP header. To override an HTTP body-related header (for example,Content-Type), you must select the Override existing header
and Add header to body settings.
Base64 Encode: Select this setting to Base64 encode the HTTP header value. For example, you should use this if the header value is an X.509 certificate.
Add header to body: Select this option to add the HTTP header to the message body. Use this option for HTTP body entity headers, which provide metadata about the message body. For example, this includes headers such as the following:
Content-Language
Content-Length
Content-Location
Content-MD5
Content-Range
Content-Type
Expires
Last-Modified
Extension header
Add header to HTTP headers attribute: Select this option to add the HTTP header to the http.headers message attribute. Use this option for general HTTP headers, which apply to both request and response messages. For example, this includes headers such as SOAPAction:
Server:
Connection: close
X-CorrelationID: Id-9e38c653c24c0000000000009593813a 0
Host: localhost:8083
SOAPAction: "http://example.com/api/ConvertUnits"
User-Agent: Gateway
Content-Type: text/xml; charset="utf-8"
MyHeader: FOO
<?xml version="1.0" encoding="utf-8"?>
<soap:Envelope xmlns:soap="http://schemas.xmlsoap.org/soap/envelope/">
   <soap:Body>
      <ConvertUnits xmlns="http://example.com/api/">
         <EnterUnit>100</EnterUnit>
         <FromUnits>K</FromUnits>
         <ToUnits>M</ToUnits>
      </ConvertUnits>
    </soap:Body>
</soap:Envelope>
Remove HTTP header filter
The API Gateway can strip a named HTTP header from the message as it passes through a policy. This is especially useful in cases where end user credentials are passed to the API Gateway in an HTTP header. After processing the credentials, you can use the Remove HTTP Header filter to strip the header from the message to ensure that it is not forwarded on to the destination web service.
To configure the Remove HTTP Header filter, perform the following steps:
- Enter an appropriate name for this filter in the Name field.
- Specify the name of the HTTP header to remove in the HTTP Header Name field.
- Select Fail if header is not present to configure the API Gateway to abort the filter if the message does not contain the named HTTP header. Headers can be added to the message using the Add HTTP Header filter.
Add JSON node filter
You can use the JSON Add Node filter to add a node to a JavaScript Object Notation (JSON) document. The new node is inserted into the location specified by a JSON Path expression. JSON Path is a query language that enables you to select nodes in a JSON document.
For more details on JSON Path, see http://code.google.com/p/jsonpath.
You can configure the following settings:
Name: Enter a suitable name that reflects the role of this filter in the policy.
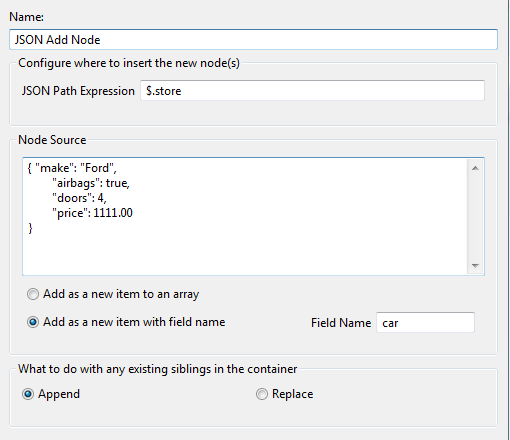
JSON Path Expression: Enter the JSON Path expression used to add the node to the JSON document (for example, $.store). Policy Studio warns you if you enter an unsupported JSON Path expression.
Note
If this expression returns more than one node, the first node is used. If the expression returns no nodes, the filter returns false.Node Source: In the Content area, enter the JSON node to be inserted into the message. For example, the following node source represents a new car:
{
  "make":"Ford",
  "airbags":true,
  "doors":4,
  "price":1111.00
}
Select one of the following options for the source of the new node:
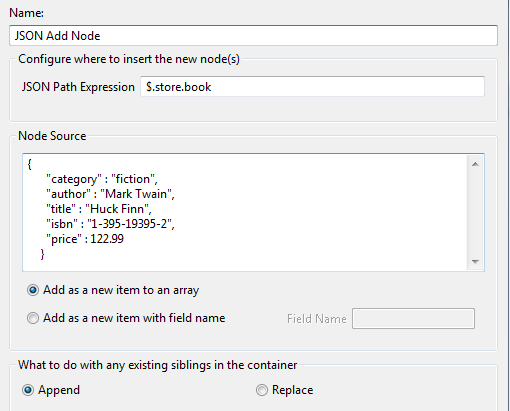
- Add as a new item to an array: If you select this option, the new JSON node is added as an item in an array.
- Add as a new item with field name: If you select this option, the new JSON node is added as a field specified in the Field Name field (for example,
car). - Insert previously removed nodes: You can configure a JSON Remove Node filter to remove JSON nodes from the message and store them in the
deleted.json.node.listmessage attribute. You can then use the JSON Add Node filter to reinsert these nodes in a different location in the message, effectively moving the deleted nodes in the message. When selecting this option, you must also select Save deleted nodes to be reinserted to new location in the Remove JSON Node filter, which runs before the Add JSON Node filter in the policy.
What to do with any existing siblings in the container: Select one of the following options to determine where the new node is placed relative to the nodes returned by the JSON Path expression:
- Append: The new node is appended as a child node of the node returned by the JSON Path expression. If there are already child nodes of the node returned by the JSON expression, the new node is added as the last child node.
- Replace: The node pointed to by the JSON expression is completely replaced by the new node.
Add JSON node examples
The following are some examples of using the JSON Add Node filter to add and replace JSON nodes.
Add a JSON node
The following example shows the settings required to add a car node to the store:
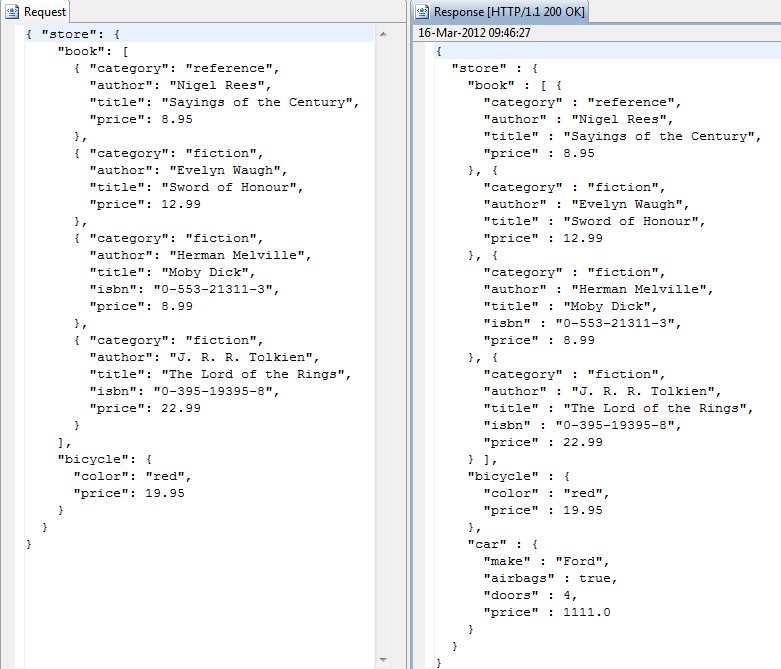
The following example shows the corresponding request and response message in Axway API Tester:
Add an item to an array
The following example shows the settings required to add a book to an array:
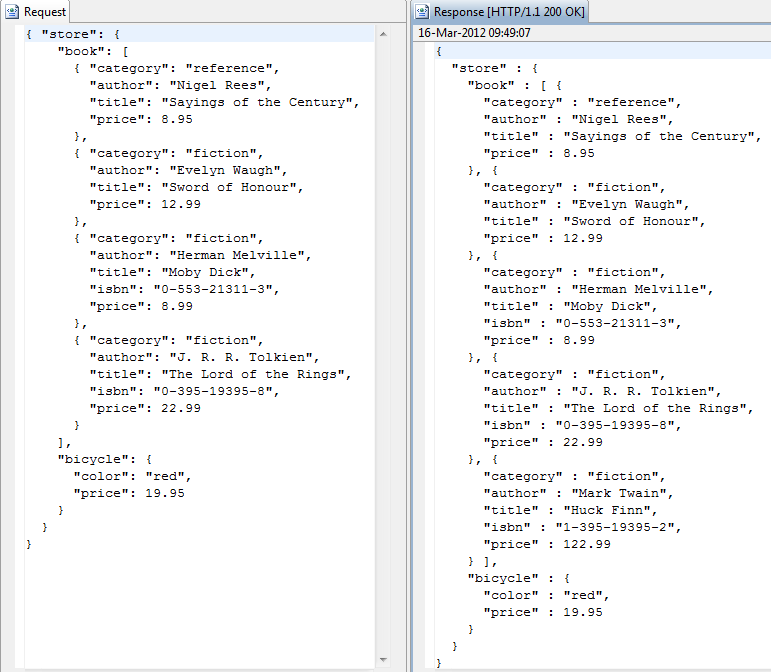
The following example shows the corresponding request and response message in API Tester:
Add a field replacing others
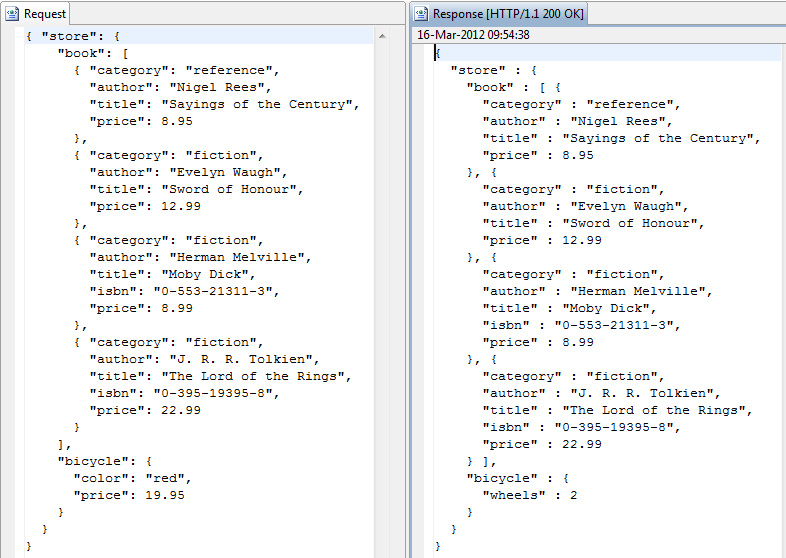
The following example shows the settings required to add a field to the bicycle, removing any other fields that may exist:
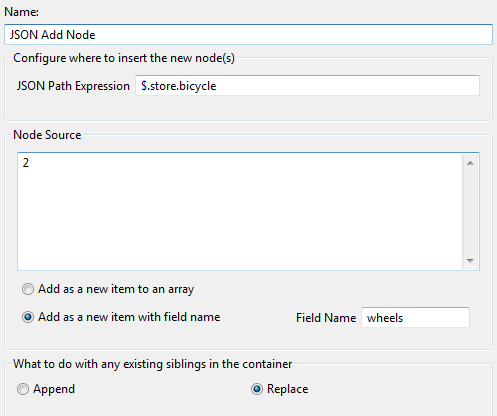
The following example shows the corresponding request and response message in API Tester:
Add JSON node filter exceptions
The JSON Add Node filter aborts with a CircuitAbortException if:
- Content body of the payload is not in valid JSON format
- New node to be added (content in Node Source) is not in valid JSON format
Remove JSON node filter
You can use the JSON Remove Node filter to remove a JSON node from a JSON message. You can specify the node to remove using a JSON Path expression. The JSON Path query language enables you to select nodes in a JSON document.
For more details on JSON Path, see http://code.google.com/p/jsonpath.
To configure this filter, specify the following fields:
Name: Enter a suitable name that reflects the role of the filter in the policy.
JSON Path Expression: Enter a JSON Path expression to specify the node to remove (for example, $.store.bicycle). Policy Studio warns you if you enter an unsupported JSON Path expression.
Note
If the specified expression returns more than one node, all returned nodes are removed.Fail if no nodes returned from JSON Path: When this option is selected, and the JSON Path expression returns no nodes, the filter returns false. If this option is not selected, and the JSON Path returns no nodes, the filter returns true, and no nodes are removed. This option is not selected by default.
Save deleted nodes to be reinserted to new location: Select this option if you want to move JSON nodes from one location in the message to another. The deleted nodes are stored in the deleted.json.node.list message attribute. You can then use the JSON Add Node filter to insert the deleted nodes into a different location in the message.
Remove JSON node examples
The following are some examples of using the JSON Remove Node filter.
Remove a node
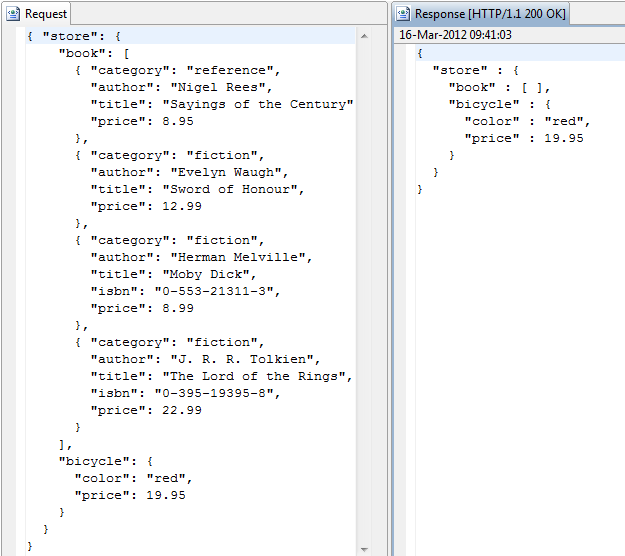
The following example shows removing a bicycle from the store:

The following example shows the corresponding request and response message in Axway API Tester:
Remove all items in an array
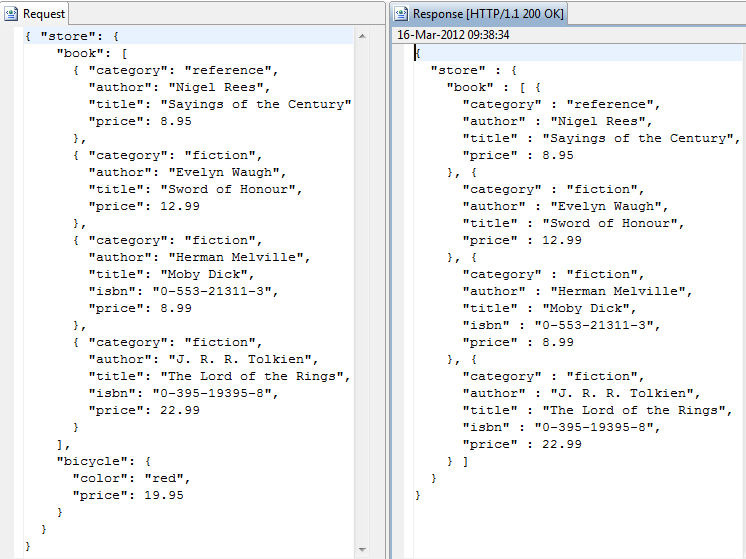
The following example shows removing all books in an array:

The following example shows the corresponding request and response message in API Tester:
Remove JSON node filter exceptions
The JSON Remove Node filter aborts with a CircuitAbortException if:the content body of the payload is not in valid JSON format.
Set message filter
The Set Message filter replaces the body of the message. The replacement data can be plain text, HTML, XML, or any other text-based markup.
You can also use the Set Message filter to customize SOAP faults that are returned to clients in the case of a failure or exception in the policy. For a detailed explanation of how to use this filter to customize SOAP faults, see SOAP fault handling.
Perform the following steps to configure the Set Message filter:
-
Enter a name for this filter to display in a policy in the Name field.
-
Specify the content type of the new message body in the Content-Type field. For example, if the new message body is HTML markup, enter
text/htmlin the Content-Type field. -
Enter the new message body in the Message Body text area.
You can use selectors to ensure that current message attribute values are inserted into the message body at the appropriate places.
Alternatively, click Populate on the right of the window, and select From file on disk to load the message contents from a file, or select From web service operation to load the message contents from a web service (WSDL file) that you have already imported into the web service repository.
You can also insert REST API parameters into the message body. Right-click within the message body at the point where the parameter should be inserted and select Insert > REST API Parameter.
Example of using selectors in the message body
You can use selectors representing the values of message attributes in the replacement text to insert message-specific data into the message body. For example, you can insert the authenticated user’s ID into a <Username> element by using a ${authentication.subject.id} selector as follows:
<?xml version="1.0" encoding="UTF-8"?>
<soap:Envelope xmlns:soap="http://schemas.xmlsoap.org/soap/envelope/">
    <soap:Header>
    <Username>${authentication.subject.id}</Username>
    </soap:Header>
    <soap:Body>
    <getQuote xmlns="axway.com">
        <ticker>ORM.L</ticker>
    </getQuote>
    </soap:Body>
</soap:Envelope>
Assuming the user authenticated successfully to the API Gateway, the message body is set as follows:
<?xml version="1.0" encoding="UTF-8"?>
<soap:Envelope xmlns:soap="http://schemas.xmlsoap.org/soap/envelope/">
    <soap:Header>
    <Username>axway</Username>
    </soap:Header>
    <soap:Body>
    <getQuote xmlns="axway.com">
        <ticker>ORM.L</ticker>
    </getQuote>
    </soap:Body>
</soap:Envelope>
Create REST request filter
The Create REST Request filter enables you to create HTTP requests to RESTful web services. You can also configure the query string parameters that are sent with the REST request. For example, for an HTTP GET request, the parameters are URL-encoded and appended to the request URI as follows:
GET /translate_a/t?client=t&sl=en&tl=ga&text=Hello
For an HTTP POST request, the parameters are URL-encoded and added to the request body as follows:
POST /webservices/tempconvert.asmx/CelsiusToFahrenheit
Host:ww.w3schools.com
Accept-charset:en
Celsius=200
This filter is found in the Conversion category in Policy Studio. For details on how to extract REST request attributes from a message, see Extract REST request attributes filter. For details on how to validate a REST request, see REST request validatioon filter.
Complete the following fields:
Name: Enter an appropriate name for the filter to display in a policy.
HTTP Method: Enter or select an HTTP method from the list (for example, POST, GET, DELETE, and so on).
REST Request Parameters: You can add query string parameters to the REST request. These are simple name-value pairs (for example, Name=Joe Bloggs). To add query string parameters, click the Add button, and enter the name-value pair in the Configure REST Request Parameters dialog. Repeat to add multiple parameters.
This filter generates the http.querystring and http.raw.querystring message attributes to store the query string. For example, you can then append contents of the http.raw.querystring message attribute to a Connect to URL or Rewrite URL filter using a message attribute selector (for example, ${http.raw.querystring}).
Add attributes stored in attribute lookup list to REST request: If you have populated the attribute.lookup.list message attribute using a previous filter in a policy, you can select this setting to include these message attributes in the serialized query string that is written to the request.
Insert MTOM attachment filter
Message Transmission Optimization Mechanism (MTOM) provides a way to send binary data to web services in standard SOAP messages. MTOM leverages the include mechanism defined by XML Optimized Packaging (XOP) whereby binary data can be sent as a MIME attachment (similar to SOAP with attachments) to a SOAP message. The binary data can then be referenced in the SOAP message using the <xop:Include> element.
The following MTOM message contains a binary image encapsulated in a MIME part:
Note
The MIME part that contains the binary image is referenced in the SOAP request body using the<xop:Include>
element. The href
attribute of this element refers to the Content-ID
HTTP header of the MIME part.
POST /services/uploadImages HTTP/1.1
Host: API Tester
Content-Type: Multipart/Related;boundary=MIME_boundary;
    type="application/xop+xml";
    start="<mymessage.xml@example.org>";
    start-info="text/xml"

--MIME_boundary
Content-Type: application/xop+xml;
    charset=UTF-8;
    type="text/xml"
Content-Transfer-Encoding: 8bit
Content-ID: <mymessage.xml@example.org>

<?xml version="1.0" encoding="UTF-8"?>
    <soap:Envelope xmlns:soap="http://schemas.xmlsoap.org/soap/envelope/">
        <soap:Body>
        <uploadGraphic xmlns="www.example.org">
            <image>
            <xop:Include xmlns:xop='http://www.w3.org/2004/08/xop/include' href='cid:http://example.org/myimage.gif' />
            </image>
        </uploadGraphic>
        </soap:Body>
    </soap:Envelope>

--MIME_boundary
Content-Type: image/gif
Content-Transfer-Encoding: binary
Content-ID: <http://example.org/myimage.gif>

// binary octets for image

--MIME_boundary
When the API Gateway receives this request, the Insert MTOM Attachment filter can be used to read the binary data in the MIME parts pointed to by the <xop:Include> elements embedded in the SOAP request. The binary data is then Base64-encoded and inserted into the message in place of the <xop:Include> elements. The resulting message is as follows:
<?xml version="1.0" encoding="UTF-8"?>
<soap:Envelope xmlns:soap="http://schemas.xmlsoap.org/soap/envelope/">
    <soap:Body>
    <uploadGraphic xmlns="www.example.org">
        <image>/aWKKapGGyQ=</image>
    </uploadGraphic>
    </soap:Body>
</soap:Envelope>
Complete the following fields for the Insert MTOM Attachment filter:
Name: Enter a name for the filter.
XPath Location: Use an XPath expression to point to the location of the <xop:Include> element that refers to the binary attachment. The specified XPath expression can point to multiple <xop:Include> elements if necessary. For example, an XPath expression of //xop:Include returns all <xop:Include> elements in the SOAP envelope.
Remove attachments once they have been included in the message: Select this option to remove the MIME parts that contain the actual binary content from the message after they have been inserted into the message.
Extract MTOM content filter
Message Transmission Optimization Mechanism (MTOM) provides a way to send binary data to web services within standard SOAP messages. MTOM leverages the include mechanism defined by XML Optimized Packaging (XOP) whereby binary data can be sent as a MIME attachment (similar to SOAP with attachments) to a SOAP message. The binary data can then be referenced in the SOAP message using the <xop:Include> element.
The following MTOM message contains a binary image that has been Base64-encoded so that it can be inserted as the contents of the <image> element:
<?xml version="1.0" encoding="UTF-8"?>
<soap:Envelope xmlns:soap="http://schemas.xmlsoap.org/soap/envelope/">
    <soap:Body>
    <uploadGraphic xmlns="www.example.org">
        <image>/aWKKapGGyQ=</image>
    </uploadGraphic>
    </soap:Body>
</soap:Envelope>
When the API Gateway receives this request, the Extract MTOM Content filter can be used to extract the Base64-encoded content from the <image> element, replace it with an <xop:Include> element, which contains a reference to a newly created MIME part that contains the binary content. The following request shows the resulting MTOM message:
POST /services/uploadImages HTTP/1.1
Host: API Tester
Content-Type: Multipart/Related;boundary=MIME_boundary;
    type="application/xop+xml";
    start="<mymessage.xml@example.org>";
    start-info="text/xml"

--MIME_boundary
Content-Type: application/xop+xml;
    charset=UTF-8;
    type="text/xml"
Content-Transfer-Encoding: 8bit
Content-ID: <mymessage.xml@example.org>

<?xml version="1.0" encoding="UTF-8"?>
    <soap:Envelope xmlns:soap="http://schemas.xmlsoap.org/soap/envelope/">
        <soap:Body>
        <uploadGraphic xmlns="www.example.org">
            <image>
            <xop:Include xmlns:xop='http://www.w3.org/2004/08/xop/include' href='cid:http://example.org/myimage.gif' />
            </image>
        </uploadGraphic>
        </soap:Body>
    </soap:Envelope>

--MIME_boundary
Content-Type: image/gif
Content-Transfer-Encoding: binary
Content-ID: <http://example.org/myimage.gif>

// binary octets for image

--MIME_boundary
Note
Note the following in the resulting MTOM message:
- The Base64-encoded contents of the
<image>element have been replaced by the<xop:Include>element. - The
<xop:Include>element points to a MIME part using thehrefattribute. - The value of the
hrefattribute corresponds to the value of theContent-IDHTTP header of the MIME part that contains the binary octets of the actual image file.
Complete the following fields for the Extract MTOM Content filter:
Name: Enter an appropriate name for the filter to display in a policy.
XPath Location: Use an XPath expression to locate the encoded data elements. For example, in the sample SOAP request message above, you would configure an XPath expression to point to the <image> element.
Transform with data map filter
Data maps enable you to define how to map XML and JSON messages to other XML and JSON message formats. You can use the Execute Data Map filter to execute a data map as part of a policy. This filter is available in the Conversion category in Policy Studio
Configure the following fields:
Name: Enter a name that reflects the role of this filter in the policy.
Data Map: Click the browse button to view the list of available data maps and select the required data map.
You can create data maps under the Resources > Data Maps node in the Policy Studio tree.
Default Encoding: Enter the default encoding for the data map. The default value is UTF-8.
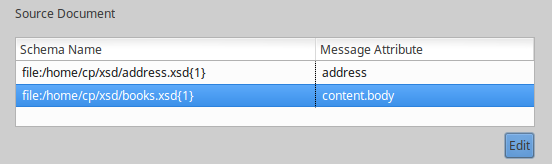
Source Document: This section is automatically populated with the input schemas when you select a data map. The ordering of the schemas in the filter matches the ordering in the data map.
You must specify the message attribute to map to the inputs of each schema. Click Edit to edit the message attributes.
- If you select a data map with a single input schema, the message attribute defaults to
content.body. - If you select a data map with multiple input schemas, you must specify the message attribute to map to the inputs of each schema. For example:
External Parameters: This section is automatically populated when you select a data map. Click Edit to edit the expression for each parameter. For more details on parameters, see the API Gateway Visual Mapper User Guide.
Example data map policy
For an example of how to use a data map in a policy, see Manage data maps.
Transform with XSLT filter
Extensible Stylesheet Language Transformations (XSLT) is a declarative, XML-based language used to transform XML documents into other XML documents. An XSL stylesheet is used to transform an XML document into another document type. The stylesheet defines how elements in the XML source document should appear in the resulting XML document.
The API Gateway can convert XML data to other data formats using XSL files. For example, an incoming XML message adhering to a specific XML schema can be converted to an XML message adhering to a different schema before it is sent to the destination web service. You can use the XSLT Transformation filter to convert the contents of a message using an XSLT stylesheet.
This type of conversion is especially valuable in the web services arena, where a web service might receive SOAP requests from various types of clients, such as browsers, applications, and mobile phones. Each client might send up a different type of SOAP request to the web service. Using stylesheets, the API Gateway can then convert each type of request to the same format. The requests can then be processed in the same fashion.
Note
The XSLT Transformation filter supports XSLT version 1.0 by default.Configure the following fields for the XSLT Transformation filter:
Name: Enter a suitable name to reflect the role of this filter in a policy.
Stylesheet location settings
On the Stylesheet Location tab, select an XSL stylesheet from the Stylesheet Location list, which is populated with the contents of the Stylesheets library.
To import a new stylesheet into the library, click the View/Import button, and click Add on the dialog that appears. Alternatively, you can add stylesheets under the Resources > Stylesheets node in the Policy Studio tree.
You can also modify existing stylesheets in the XSLT Contents text area of the dialog. Click the Update button to update them in the API Gateway configuration.
Stylesheet parameter settings
You can pass parameters to an XSL stylesheet using specified values in <xsl:param> elements. These values are then used in the templates defined throughout the stylesheet.
Using the XSLT Transformation filter, you can pass the values of message attributes to the configured stylesheet. For example, you can take the value of the authentication.subject.id message attribute, pass it to the configured XSL stylesheet, and then output this value to the result produced by the conversion.
To use this feature, select the Use Message Attributes as Stylesheet Parameters check box, and click Add to specify the message attribute to pass to the stylesheet.
The following example from an XSL stylesheet that uses parameters shows how to configure this:
<xsl:param name="authentication.subject.id"/>
<xsl:param name="authentication.issuer.id"/>
To pass the corresponding message attribute values to the stylesheet, you must add the authentication.subject.id and authentication.issuer.id message attributes to the Message Attributes to use table.
Note
The name of the specified parameter must be a valid API Gateway message attribute name, and there must be an equivalent parameter name in the stylesheet.Advanced XSLT settings
Complete the following fields on the Advanced tab:
Provider class name: Enter the fully qualified name of the XSLT provider class of the XSLT library to be used. This class must be added to the API Gateway’s classpath. If this field is left blank, the default provider is used.
To add a provider class to the API Gateway’s classpath, drop the required JAR file into the INSTALL_DIR/apigateway/ext/lib directory, where INSTALL_DIR refers to the root of your API Gateway installation.
Result will be XML: You can convert an incoming XML message to other data formats. Select this option if the result of the XSLT conversion is always XML. If not, the content-type of the result document depends on the output method of the XSLT stylesheet. For example, if the stylesheet specifies an output method of HTML (<xsl:output method="html">), this field should be left blank so that the API Gateway can forward on the HTML output document to the target web service.
Do not change the content type header: You can select whether to change the HTTP Content-Type header in this XSLT transformation. This setting is selected by default, so the content type is preserved.