API Gateway as an OAuth 2.0 client
17 minute read
OAuth is an open standard for authorization that enables client applications to access server resources on behalf of a specific resource owner. OAuth also enables resource owners (end users) to authorize limited third-party access to their server resources without sharing their credentials.
API Gateway can act as the client application in an OAuth 2.0 scenario, and as such API Gateway can instigate the authorization process handle redirects, and request OAuth tokens from an authorization server. Received tokens are stored securely and subsequently used to access protected resources on behalf of users. This provides the following benefits:
- The OAuth client burden is moved to API Gateway
- The resource owner’s credentials are never shared with the client application
- The access token is never shared with the resource owner’s user agent
Note
This document assumes that you are familiar with both the terms and concepts described in the OAuth 2.0 Authorization Framework and the OAuth server features of API Gateway.API Gateway OAuth client features
API Gateway provides the following features to support OAuth 2.0 client functionality:
-
Provider profiles for defining OAuth service providers and the applications registered with them.
-
A set of preconfigured sample provider profiles for use with Axway, Google, and Salesforce OAuth services.
-
Storage of received tokens.
-
Support for the following OAuth flows:
- Authorization code grant
- Resource owner password credentials
- Client credentials grant
- JWT
- SAML assertion
Note
The implicit grant type is not supported as it is designed to support client applications that do not have a secure server component, and as such it is not applicable for API Gateway acting as an OAuth client.
The following diagram shows the role of API Gateway as an OAuth 2.0 client application accessing OAuth services provided by Axway API Gateway, Google, and Salesforce:
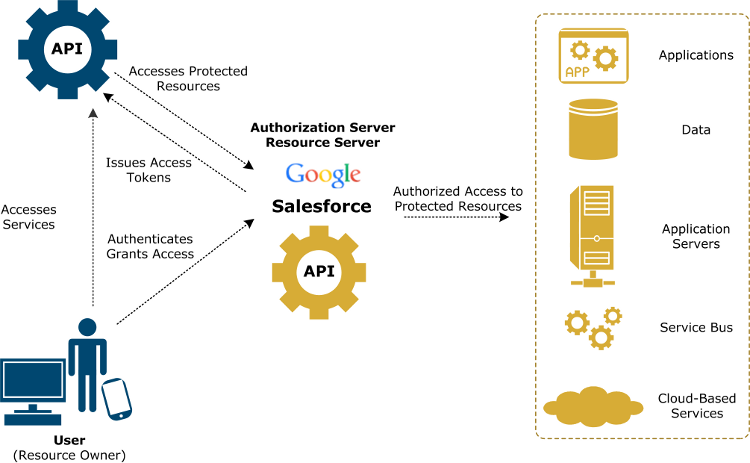
The OAuth client capability of API Gateway supports the following scenario:
- An internal application needs to invoke a back-end API X, for example offered by a cloud application. API X is protected by OAuth using the provider’s implementation.
- The internal application does not invoke API X directly.
- Instead API X is proxied by API Gateway as API Y, and exposed into the enterprise for internal applications to use. A policy implements API Y, including all the OAuth client capability to invoke API X.
- The internal application invokes API Y using an internal authentication mechanism (for example, HTTP basic). The policy authenticates the internal application and then invokes API X using OAuth.
You can test the OAuth client capabilities of API Gateway using a web-based OAuth client demo. For more information, see OAuth client demo.
Contact Axway Support for more information on integrating your application with Google or Salesforce APIs using API Gateway and OAuth 2.0.
OAuth 2.0 example client workflow
This example is similar to the OAuth server example workflow, but in this context API Gateway acts as a client, and the service provider is Google.
Assume that you, as a resource owner, are using a service that wants to access your Google calendar (a protected resource). The service is defined on API Gateway (API Gateway is an OAuth client). You do not want to reveal your Google credentials to API Gateway. This problem can be solved using the example OAuth 2.0 web server flow shown in the following diagram:
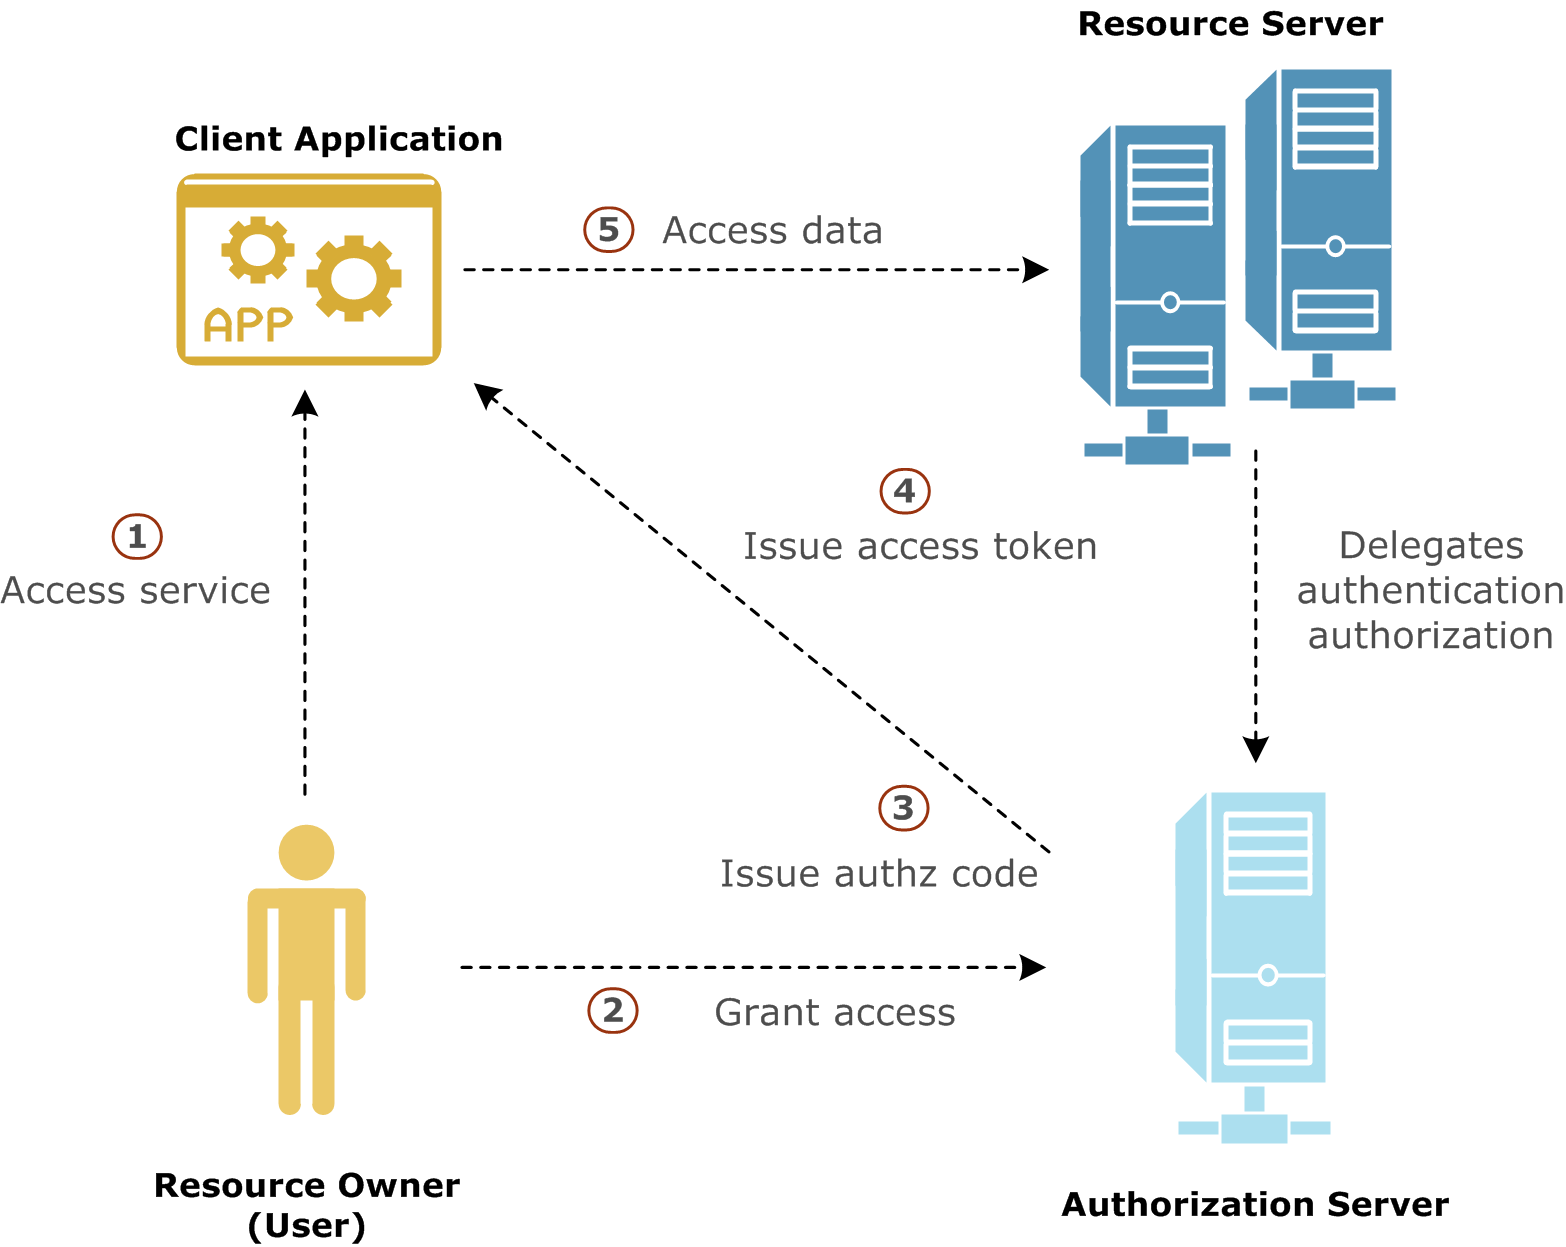
Out of band, API Gateway preregisters with Google and obtains a client ID and secret. API Gateway also registers a redirect URL to receive the authorization code from Google when you, as resource owner, authorize access to your Google calendar. The application has also requested access to an API named /google/calendar, which has an OAuth scope of calendar.
The credentials received from Google are added to the Google client credential profile using Policy Studio. The provider profile is also configured with the authorization endpoint and token endpoint of the Google authorization server. The redirect URL is also created as an HTTP listener on API Gateway, with a filter for receiving the authorization code. For more information, see Configure OAuth client application credentials.
The steps in the diagram are described as follows:
-
Using a browser or mobile phone, you access a service defined on API Gateway, which needs to access your Google calendar on your behalf. The client application initiates the authorization flow by redirecting your browser to the authorization endpoint defined in the Google OAuth provider profile.
-
After following the redirect, you log in to your Google account and authorize the application for the requested scope.
Note
You have not shared your Google user name and password with the API Gateway application. At this point, you, as the resource owner, are no longer involved in the process. -
The authorization server then redirects your browser to the callback URL on API Gateway, along with an authorization code.
-
The API Gateway client application gets the authorization code, and must exchange this short-lived code for an access token. The client application sends another request to the authorization server, this time to the token endpoint, saying it has a code that proves the user has authorized it to access their calendar, and now issues the access token to be sent on to the API (resource server). The authorization server verifies the authorization code and returns an access token.
-
The client application sends the access token to the API (resource server), and receives the calendar information as requested.
Client policies and filters
API Gateway provides a number of sample policies for when API Gateway is acting as an OAuth client. Sample policies are provided for the following OAuth providers.
- API Gateway
- SalesForce
For more details on the filters used in the sample policies, see OAuth client filters.
To view the paths exposed by the OAuth2 Client API Keys Demo listener, select Environment Configuration > Listeners > API Gateway > OAuth2 Client API Keys Demo > Paths in the Policy Studio tree. In the Resolvers window, click on the policy associated with a path to view the sample policy. Alternatively, to view all of the sample policies, select Policies > OAuth Client in the Policy Studio tree.
The following Google sample policies are exposed by the OAuth2 Client API Keys Demo listener on the following paths.
Google Authorize sample policy
Exposed on path: /client/google/authorize
This policy is used in the authorization code flow when API Gateway is acting as an OAuth client. It redirects the resource owner’s user agent to the Google authorization server, where they are asked to log in and grant access to the requested scope. It uses the Redirect resource owner to Authz Server filter.
Google Access Calendar Resource sample policy
Exposed on path: /client/google/calendar
This policy is used to access the protected resource (Google Calendar). It uses the the Retrieve OAuth Client Access Token from Token Storage filter to retrieve the access token received from Google from the API Gateway client access token store.
Google Authorize Callback sample policy
Exposed on path: /client/google/callback
This policy is used when Google returns the authorization code to the callback URL listener on API Gateway. It uses the Get OAuth Access Token filter to exchange the authorization code for an access token.
Configure OAuth client application credentials
OAuth 2.0 client credential profiles enable you to globally configure authentication settings for OAuth 2.0 as a client. An OAuth 2.0 credential profile is the combination of OAuth service provider details and a specific OAuth client application. An OAuth service provider defines the authorization and token endpoints. API Gateway includes the following preconfigured OAuth providers.
- API Gateway
- SalesForce
You can access the preconfigured OAuth providers and add client application credentials under the Environment Configuration > External Connections > Client Credentials > OAuth2 node in the Policy Studio tree. You can also add new OAuth providers.
You must register client applications with the OAuth service provider (for example, Google) to obtain a client ID and secret. You can also register additional details with the service provider where required, such as the OAuth flow type and the redirect URL. The redirect URL is the location where the OAuth provider sends the authorization code. This is implemented on API Gateway as an HTTP listener.
- Google applications can be registered at https://cloud.google.com/console
- SalesForce applications can be registered at https://www.salesforce.com
- API Gateway applications can be registered in the Client Application Registry (port 8089).
If you have installed API Manager, you can register API Gateway applications in API Manager (port 8075). For more information, see the Manage client applications in API Manager.
The API Gateway provider represents OAuth services running on an API Gateway. The API Gateway provider uses the existing OAuth server samples for authorization and token endpoints (for example, https://127.0.0.1:8089/api/oauth/authorize and https://127.0.0.1:8089/api/oauth/token). The Google and SalesForce provider settings ship with the current public endpoints.
Add application credentials
Each OAuth 2.0 provider can have multiple client application credentials. Each set of credentials represents an application that has been registered with the provider. Upon registering, the application is assigned a client ID and secret and can designate a redirect URL for receiving access codes.
To add an application for an existing OAuth 2.0 provider, click an OAuth 2.0 client credential node (for example, Google), and click the Add button on the OAuth2 Credentials tab of the OAuth2 Credential Profile window. Complete the following fields on the Add OAuth2 Application dialog:
Name: Enter a suitable name for this client application.
Client ID: This identifies the client responsible for the OAuth request. This ID is assigned by the OAuth provider.
Client Secret: This is a confidential secret key used for authentication. This secret is assigned by the OAuth provider.
OAuth Flow Type: Select an OAuth flow type. The options are:
- Authz Code
- Client Credentials
- JWT
- Resource Owner
- SAML
For more details on the authentication flows that API Gateway supports, see OAuth 2.0 authentication flows.
Redirect URL:
Enter the URL of the client’s redirect endpoint (for example, https://localhost:8088/oauth_callback). This is the URL registered with the provider for receiving access codes via a redirect from the authorization server. This must match a listener configured on API Gateway (see Create a callback URL listener).
To configure client scopes, SAML bearer settings, JWT settings, or other advanced settings, click the appropriate tabs.
Configure scopes
You can configure the scopes that a client application can access on the Scopes tab. Click Add to add a scope. This is the set of scopes required by the application, and this list must match, or be a subset of, the required scopes registered with the OAuth provider. For more information on scopes, see Manage OAuth scopes.
Configure SAML bearer
You can configure SAML bearers on the SAML Bearer tab. According to the IETF draft document SAML 2.0 Profile for OAuth 2.0, a SAML assertion can be used to request an access token when a client wishes to utilize an existing trust relationship, expressed through the semantics of the SAML assertion, without a direct user approval step at the authorization server. When a client application is configured to use the SAML grant type, a SAML assertion must be either configured/generated or made available on the message board.
To generate an assertion select the Generate assertion using following configuration option and complete the following fields:
Use private key to sign SAML assertion: Click Signing Key to select a private key to use to sign the assertion. This will be the private key certificate registered with the OAuth provider.
Resource Owner ID:
Enter the identity of the resource owner as expected by the resource server. This can be specified using a selector (for example, ${authentication.subject.id}).
Assertion expires in: Enter the time duration that the assertion is valid for. Expressed in days, hours, minutes, and seconds.
Drift time (secs): Enter a drift time in seconds to allow for clock skew.
Alternatively, you can generate the assertion through other means and take it from the message board by selecting the option Get assertion from message attribute named
and entering the name of the attribute (for example, ${oauth.saml.assertion}).
Note
The IETF draft document also describes how to use SAML 2.0 for client authentication. This is not supported in API Gateway.The API Gateway uses a SAML template to generate the SAML assertion. The template file is stored under the Resources/Stylesheets directory in Policy Studio when the client demo is deployed. Alternatively, you can find this file in INSTALL_DIR/apigateway/samples/oauth/templates/samltemplate.xml and import it via Policy Studio. At runtime the values in the template are substituted with values configured for the OAuth client SAML application.
Configure JWT
You can configure JWT on the JWT tab. This enables you to configure JWT for authorization grant, as defined by the IETF draft document JSON Web Token (JWT) Profile for OAuth 2.0 Client Authentication and Authorization Grants.
Note
API Gateway only supports the use of JWT as authorization grant and does not support JWT for client authentication.Configure the following fields:
Sign using private key: Select this option and click Signing Key to select a private key certificate that has been registered with the OAuth provider, and use it to sign the JWT claim.
Sign using client secret: Select this option to sign the JWT claim using a client secret issued by the OAuth provider.
JWT expiry (in secs): Enter the expiry time for the JWT claim, in seconds.
Add additional JWT claims: Click the Add button to add additional JWT claims. You can also Edit or Delete existing claims.
By default a JWT is generated with the following claim set:
| Claim | Default value |
|---|---|
iss |
The application client ID. |
aud |
The token endpoint of the provider. |
exp |
The expiry time from the field JWT expiry (in secs). |
iat |
The issued assertion time, the time the assertion was issued measured in seconds since 00:00:00 UTC, January 1, 1970. |
These claims can be overridden or extended by adding additional claims. It is also possible to add claims like scope to define scopes, and prn (for SalesForce), or sub (as defined in the IETF draft document) to identify the resource owner for whom a token is being requested. Service defined claims must also be added here. Unrecognized claims should be ignored by service providers.
| Claim | Default value |
|---|---|
sub |
The subject ID of the resource owner. This identifies the resource owner for whom the request is being made. The property prn can also be used here for some providers (for example, SalesForce), but the use of this property has been superseded by sub in the IETF specification. |
scope |
A space delimited list of scopes within the claim, defining the required permissions of the request. |
Note
Scopes must be added to a claim on this tab if they are required by the provider to be present in a claim. The scopes defined on the Scopes tab are added to the query string of the token request, but for flexibility they are not automatically added to the claim. The reason for this is because JWT authorization grants are non-normative and claim sets must be agreed in advance with individual OAuth providers. For example, SalesForce does not allow the addition of scopes to a JWT claim, whereas Google requires a scope claim. Automatically adding scopes from the Scopes tab to a claim could preclude a JWT grant flow where scopes must be present in the request but not the claim.Configure advanced settings
You can use the following options to specify where to add the client credentials in token requests (the authorization header or the query string). This option applies to all standard grant types excluding JWT and SAML.
In Authorization Header: Select this option to add the client credentials to the authorization header.
In Query String: Select this option to add the client credentials to the query string.
Use the following options to specify where to find resource owner credentials, for the resource owner grant type.
Resource Owner ID: Enter the resource owner ID. This can be specified as a selector.
Resource Owner Password: Enter the resource owner password. This can be specified as a selector.
Finally, in the Properties table you can add additional properties to pass with authorization or token requests. These properties can be used to set up provider-specific options, for example, Google authorization requests require the parameter access_type=offline to issue a refresh token.
After you have configured your OAuth 2.0 client credentials globally, you can select the client credential profile to use for authentication on the Authentication tab of your filter (for example, in the Connection and Connect To URL filters) in the policy calling the resource server. The selected client credential links back to the access token store holding the access token received from the OAuth2 server. When you invoke the policy, the filter sets the bearer token in the authorization header.
Add OAuth provider
To configure a new OAuth 2.0 provider, right-click OAuth2, and select Add OAuth2 Client Credential. Complete the following fields on the OAuth2 Provider Configuration dialog.
Profile Name:
Enter a suitable name for this OAuth provider configuration (for example, Google or Microsoft).
Authorization Endpoint:
Enter the URL of the OAuth provider’s authorization endpoint (for example, https://accounts.google.com/o/oauth2/auth). This is a public URL where a resource owner is directed to authorize a client application. This is used in the authorization code flow.
Token Endpoint:
Enter the URL of the OAuth provider’s token endpoint (for example, https://accounts.google.com/o/oauth2/token). This is a public URL where a client application can request a token.
Token Store: Click the browse button to choose an access token store. This is where received tokens are persisted.
You can configure OAuth access token stores globally under the Environment Configuration > Libraries node in the Policy Studio tree. These can then be selected in the Access Token Store field.
Store OAuth State in this Cache: Click the browse button to choose a cache. This is where the state of an authorization request is stored. This is used in the authorization code flow to maintain state when the user is directed to the authorization server for authorization.
To change the configuration of an existing OAuth 2.0 provider, click the OAuth client credential node, and edit the settings on the OAuth2 Provider Settings tab of the OAuth2 Credential Profile window.
Create a callback URL listener
The callback URL that is registered with an OAuth provider is implemented very simply by creating a matching relative path in an HTTP listener. The policy for this path needs only to add a Redirect resource owner to Authz Server filter. The filter must be configured with a reference to the relevant provider profile for this callback URL.
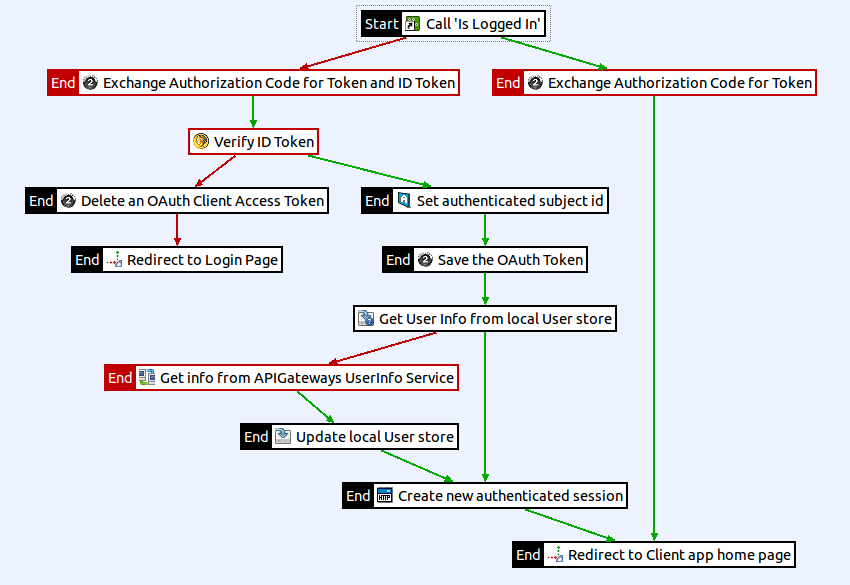
Callback sample
In the client demo configuration the callback policy first checks if the current session is for an authenticated user. If it is an anonymous session the policy exchanges the code for an access token and attempts to verify an ID token if one is received. If the ID token is valid it sets the authentication.subject.id to the sub identifier and saves the token. Using the sub the policy then checks the local user store for additional user information (in this case the local user store is a cache set up to simulate an actual user store). If an entry cannot be found for the user, a request is made to the provider’s UserInfo endpoint using the access token. A successful request updates the local user store with the returned user data. Finally, a new authenticated session is created for the user and they are returned to the client application home page where they are now signed in. (In a real world example, a user might be presented with a form to alter or embellish the retrieved data before it is persisted).
Manage client access tokens
You can configure client access token stores under the Environment Configuration > Libraries > OAuth2 Stores node in the Policy Studio tree. API Gateway can store client access tokens in its cache, in an embedded database, or in a relational database. For more information on the persistent storage options, see Manage access tokens and authorization codes.
To store client access tokens in a relational database, create the supporting schema using the oauth-client.sql SQL scripts that you can find in the following directory:
INSTALL_DIR/apigateway/system/conf/sql/
OAuth client access tokens are purged on expiry. After a successful token request the OAuth client access token (and potentially a refresh token) are stored in persistent storage. OAuth authorization servers usually return an expiry with the access token, otherwise the default expiry of 3600 seconds is used. An expiry is not usually returned with a refresh token, but a default expiry of 30 days is used. You can alter these expiry settings in the Client Token Cleanup Settings section of the client access token store.
Note
For client access token stores backed by a database, you can configure the Purge expired tokens field to perform a purge (for example, run a query to remove tokens) at a specified interval.Set Bearer token in authorization header
You can configure a OAuth credential profile to set a Bearer token in the authorization header on API Gateway when calling a resource server. This example uses a call policy with Connect to URL filter to call the resource server.
-
In the Policy Studio tree, click External Connections > Client Credentials > OAuth2.
-
On the OAuth Credentials tab, double-click the credential profile you want to edit.
-
If you do not already have a token to access the API, add a Get Oauth Token filter to get a token.
-
Call the Resource server:
- Select the filter Connect to URL.
- Select the Authentication tab.
- Select a Credential profile.
-
Select the Client Credential. This links back to the access token store which holds the Access token you received from the OAuth2 server.
-
Invoke this filter to call the Resource Server. The Bearer token in the authorization header is set.