Authorization filters
21 minute read
Insert SAML authorization assertion filter
After successfully authorizing a client, the API Gateway can insert a Security Assertion Markup Language (SAML) authorization assertion into the SOAP message. Assuming all other security filters in the policy are successful, the assertion is eventually consumed by a downstream web service.
The following example of a signed SAML authorization assertion might be useful when configuring this filter.
<?xml version="1.0" encoding="UTF-8"?>
<soap:Envelope xmlns:soap="http://.../soap/envelope/">
<soap:Header xmlns:wsse="http://.../secext">
  <wsse:Security>
    <saml:Assertion
      xmlns:saml="urn:oasis:names:tc:SAML:1.0:assertion"
      AssertionID="axway-1056130475340"
      Id="axway-1056130475340"
      IssueInstant="2003-06-20T17:34:35Z"
      Issuer="CN=Sample User,...........,C=IE"
      MajorVersion="1"
      MinorVersion="0">
        <saml:Conditions
          NotBefore="2003-06-20T16:20:10Z"
          NotOnOrAfter="2003-06-20T18:20:10Z"/>
          <saml:AuthorizationDecisionStatement
            Decision="Permit"
            Resource="http://www.axway.com/service">
            <saml:Subject>
              <saml:NameIdentifier
                Format="urn:oasis:names:tc:SAML:1.0:assertion#X509SubjectName">
                  sample
              </saml:NameIdentifier>
            </saml:Subject>
          </saml:AuthorizationDecisionStatement>
          <dsig:Signature xmlns:dsig="http://.../xmldsig#" id="Sample User">
            <!-- XML SIGNATURE INSIDE ASSERTION -->
          </dsig:Signature>
    </saml:Assertion>
  </wsse:Security>
</soap:Header>
<soap:Body>
  <ns1:getTime xmlns:ns1="urn:timeservice">
  </ns1:getTime>
</soap:Body>
</soap:Envelope>
Configure assertion details settings
Configure the following fields on the Assertion Details tab:
Issuer Name:
Select the certificate containing the Distinguished Name (DName) to use as the Issuer of the SAML assertion. This DName is included in the SAML assertion as the value of the Issuer
attribute of the <saml:Assertion>
element. For an example, see the sample SAML assertion above.
Expire In: Specify the lifetime of the assertion in this field. The lifetime of the assertion lasts from the time of insertion until the specified amount of time has elapsed.
Drift Time: The drift time is used to account for differences in the clock times of the machine hosting the API Gateway (that generate the assertion) and the machines that consume the assertion. The specified time is subtracted from the time at which the API Gateway generates the assertion.
SAML Version: You can create SAML 1.0, 1.1, and 2.0 attribute assertions. Select the appropriate version from the list.
Note
SAML 1.0 recommends the use of the http://www.w3.org/TR/2001/REC-xml-c14n-20010315
XML Signature Canonicalization algorithm. When inserting signed SAML 1.0 assertions into XML documents, it is quite likely that subsequent signature verification of these assertions will fail. This is due to the side effect of the algorithm including inherited namespaces into canonical XML calculations of the inserted SAML assertion that were not present when the assertion was generated.
For this reason, Axway recommend that SAML 1.1 or 2.0 is used when signing assertions as they both use the exclusive canonical algorithm http://www.w3.org/2001/10/xml-exc-c14n#, which safeguards inserted assertions from such changes of context in the XML document. See section 5.4.2 of the oasis-sstc-saml-core-1.0.pdf
and section 5.4.2 of sstc-saml-core-1.1.pdf
documents, both of which are available at http://www.oasis-open.org.
Resource:
Enter the resource for which to obtain the authorization assertion. You should specify the resource as a URI (for example, http://www.axway.com/TestService). The name of the resource is then included in the assertion.
Action:
You can specify the operations that the user can perform on the resource using the Action
field. This entry is a comma-separated list of permissions. For example, the following is a valid entry: read,write,execute.
Configure assertion location settings
The options on the Assertion Location tab specify where the SAML assertion is inserted in the message. By default, the SAML assertion is added to the WS-Security block with the current SOAP actor/role. The following options are available:
Append to Root or SOAP Header: Appends the SAML assertion to the message root for a non-SOAP XML message, or to the SOAP Header for a SOAP message. For example, this option may be suitable for cases where this filter may process SOAP XML messages or non-SOAP XML messages.
Add to WS-Security Block with SOAP Actor/Role: Adds the SAML assertion to the WS-Security block with the specified SOAP actor (SOAP 1.0) or role (SOAP 1.1). By default, the assertion is added with the current SOAP actor/role only, which means the WS-Security block with no actor. You can select a specific SOAP actor/role when available from the list.
XPath Location:
To insert the SAML assertion at an arbitrary location in the message, you can use an XPath expression to specify the exact location in the message. You can select XPath expressions from the list. The default is the First WSSE Security Element, which has an XPath expression of //wsse:Security. You can add, edit, or remove expressions by clicking the relevant button.
You can also specify how exactly the SAML assertion is inserted using the following options:
- Append to node returned by XPath expression (the default)
- Insert before node returned by XPath expression
- Replace node returned by XPath expression
Insert into Message Attribute:
Specify a message attribute to store the SAML assertion from the drop-down list (for example, saml.assertion). Alternatively, you can also enter a custom message attribute in this field (for example, my.test.assertion). The SAML assertion can then be accessed downstream in the policy.
Configure subject confirmation method settings
The settings on the Subject Confirmation Method
tab determine how the <SubjectConfirmation>
block of the SAML assertion is generated. When the assertion is consumed by a downstream Web service, the information contained in the <SubjectConfirmation>
block can be used to authenticate either the end-user that authenticated to the API Gateway, or the issuer of the assertion, depending on what is configured.
The following is a typical <SubjectConfirmation>
block:
<saml:SubjectConfirmation>
  <saml:ConfirmationMethod>
    urn:oasis:names:tc:SAML:1.0:cm:holder-of-key
  </saml:ConfirmationMethod>
  <dsig:KeyInfo xmlns:dsig="http://www.w3.org/2000/09/xmldsig#">
    <dsig:X509Data>
      <dsig:X509SubjectName>CN=axway</dsig:X509SubjectName>
      <dsig:X509Certificate>
        MIICmzCCAY ...... mB9CJEw4Q=
      </dsig:X509Certificate>
    </dsig:X509Data>
  </dsig:KeyInfo>
</saml:SubjectConfirmation>
The following configuration fields are available on the Subject Confirmation Method tab:
Method:
The selected value determines the value of the <ConfirmationMethod>
element. The following table shows the available methods, their meanings, and their respective values in the <ConfirmationMethod>
element:
- Holder Of Key: The API Gateway includes the key used to prove that the API Gateway is the holder of the key, or it includes a reference to the key. Value:
urn:oasis:names:tc:SAML:1.0:cm:holder-of-key - Bearer: The subject of the assertion is the bearer of the assertion. Value:
urn:oasis:names:tc:SAML:1.0:cm:bearer - SAML Artifact: The subject of the assertion is the user that presented a SAML Artifact to the API Gateway. Value:
urn:oasis:names:tc:SAML:1.0:cm:artifact - Sender Vouches: Use this confirmation method to assert that the API Gateway is acting on behalf of the authenticated end user. No other information relating to the context of the assertion is sent. It is recommended that both the assertion and the SOAP Body must be signed if this option is selected. These message parts can be signed by using the XML Signature Generation filter. Value:
urn:oasis:names:tc:SAML:1.0:cm:bearer
You can also leave the Method
field blank, in which case no <ConfirmationMethod>
block is inserted into the assertion.
Holder-of-Key Configuration:
When you select Holder of Key
as the SAML subject confirmation in the Method
field, you must configure how information about the key is included in the message. There are a number of configuration options available depending on whether the key is a symmetric or asymmetric key.
To use an asymmetric key as proof that the API Gateway is the holder-of-key entity, you must select the Asymmetric Key radio button and then configure the following fields on the Asymmetric tab:
- Certificate from Store: To select a key that is stored in the Certificate Store, select this option and click the Signing Key button. On the Select Certificate window, select the check box next to the certificate that is associated with the key to use.
- Certificate from Selector Expression: Alternatively, the key may have already been used by a previous filter in the policy (for example, to sign a part of the message). In this case, the key can be retrieved using the selector expression entered in this field. Using a selector enables settings to be evaluated and expanded at runtime based on metadata (for example, in a message attribute, Key Property Store, or environment variable).
To use a symmetric key as proof that the API Gateway is the holder of key, select the Symmetric Key radio button, and configure the fields on the Symmetric tab:
-
Generate Symmetric Key, and Save in Message Attribute: If you select this option, the API Gateway generates a symmetric key, which is included in the message before it is sent to the client. By default, the key is saved in the
symmetric.keymessage attribute. -
Symmetric Key Selector Expression: If a previous filter (for example, an XML Signature Generation filter) has already used a symmetric key, you can reuse this key as proof that the API Gateway is the holder-of-key entity. Enter the name of the selector expression (for example, message attribute) in the field provided, which defaults to
${symmetric.key}. Using a selector enables settings to be evaluated and expanded at runtime based on metadata (for example, in a message attribute, Key Property Store, or environment variable). -
Encrypt using Certificate from Certificate Store: When a symmetric key is used, you must assume that the recipient has no prior knowledge of this key. It must, therefore, be included in the message so that the recipient can validate the key. To avoid meet-in-the-middle style attacks, where a hacker could eavesdrop on the communication channel between the API Gateway and the recipient and gain access to the symmetric key, the key must be encrypted so that only the recipient can decrypt the key.
One way of doing this is to select the recipient’s certificate from the Certificate Store. By encrypting the symmetric key with the public in the recipient’s certificate, the key can only be decrypted by the recipient’s private key, to which only the recipient has access. Select the Signing Key button, and select the recipient’s certificate on the Select Certificate dialog.
-
Encrypt using Certificate from Selector Expression: Alternatively, if the recipient’s certificate has already been used (perhaps to encrypt part of the message), the certificate can be retrieved using the selector expression entered in this field. Using a selector enables settings to be evaluated and expanded at runtime based on metadata (for example, in a message attribute, Key Property Store, or environment variable).
-
Symmetric Key Length: Enter the length (in bits) of the symmetric key to use.
-
Key Wrap Algorithm: Select the algorithm to use to encrypt (wrap) the symmetric key.
The Key Info tab must be configured regardless of whether you have elected to use symmetric or asymmetric keys. It determines how the key is included in the message. The following options are available:
-
Do Not Include Key Info: Select this option if you do not wish to include a
<KeyInfo>section in the SAML assertion. -
Embed Public Key Information: If this option is selected, details about the key are included in a
<KeyInfo>block in the message. You can include the full certificate, expand the public key, include the distinguished name, and include a key name in the<KeyInfo>block by selecting the appropriate check boxes. When selecting the Include Key Name field, you must enter a name in the Value field, and then select the Text Value or Distinguished Name Attribute radio button, depending on the source of the key name. -
Put Certificate in Attachment: Select this option to add the certificate as an attachment to the message. The certificate is then referenced from the
<KeyInfo>block. -
Security Token Reference: The Security Token Reference (STR) provides a way to refer to a key contained within a SOAP message from another part of the message. It is often used in cases where different security blocks in a message use the same key material and it is considered an overhead to include the key more than once in the message.
When this option is selected, a
<wsse:SecurityTokenReference>element is inserted into the<KeyInfo>block. It references the key material using aURIto point to the key material and aValueTypeattribute to indicate the type of reference used. For example, if the STR refers to an encrypted key, you should selectEncryptedKeyfrom the list, whereas if it refers to aBinarySecurityToken, you should selectX509v3from the list. Other options are available to enable more specific security requirements.
Configure SAML assertion advanced settings
The settings on the Advanced tab include the following fields.
Select Required Layout Type:
WS-Policy and SOAP Message Security define a set of rules that determine the layout of security elements that appear in the WS-Security header within a SOAP message. The SAML assertion is inserted into the WS-Security header according to the layout option selected here. The available options correspond to the WS-Policy Layout assertions ofStrict, Lax, LaxTimestampFirst, and LaxTimestampLast.
Insert SAML Attribute Statement:
You can insert a SAML attribute statement into the generated SAML authentication assertion. If you select this option, a SAML attribute assertion is generated using attributes stored in the attribute.lookup.list
message attribute and subsequently inserted into the assertion. The attribute.lookup.list
attribute must have been populated previously by an attribute lookup filter for the attribute statement to be generated successfully.
Indent: Select this method to ensure that the generated signature is properly indented.
Security Token Reference:
The generated SAML authentication assertion can be encapsulated within a <SecurityTokenReference>
block. The following example demonstrates this:
<soap:Header>
  <wsse:Security
    xmlns:wsse="http://schemas.xmlsoap.org/ws/2002/12/secext"
    soap:actor="axway">
      <wsse:SecurityTokenReference>
      <wsse:Embedded>
      <saml:Assertion
        xmlns:saml="urn:oasis:names:tc:SAML:1.0:assertion"
        AssertionID="axway-1056130475340"
        Id="axway-1056130475340"
        IssueInstant="2003-06-20T17:34:35Z"
        Issuer="CN=Sample User,...........,C=IE"
        MajorVersion="1"
        MinorVersion="0">
          <saml:Conditions
            NotBefore="2003-06-20T16:20:10Z"
            NotOnOrAfter="2003-06-20T18:20:10Z"/>
          <saml:AuthorizationDecisionStatement
              Decision="Permit"
              Resource="http://www.axway.com/service">
              <saml:Subject>
                  <saml:NameIdentifier
                    Format="urn:oasis:names:tc:SAML:1.0:assertion#X509SubjectName">
                    sample
                  </saml:NameIdentifier>
              </saml:Subject>
          </saml:AuthorizationDecisionStatement>
          <dsig:Signature xmlns:dsig="http://.../xmldsig#" id="Sample User">
                <!-- XML SIGNATURE INSIDE ASSERTION -->
          </dsig:Signature>
      </saml:Assertion>
      </wsse:Embedded>
    </wsse:SecurityTokenReference>
  </wsse:Security>
</soap:Header>
To add the SAML assertion to a <SecurityTokenReference>
block as in the example above, select the Embed SAML assertion within Security Token Reference
option. Otherwise, select No Security Token Reference.
XACML PEP authorization filter
The eXtensible Access Control Markup Language (XACML) Policy Enforcement Point (PEP) filter enables you to configure the API Gateway to act as a PEP. The API Gateway intercepts a user request to a resource, and enforces the decision from the Policy Decision Point (PDP). The API Gateway queries the PDP to see if the user has access to the resource, and depending on the PDP response, allows the filter to pass or fail. Possible PDP responses include Permit, Deny, NotApplicable, and Indeterminate.

Workflow
In more detail, when the XACML PEP filter is configured in the API Gateway, the workflow is as follows:
- The client sends a request for the resource to the XACML PEP filter.
- The PEP filter stores the original client request, and generates the XACML request.
- The PEP filter delegates message-level security to the polices configured on the XACML tab.
- The PEP filter routes the XACML request to the PDP using details configured on the Routing tab.
- The PDP decides if access should be granted, and sends the XACML response back to the API Gateway.
- The PEP filter validates the response from the PDP.
- By default, if the response is
Permit, the PEP filter passes, and the original client request for the resource is authorized, and the policy flow continues on the success path.
For more details on XACML, see the XACML specification.
Example XACML request
The following example XACML request is used to illustrate the XACML request configuration settings explained in this topic:
<Request xmlns="urn:oasis:names:tc:xacml:2.0:context:schema:os"
  xmlns:xsi="http://www.w3.org/2001/XMLSchema-instance">
    <Subject>
      <Attribute AttributeId="urn:oasis:names:tc:xacml:1.0:subject:subject-id"
        DataType="http://www.w3.org/2001/XMLSchema#string">
        <AttributeValue>admin</AttributeValue>
      </Attribute>
      <Attribute AttributeId=”department"
        DataType="http://www.w3.org/2001/XMLSchema#string">
        <AttributeValue>sysadmin</AttributeValue>
      </Attribute>
    </Subject>
    <Resource>
      <Attribute AttributeId="urn:oasis:names:tc:xacml:1.0:resource:resource-id"
        DataType="http://www.w3.org/2001/XMLSchema#string">
        <AttributeValue>http://localhost:8280/services/echo/echoString</AttributeValue>
      </Attribute>
    </Resource>
    <Action>
      <Attribute AttributeId="urn:oasis:names:tc:xacml:1.0:action:action-id"
        DataType="http://www.w3.org/2001/XMLSchema#string">
        <AttributeValue>read</AttributeValue>
      </Attribute>
    </Action>
    <Environment/>
</Request>
Configure XACML settings
The XACML tab specifies configuration settings for the generated XACML request. Configure the following fields on this tab:
XACML Version:
Select the XACML version from the list. Defaults to XACML2_0.
Create XACML Request Assertion with the following attributes: Click the Add button on the following tabs to add attributes to the XACML request:
- Subject: Represents the entity making the access request (wants access to the resource). The
Subjectelement can contain multipleAttributeelements used to identify theSubject. EachAttributeelement has two attributes:AttributeIdandDataType. You can define your ownAttributeIdor use those provided by the XACML specification. For more details on adding attributes, see the next subsection. - Resource: Defines the data, service, or system component that the
Subjectwants to access. TheResourceelement contains one or more attributes of the resource to which subjects request access. There can be only oneResourceelement per XACML request. A specificResourceis identified by theAttributechild element. In the Example XACML request, theSubjectwants to access the followingResource:
http://localhost:8280/services/echo/echoString
- Action: Contains one or more attributes of the action that subjects wish to perform on the resource. There can be only one
Actionelement per XACML request. A specificActionis identified by theAttributechild element. In the Example XACML request, theSubjectwants read access the followingResource:
http://localhost:8280/services/echo/echoString
- Environment: A more complex request context may contain some attributes not associated with the
Subject,Resource, orAction. These are placed in an optionalEnvironmentelement after theActionelement.
When you click the Add button on each tab, the XACML dialog is displayed to enable you to add attributes. Complete the following fields on this dialog:
Attribute ID:
Enter a custom AttributeId
or select one provided by the XACML specification from the list. For example, the XACML special identifiers defined for the Subject
include the following:
urn:oasis:names:tc:xacml:1.0:subject:
authn-locality:dns-name
urn:oasis:names:tc:xacml:1.0:subject:
authn-locality:ip-address
urn:oasis:names:tc:xacml:1.0:subject:
authentication-method
urn:oasis:names:tc:xacml:1.0:subject:
authentication-time
urn:oasis:names:tc:xacml:1.0:subject:
key-info
urn:oasis:names:tc:xacml:1.0:subject:
request-time
urn:oasis:names:tc:xacml:1.0:subject:
session-start-time
urn:oasis:names:tc:xacml:1.0:subject:
subject-id
...
In the Example XACML request, the first attribute under the Subject
element uses the urn:oasis:names:tc:xacml:1.0:subject:subject-id
identifier. The next is a custom department
attribute. This can be any custom attribute for example, mail, givenName, or accessList), which is identified by the XACML policy defined where this request is evaluated.
Value(s): Click the Add button to add an attribute value. Enter the value in the Add dialog, and click OK. You can add multiple values for a single attribute.
Type:
Select the type of data that the AttributeValue
element should contain from the list. For example, the set of data types defined in XACML includes the following:
http://www.w3.org/2001/XMLSchema#string
http://www.w3.org/2001/XMLSchema#boolean
http://www.w3.org/2001/XMLSchema#integer
http://www.w3.org/2001/XMLSchema#double
http://www.w3.org/2001/XMLSchema#time
http://www.w3.org/2001/XMLSchema#date
http://www.w3.org/2001/XMLSchema#dateTime
http://www.w3.org/TR/2002/WD-xqueryoperators-
20020816#dayTimeDuration
http://www.w3.org/TR/2002/WD-xqueryoperators-
20020816#yearMonthDuration
http://www.w3.org/2001/XMLSchema#anyURI
http://www.w3.org/2001/XMLSchema#hexBinary
...
In the Example XACML request, the Attributes are of type http://www.w3.org/2001/XMLSchema#string.
Issuer: Specify an optional issuer for the attribute. For example, this may be a Distinguished Name, or some other identifier agreed with the issuer.
AuthzDecisionQuery settings
This section enables you to configure settings for the Authorization Decision Query, which is sent in the XACML request to the PDP. Complete the following fields in this group:
Decision based on external XACML attributes: If this is selected, the authorization decision must be made based only on the information contained in the XACML Authz Decision Query, and external XACML attributes must not be used. If this is unselected, the authorization decision can be made based on XACML attributes not contained in the XACML Authz Decision Query. This is unselected by default, which is equivalent to the following setting in the XACML Authz Decision Query:
<InputContextOnly value="false">
Return Context:
If this is selected, the PDP must include an xacmlcontext:Request
instance in the XACMLAuthzDecision
statement in the XACMLAuthzDecision
response. The xacmlcontext:Request
instance must include all attributes supplied by the PEP in the xacml-samlp:XACMLAuthzDecisionQuery
used to make the authorization decision. If this is unselected, the PDP must not include an xacmlcontext:Request
instance in the XACMLAuthzDecision
statement in the XACMLAuthzDecision
response. This is unselected by default, which is equivalent to the following setting in the XACML request:
<ReturnContext value="false">
Combine Policies:
If this is selected, the PDP must insert all policies passed in the xacmlsamlp:XACMLAuthzDecisionQuery
into the set of policies or policy sets that define the PDP. If this is unselected, there must be no more than one xacml:Policy
or xacml:PolicySet
passed in the xacml-samlp:XACMLAuthzDecisionQuery
. This is selected by default, which is equivalent to the following setting in the XACML request:
<CombinePolicies value="true">
XACML Message Security
This section enables you to delegate message-level security to the configured custom security polices. Complete the following fields in this group:
- XACML Request Security: Click the browse button, select a policy in the XACML request security policy dialog, and click OK.
- XACML Response Security: Click the browse button, select a policy in the XACML response security policy dialog, and click OK.
XACML Response
Select the Required response decision
from the PDP that is required for this XACML PEP
filter to pass. Defaults to Permit. Possible values are as follows:
PermitDenyIndeterminateNotApplicable
Configure routing settings
The Routing tab enables you to specify configuration settings for routing the XACML request to the PDP. You can specify a direct connection to the PDP using a URL. Alternatively, if the routing behavior is more complex, you can delegate to a custom routing policy, which takes care of the added complexity.
Use the following URL:
To route XACML requests to a URL, select this option, and enter the URL. You can also specify the URL as a selector so that the URL is built dynamically at runtime from the specified message attributes. For example, ${host}:${port}, or ${http.destination.protocol}://${http.destination.host}:${http.destination.port}.
You can configure SSL settings, credential profiles for authentication, and other settings for the direct connection using the tabs in the Connection Details group. For more details, see Connect to URL.
Delegate routing to the following policy: To use a dedicated routing policy to send XACML requests to the PDP, select this option. Click the browse button next to the Routing Policy field. Select the policy to use to route XACML requests, and click OK.
Configure advanced XACML settings
Configure the following settings on the Advanced tab:
SOAP Settings
The available SOAP settings are as follows:
SOAP version required: Specifies the SOAP version required when creating the XACML request message. The available options are as follows:
SOAP1_1SOAP1_2NONE
Defaults to SOAP1_1.
SOAP Operation:
Specifies the SOAP operation name used in the XACML request message. Defaults to XACMLAuthzDecisionQuery.
Prefix:
Specifies the prefix name used in the XACML request message. Defaults to xacml-samlp.
Namespace:
Specifies the namespace used in the XACML request message. Defaults to urn:oasis:xacml:2.0:saml:protocol:schema:os.
SOAP Action:
You can specify an optional SOAPAction
field used in the XACML request header to indicate the intent of the request message.
Advanced Settings
The available advanced settings are as follows:
Store and restore original message: Specifies whether to store the original client request before generating the XACML request, and then to restore the original client request after access is granted. This option is selected by default.
Split subject attributes into individual elements:
Specifies whether to split Subject
attributes into individual elements in the XACML request. This option is not selected by default.
Split resource attributes into individual elements:
Specifies whether to split Resource
attributes into individual elements in the XACML request. This option is not selected by default.
LDAP attribute authorization filter
The LDAP RBAC
filter combines Lightweight Directory Access Protocol (LDAP) with Role-Based Access Control (RBAC). This filter enables you to authorize a backend service based on user roles stored using LDAP. You can use the LDAP RBAC
filter to read an attribute from LDAP, and compare it against some known values (for example, if role
contains engineering, authorize the user). This filter combines functionality available in the Retrieve from Directory Server
and Compare Attribute filters.
The LDAP RBAC filter enables you to define LDAP connection and search settings, and to configure how specified message attributes are processed. This filter also enables you to configure optional settings such as results caching and actions to take if a returned attribute is multivalued.
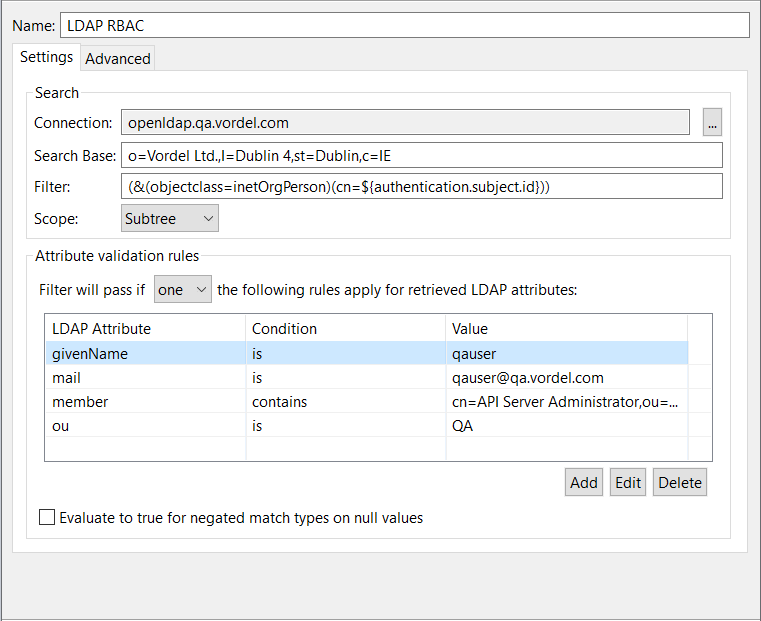
Configure LDAP RBAC general settings
Configure the following fields on the Settings tab:
Connection:
Click the button on the right to select your preconfigured LDAP directory server (for example, openldap.qa.axway.com). For details on how to configure LDAP servers, see
Configure LDAP directories.
Search Base:
Enter the Distinguished Name (DN) to use as the base from which the search starts (for example, o=Axway,l=Dublin 4,st=Dublin,C=IE).
Filter: Enter the search filter to use. For example:
(&(objectclass=inetOrgPerson)(cn=${authentication.subject.id}))
Scope: Select one of the following search scopes from the list.
- Object: Searches on the base DN only (compare)
- One Level: Searches the direct children of the base DN
- Subtree: Searches the base DN and all its descendants
Defaults to Subtree.
Attribute validation rules:
When the search completes, the attributes returned in the results are processed by the rules in the Attribute validation rules
table. This processing is the same as the Compare Attribute
filter. You can logically AND
and OR
rules together in the Filter will pass if
list by selecting all
or one.
For example, if Filter will pass if is set to all, and Rule A, Rule B, and Rule C all evaluate to true, the filter passes. However, if Rule A evaluates to false, the filter fails. If the Filter will pass is set to one, and Rule A and Rule B evaluate to false, but Rule C evaluates to true, the filter passes. However, if Rule C evaluates to false, the filter fails.
Select all or one of the specified conditions to apply. Click the Add button at the bottom right to specify a rule condition. In the Attribute filter rule dialog, perform the following steps:
-
Enter a message attribute name in the LDAP attribute named field (for example,
memberormail). -
Select one of the following rule conditions from the list:
containsdoesn't containdoesn't match regular expressionends withisis notmatches regular expressionstarts with
-
Enter a value to compare with in the text box on the right (for example,
POST). Alternatively, you can enter a selector that is expanded at runtime (for example,${http.request.uri}). -
Click OK.
Evaluate to true: When checked the negated rule conditions (doesn't contain, doesn't match regular expression and is not) evaluate to true if either the LDAP attribute value is null or the value to compare resolves to null for selector values. Negated rule conditions evaluate to false by default.
The following figure shows some example search settings and attribute validation rules:
Tip
When using this filter to determine if a user is a member of a groupOfNames, all the member attributes are concatenated together. The string containing the member attributes can be compared using a regular expression value provided in Attribute validation rules.
Because each attribute is not checked individually, you must create the regular expression string appropriately. For example, an expression such as (?i:^.*${cert.subject.id}.*$)
allows for extra characters before and after the string searched for.
Configure LDAP RBAC advanced settings
You can configure the following optional settings on the Advanced tab:
Cache settings: Select whether to cache the LDAP search results. This setting is selected by default.
Store results in the cache: Click the button on the right to select the preconfigured cache in which to store results. For more details on caches, see Configure caching. Select one of the following settings:
- Use the LDAP search filter as cache key: Uses the LDAP search filter configured on the Settings tab as the cache key.
- Or use the following value as the cache key: Enter a specific value for the cache key.
If returned attribute contains multiple values: Select one of the following settings:
- Concatenate values with the following: Enter the character used to concatenate multiple attribute values. A comma is used by default.
- Use value at index: Enter the index number of the attribute value to use. Defaults to
0.