Edit the YAML configuration
6 minute read
You can use the file explorer from your operating system to navigate the user friendly directory structure of a YAML configuration, and you can use any standard text editor to view and edit the individual YAML files.
Ideally, a standard IDE can be used to create a project and edit the files of a YAML configuration. The externalized files for scripts, JSON, and so on allow you to edit these files in an editor that is syntax-aware.
Edit a YAML configuration with ES Explorer
ES Explorer can be used with some limitations to view, navigate, and edit a YAML configuration. To connect to a YAML configuration, enter a URL of the form yaml:file:/root/dir/of/yaml.
Add a new certificate and private key to a YAML configuration
This section covers the steps required to add a new certificate and private key to an existing YAML configuration.
-
You must have a certificate in a
PEMfile and its related private key in a separatePEMfile. For example,Axway-cert.pemandAxway-key.pem. The private key cannot be encrypted with OpenSSL, as it is not supported. -
For testing purposes, you can generate an unencrypted private key and a self-signed certificate PEM files using OpenSSL as follows:
> openssl req -nodes -new -x509 -keyout Axway-key.pem -out Axway-cert.pem Generating a RSA private key ................+++++ ...............................................................................+++++ writing new private key to 'Axway-key.pem' ----- You are about to be asked to enter information that will be incorporated into your certificate request. What you are about to enter is what is called a Distinguished Name or a DN. There are quite a few fields but you can leave some blank For some fields there will be a default value, If you enter '.', the field will be left blank. ----- Country Name (2 letter code) [AU]:IE State or Province Name (full name) [Some-State]:Dublin Locality Name (eg, city) []: Organization Name (eg, company) [Internet Widgits Pty Ltd]:Axway Organizational Unit Name (eg, section) []: Common Name (e.g. server FQDN or YOUR name) []:Axway Email Address []:axway@axway.com -
Copy the
Axway-cert.pemandAxway-key.pemfiles into the/Environment Configuration/Certificate Storedirectory in your YAML entity store. -
Create the
/Environment Configuration/Certificate Store/Axway.yamlfile in your YAML entity store:--- type: Certificate fields: dname: Axway key: '{{file "Axway-key.pem" "pem"}}' content: '{{file "Axway-cert.pem" "pem"}}'The
pemoption in{{file}}placeholder is mandatory when using aPEMfile containing header and footer. -
Edit another entity that requires a certificate and private key, for example, an
XML Signature filter(see thesigningCertfield in the following example). It now points to the new certificate and private key via its YamlPK/Environment Configuration/Certificate Store/Axway.--- type: FilterCircuit fields: name: cert start: ./XML Signature Generation children: - type: GenerateSignatureFilter fields: signingCertAttribute: "" keyWrapAlgorithm: http://www.w3.org/2001/04/xmlenc#rsa-oaep-mgf1p symmetricKeyEncryptionCertAttribute: "" name: XML Signature Generation signingCert: /Environment Configuration/Certificate Store/Axway # <-- certificate ref symmetricKeyAttribute: "" wsuIdElementSpecification: - /System/Element Specifiers/http://schemas.xmlsoap.org/soap/envelope/,Body,1 - /System/Element Specifiers/http://www.w3.org/2003/05/soap-envelope,Body,1 attachmentTransform: "" routing: success: ../XML Signature Verification logging: fatal: 'Error during message signing. Error: ${circuit.exception}' failure: Failed to sign message success: Signed message successfully children: - type: KeyInfoFormat fields: keyNameValue: CN publicKeyInfoMask: 15 keyNameType: 2 certAttachmentId: ""
If the YAML configuration you are adding the certificate and private key into is encrypted with a passphrase, you will need to encrypt the private key file. To encrypt the private key file Axway-key.pem, execute all the previous steps and also perform the following:
cd apigateway/posix/bin
./yamles encrypt --file ~/yaml/Environment\ Configuration/Certificate\ Store/Axway-key.pem --source /home/user/yaml --passphrase changeme
The file `/home/user/yaml/Environment Configuration/Certificate Store/Axway-key.pem` has been encrypted
-
yamles encryptwith--fileoption only supports encryption ofPEMfile containing header and footer. -
The YAML configuration referenced in the
--sourceparameter of theencryptcommand must be the destination YAML configuration to ensure it is encrypted correctly. -
After you complete editing the YAML configuration, create a
.tar.gzfile and deploy it to your running API Gateway. Your API Gateway group must use the same encryption passphrase.
Note
Encrypting a private key viaopenssl and adding it to the YAML configuration is not supported.
Manually create an entity instance YAML file
To create an entity instance of NetService type, perform the following:
-
Search for the
NetService.yamlfile within theMETA-INF/typesdirectory.To know what fields can be used, move up to the ancestor types:
NetService.yamlis contained withinJavaProcessdirectory. Check the fields within YAML entity type fileJavaProcess.yaml.JavaProcess.yamlis contained withinProcessdirectory. Check the fields within YAML entity type fileProcess.yaml.- Continue until you reach the root directory
Entity.
-
Search for components.
Use the same approach you have used to search for fields.
NetServicehas two components:LoadableModuleandClassLoader. Search forLoadableModule.yamlandClassLoader.yamlYAML files within theMETA-INF/typesdirectory. -
Execute all the previous steps again to get all required and optional fields for each entity type.
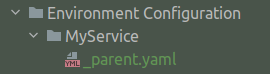
Create a container entity
If the entity instance you have created is a container entity:
- Create a new directory with the same name of the new entity instance.
- Create a YAML file named
_parent.yaml. - Add the YAML file to the newly created directory.
Example:
---
type: NetService
fields:
  name: MyService
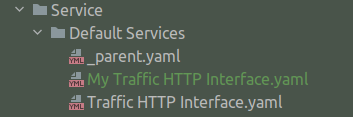
Create a non-container entity
If the entity instance you have created is not a container entity:
- Create a YAML file named like the name field.
- Add the YAM file to the correct directory.
Example:
---
type: InetInterface
fields:
  port: 8080
  name: My Traffic HTTP Interface
Despite what is in the model, some fields that are said to be mandatory (cardinality=1 and no default value) are not mandatory. Required fields and default values can be checked in Policy Studio on an XML-based project by creating the same type of entity and observing what is allowed and created by default.
YAML syntax considerations
When modifying your YAML configuration, consider the following:
Strings fields
For strings literal we chose the “plain mode” of YAML as it is more readable, here are some caveat you want to avoid:
| Syntax | Status |
|---|---|
name: Foo |
OK |
name: "Foo" |
OK |
name: ${system.host} |
Error |
name: "${system.host}" |
OK |
name: '${system.host}' |
OK |
name: "Please avoid trailing spaces " |
OK |
name: " Please avoid leading spaces" |
OK |
name: So many whitespaces ! |
Warning |
For the last case, leading and trailing spaces will be removed. The value will be “So many whitespaces !”
int, long, and boolean fields
Quotation marks are not recommended for int, long, and boolean fields.
| Syntax | Status |
|---|---|
integerField: 0 |
OK |
integerField: -1 |
OK |
integerField: 9999999999999999 |
Error (it a long) |
integerField: 100_000 |
Error |
integerField: "1" |
Avoid (though it will work) |
longField: 21546873548687 |
OK |
longField: 1_000_000_000_000 |
Error |
longField: "21546873548687" |
Avoid (though it will work) |
booleanField: true |
OK |
booleanField: false |
OK |
booleanField: 0 |
Avoid (though it will work) |
booleanField: 1 |
Avoid (though it will work) |
booleanField: yes |
Avoid (though it will work) |
booleanField: no |
Avoid (though it will work) |
Lists
YAML Entity Store exports lists without indentation.
The following is an example of how YAML Entity Store writes a YAML file. This is done by tools, such as ES Explorer, when updating or creating and Entity.
type: FilterCircuit
fields:
  name: ...
# some other fields
children:
- type: ...
  fields:
    name: ...
    multi:
    - value 1
    - value 2
  children:
  - type: ...
    fields:
# some other stuff
The following example is also supported:
type: FilterCircuit
fields:
  name: ...
# some other fields
children:
  - type: ...
    fields:
      name: ...
      multi:
        - value 1
        - value 2
    children:
      - type: ...
        fields:
# some other stuff
Note
refs: {} is an empty list.